🦁 Lesson 33: Hair and Fur
Transform smooth surfaces into living texture. Hair and fur add realism, character, and life to models—from human hairstyles to animal coats, from grass fields to fabric fibers. Master Blender's sophisticated hair particle system, grooming tools, and strand dynamics to create convincing organic coverage that moves, flows, and responds naturally.
🎯 What You'll Learn
- Hair particle systems: How hair differs from emitter particles
- Surface emission: Distributing hair across meshes
- Grooming tools: Combing, cutting, styling hair strands
- Hair dynamics: Physics simulation for natural movement
- Materials and rendering: Shader setup for realistic hair appearance
- Optimization: Managing performance with thousands of strands
- Applications: Character hair, animal fur, grass, fabric details
- Project: Create stylized character hair with grooming and dynamics
⏱️ Estimated time: 90-120 minutes
🎨 Project: Groomed character hairstyle with movement
In This Lesson
🌾 Understanding Hair Particles
Hair particle systems represent a specialized branch of particle simulation. Unlike emitter particles that fly free, hair particles remain rooted to surfaces. They grow from meshes like real hair from skin, grass from ground, or fur from bodies. Understanding this fundamental difference shapes everything about how you work with hair systems.
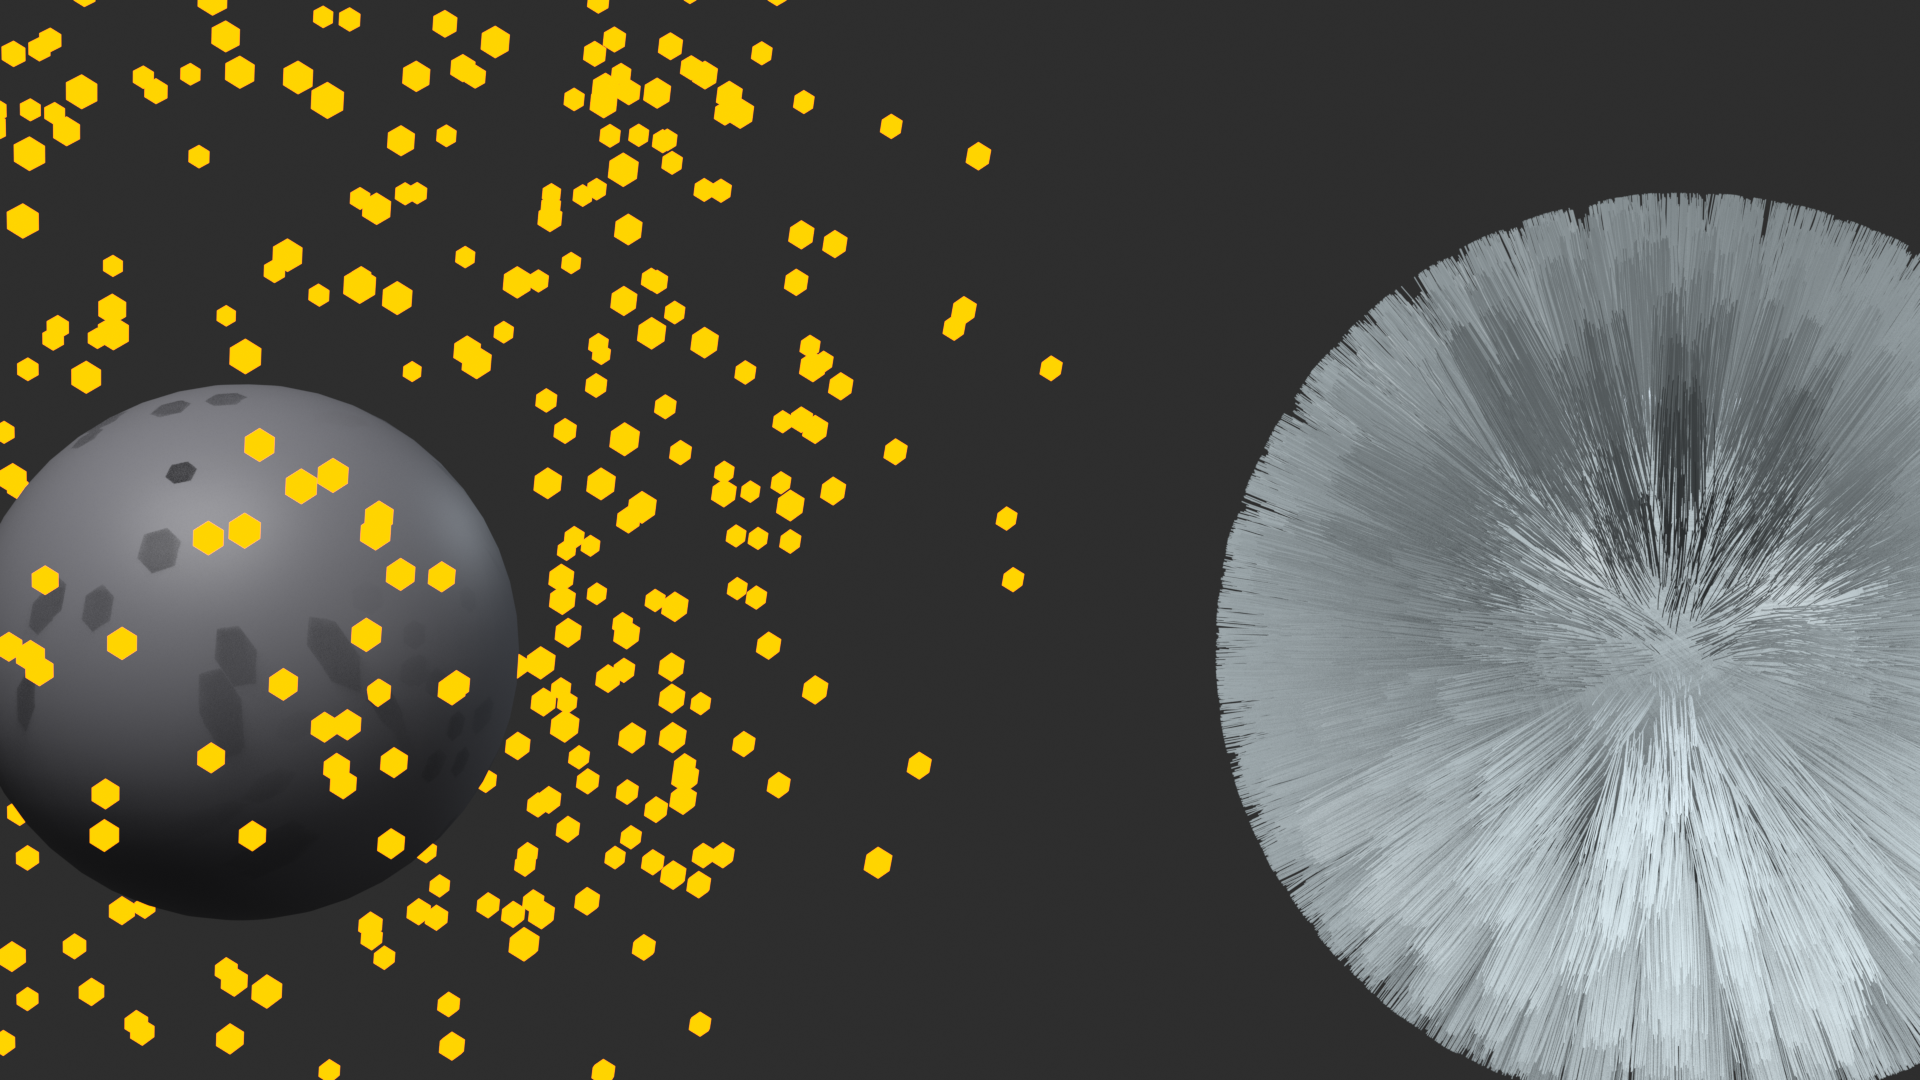
Hair vs. Emitter Particles
🔄 Key Differences
Emitter particles (Lesson 32):
- Born at specific time
- Move freely through space
- Have finite lifetime (die)
- Independent from surface after birth
- Used for: Rain, sparks, debris, effects
Hair particles (this lesson):
- Exist from start to end of animation
- Rooted to surface (attached)
- Persistent (don't die or disappear)
- Maintain connection to emission point
- Used for: Hair, fur, grass, fibers, coverage
| Feature | Emitter | Hair |
|---|---|---|
| Attachment | Free-flying | Surface-rooted |
| Lifetime | Temporary (birth/death) | Persistent (always visible) |
| Motion | Ballistic trajectory | Strand dynamics |
| Count Control | Number parameter | Number + Children |
| Grooming | Not applicable | Combing, styling tools |
| Rendering | Points, Objects, Paths | Strand-based |
Free Motion] A --> C[Hair:
Surface Attached] B --> D[Rain, Sparks
Debris, Effects] C --> E[Hair, Fur
Grass, Fibers] style B fill:#888,stroke:#333,stroke-width:2px,color:#fff style C fill:#4CAF50,stroke:#333,stroke-width:2px,color:#fff
The Hair Strand Concept
📏 Understanding Strands
What is a hair strand?
- Base/root: Point where hair connects to surface
- Segments: Subdivisions along strand length (like bones in chain)
- Tip: Free end of strand
- Length: Total strand distance from root to tip
- Path: Curved trajectory through 3D space
Strand anatomy:
How strands behave:
- Root locked: Never moves from emission point
- Segments flexible: Bend and curve along path
- Tip free: Most mobile, responds to physics
- Continuity: Each segment influences neighbors
- Stiffness: Resistance to bending (controlled by settings)
More segments = smoother curves:
- Low segments (3-5):
- Angular, stiff appearance
- Fast simulation and render
- Good for: Straight hair, distant views, grass
- Medium segments (7-12):
- Balanced quality and performance
- Natural curves
- Most common choice
- High segments (15-30):
- Very smooth, flowing curves
- Slower simulation and render
- Good for: Close-up hero hair, detailed fur
Use Cases for Hair Systems
🎯 When to Use Hair Particles
Character applications:
- Human hair:
- Head hair (various styles)
- Facial hair (beards, mustaches, eyebrows, eyelashes)
- Body hair
- Requires grooming and styling
- Animal fur:
- Mammals (dogs, cats, bears, etc.)
- Full body coverage
- Varying length and density by region
- Direction follows anatomy
Environmental applications:
- Vegetation:
- Grass fields and lawns
- Wheat, grain crops
- Moss coverage
- Dense ground cover
- Architectural details:
- Carpet fibers
- Fabric texture (velvet, terry cloth)
- Brush bristles
- Surface coverage effects
Stylized and creative:
- Fantasy character hair (exaggerated styles)
- Creature designs (spines, quills, feathers)
- Abstract fiber patterns
- Procedural textures as 3D geometry
💡 Hair System Versatility
Don't limit thinking to literal hair:
- Any surface coverage can use hair particles
- Think: "rooted, persistent strands"
- Grass is just short, stiff hair
- Fur is just dense, variable-length hair
- Understanding this opens creative possibilities
Hair System Workflow Overview
🔄 Typical Production Pipeline
Standard hair creation workflow:
- Mesh preparation:
- Clean topology on emission surface
- UV unwrap if using texture control
- Vertex groups for density variation (optional)
- Add hair particle system:
- Select object → Particle Properties
- Add system, change type to Hair
- Initial emission appears
- Configure emission:
- Set hair count (Number)
- Adjust distribution (faces/vertices)
- Set base length
- Add children (density):
- Enable child particles
- Multiply coverage without performance hit
- Creates final visual density
- Grooming:
- Enter Particle Edit mode
- Use combing, cutting, styling tools
- Shape hair to desired style
- Most time-intensive step
- Physics setup (optional):
- Enable Hair Dynamics
- Configure stiffness, damping
- Test motion and refine
- Materials and shading:
- Hair BSDF shader
- Color, roughness, variation
- Root-to-tip gradients
- Rendering:
- Adjust render settings for hair
- Balance samples and noise
- Optimize for performance
Time investment by stage:
- Setup (10%): Adding system, basic settings
- Grooming (60%): Styling, combing, shaping—most time here
- Materials (15%): Shader setup, color, variation
- Physics (10%): If animated, testing dynamics
- Rendering (5%): Final optimization and output
Performance Considerations
⚡ Managing Hair Complexity
Hair is computationally expensive:
- Thousands to millions of strands
- Each strand has multiple segments
- Physics simulation for each segment
- Rendering requires many samples (translucency, shadows)
- Can slow viewport and renders significantly
Parent/Child system (key optimization):
- Parent hairs:
- Small number (100-5000)
- Guide hairs that you groom
- Physics calculated on parents only
- Lower performance cost
- Child hairs:
- Large number (10,000-1,000,000)
- Interpolated from parent strands
- No physics (inherit from parents)
- Only rendered, not simulated
- Creates visual density cheaply
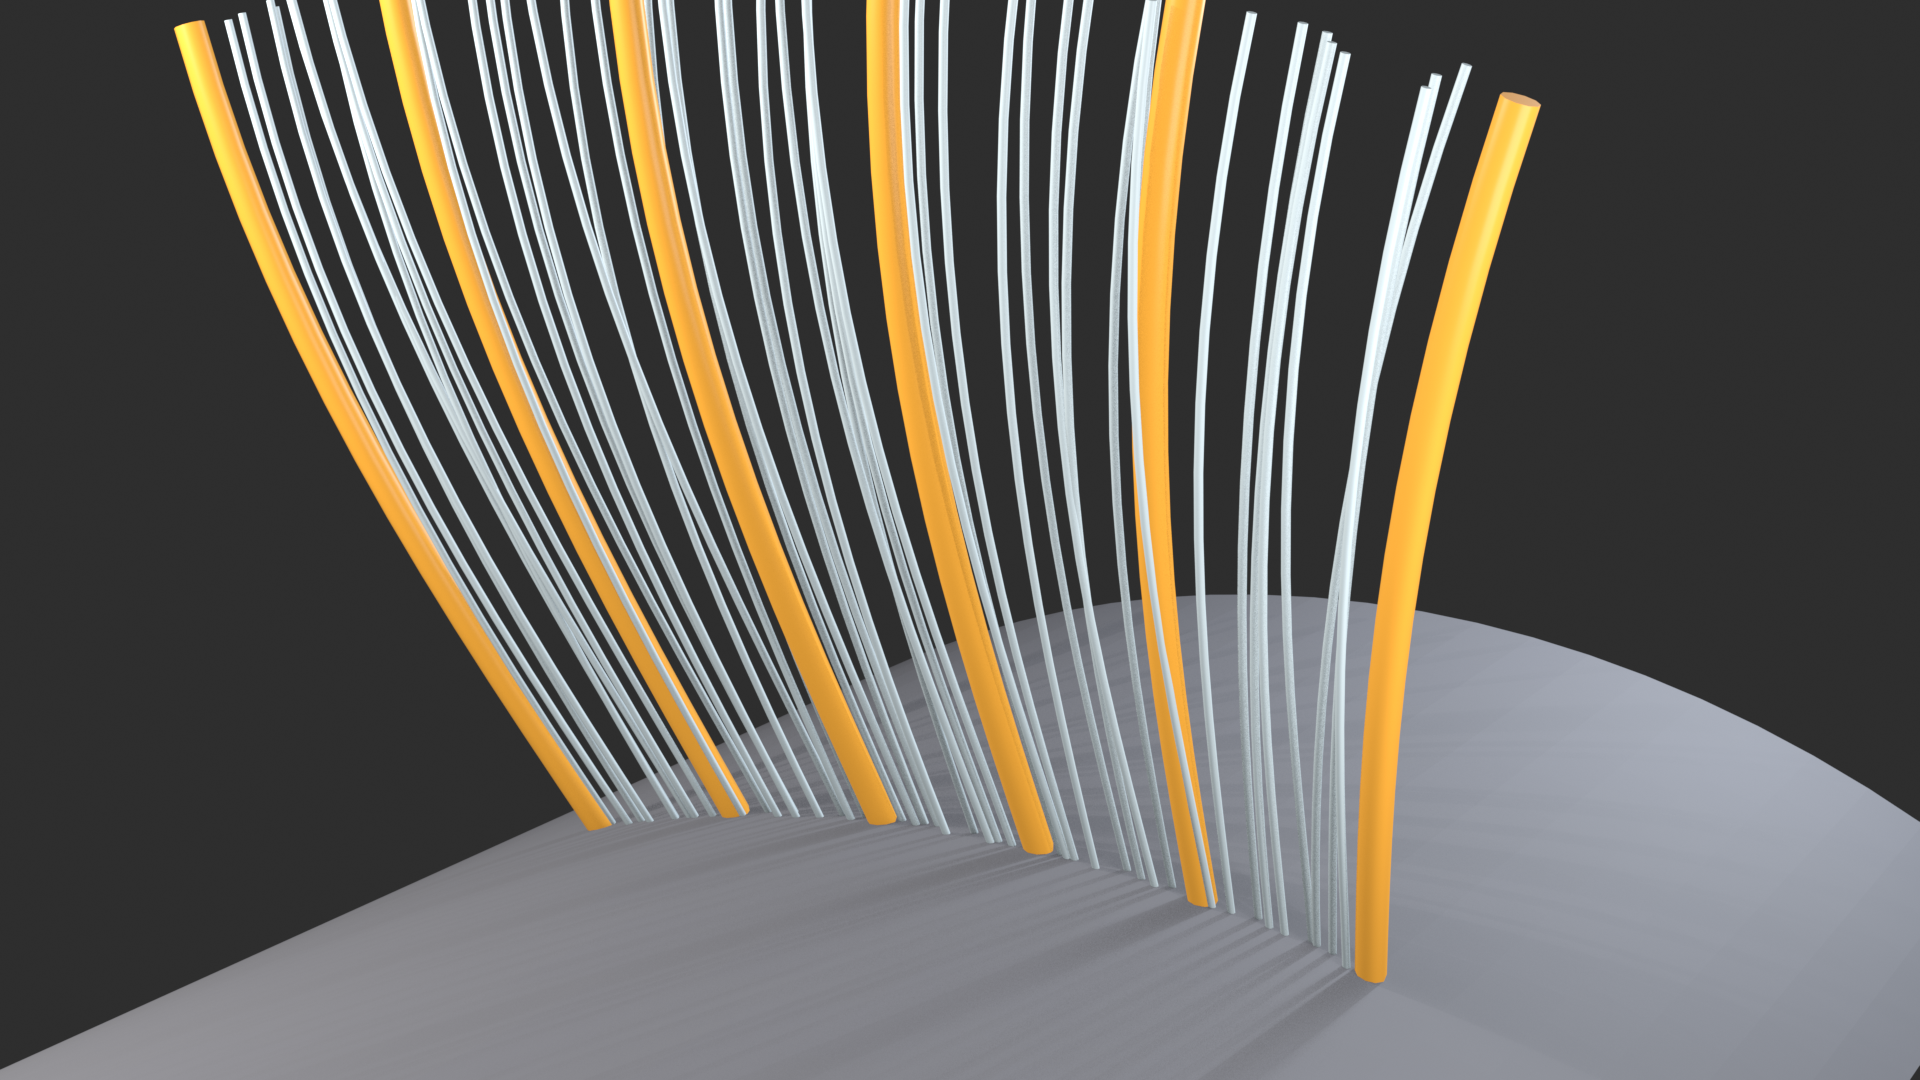
The workflow balance:
| Stage | Parents | Children |
|---|---|---|
| Grooming | Edit these | Hidden or minimal |
| Physics | Simulated | Follow parents |
| Rendering | Visible | Full density |
Typical counts for different applications:
- Character hair (close-up):
- Parents: 1,000-5,000
- Children: 50,000-200,000
- Animal fur:
- Parents: 2,000-10,000
- Children: 100,000-500,000
- Grass field:
- Parents: 5,000-20,000
- Children: 200,000-1,000,000
- Background/distant:
- Reduce all counts by 50-75%
⚠️ Start Low, Scale Up
Always begin with low counts:
- Start: 100-500 parents, minimal children
- Groom and test with low counts
- Increase only for final renders
- Can always add more; removing is harder
- Test render times before committing to high counts
💡 Hair Transforms Surfaces: Smooth mesh becomes textured reality. Bald head becomes character. Simple ground becomes living grass. Naked animal becomes furry creature. Hair bridges gap between geometry and life. Smooth surfaces are mathematical constructs. Real world is fuzzy, hairy, textured. Hair adds that final layer of realism. But hair is also challenge. Computationally expensive. Requires patience. Grooming takes time. Can't rush good hair. But investment pays off. Nothing sells character like good hair. Nothing makes grass convincing like proper strands. Master hair and you master surface detail. Your models go from plastic toys to living beings. From sterile CG to organic reality. That transformation matters. Makes difference between amateur and professional work. Between "nice model" and "how did they do that?" Learn hair. Practice hair. Perfect hair. It's worth it.
🎨 Hair System Basics
Every hair system starts the same way: mesh plus particle system equals strands. Understanding initial setup—the foundation—determines everything that follows. Get basics right and grooming flows naturally. Get basics wrong and you'll fight the system constantly. Let's build that foundation properly.
Creating Your First Hair System
🚀 Step-by-Step Setup
Step 1: Prepare the emission surface
- Start with clean mesh:
- UV Sphere works great for practice (head-like shape)
- Or use actual head model
- Mesh should have decent topology (not too sparse)
- Apply any modifiers that affect shape
- Check normals:
- Edit Mode → Mesh → Normals → Recalculate Outside
- Hair emits along normal direction
- Flipped normals = inward-facing hair
Step 2: Add particle system
- Select emission mesh
- Particle Properties panel (icon: particle cluster)
- Click "+" button to add system
- System appears as white dots (default emitter type)
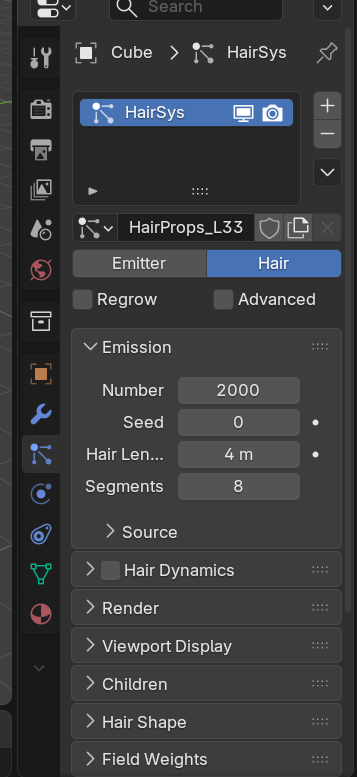
Step 3: Change to Hair type
- Particle Properties → Particle System panel
- Type dropdown: Change from "Emitter" to "Hair"
- Immediate change:
- Particles become strands
- All visible simultaneously (no birth/death)
- Rooted to surface
- Default length appears
Step 4: Basic visibility settings
- Viewport Display section:
- Display As: Path (shows strands)
- Steps: 3-5 (viewport preview quality)
- Color: Choose visible color (default white)
✅ Quick Setup Checklist
You should now see:
- ☐ Strands extending from mesh surface
- ☐ All strands visible (not appearing/disappearing)
- ☐ Strands pointing roughly outward
- ☐ Even distribution across surface
- ☐ Default length (usually 4 Blender units)
Essential Hair Settings
⚙️ Core Parameters
Emission panel (main controls):
- Number:
- Count of parent strands
- Start: 100-1000 for learning/grooming
- Final: 1000-5000 for character hair
- More = denser coverage, slower performance
- Hair Length:
- Base length of all strands
- Measured in Blender units
- Default: 4.0
- Can be modified per-strand in Particle Edit mode
- Typical values: 0.1 (short fur), 4.0 (medium hair), 10.0+ (long hair)
- Segments:
- Subdivisions along strand length
- More segments = smoother curves, better physics
- Default: 5 (usually sufficient)
- Increase to 10-15 for flowing hair
- Balance quality vs. performance
Source panel (emission method):
- Emit From:
- Faces: Distributed across face surfaces (most common)
- Vertices: One strand per vertex (denser, follows topology)
- Usually: Faces for organic distribution
- Distribution:
- Jittered: Even coverage with randomization (recommended)
- Random: Fully random placement
- Grid: Regular pattern (rarely used for hair)
- Use Modifier Stack:
- When enabled: Emit from modified geometry
- Useful if subdivision or other modifiers present
Rotation panel (strand orientation):
- Orientation Axis:
- Determines which axis points along strand
- Default: Tangent (usually correct)
- Change if strands facing wrong direction
- Randomize:
- Rotation randomness around strand axis
- Adds natural variation
- Typical: 0.0-0.5
Physics panel (dynamics - optional):
- Hair Dynamics checkbox:
- Enable for animated movement
- Leave off for static hair
- Covered in detail later
Children Particles
👶 Multiplying Hair Density
Why children matter:
- Parent hairs = guides you edit
- Children = interpolated hairs for density
- Parents: 1,000 strands (editable, simulated)
- Children: 100,000 strands (render only, cheap)
- Achieve final density without performance hit
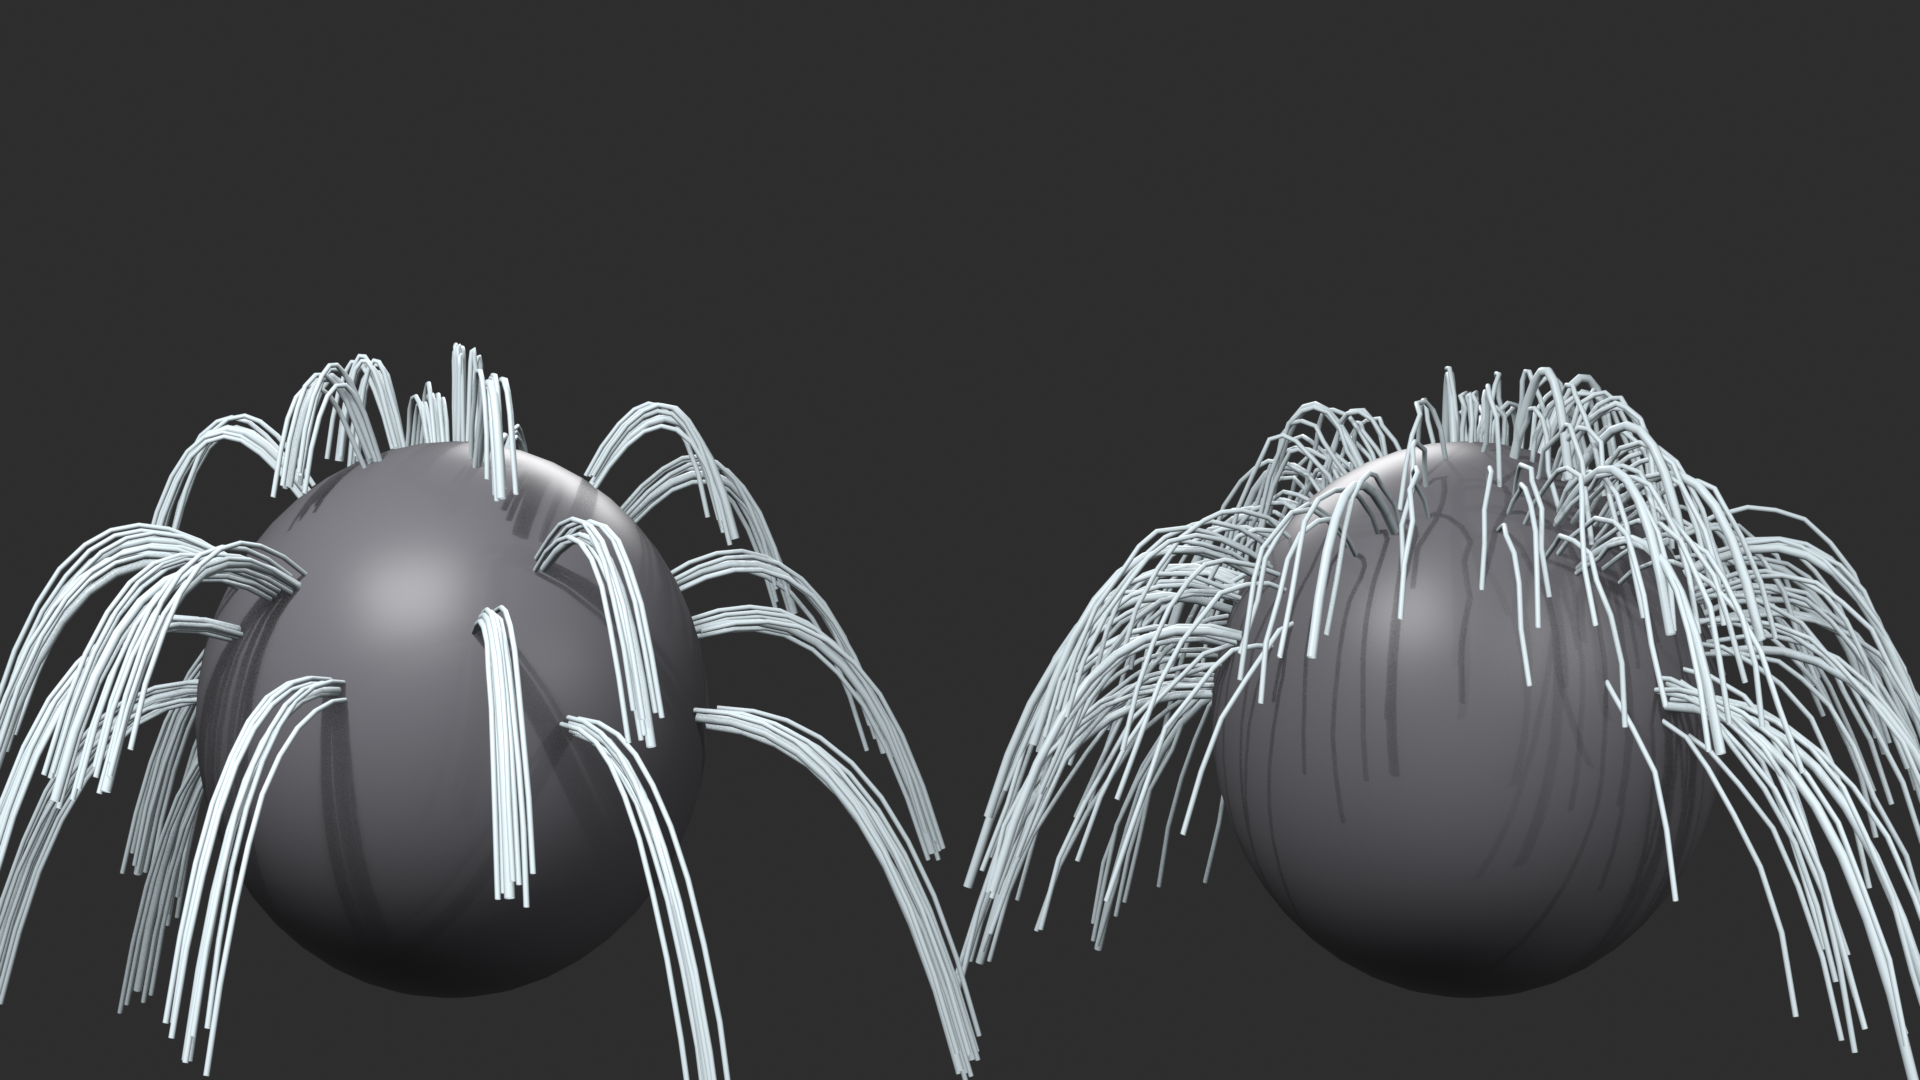
Enabling children:
- Particle Properties → Children
- Render dropdown: Choose type
- None: No children (only parents visible)
- Simple: Basic interpolation between parents
- Interpolated: Smooth interpolation (recommended)
- Display count vs. Render count:
- Display: Children shown in viewport (keep low: 10-50)
- Render: Children in final render (high: 100-500)
- Different counts = fast viewport, dense render
Children settings:
- Display Amount / Render Amount:
- Multiplier for children per parent
- Display: 10-50 (viewport preview)
- Render: 100-500 (final quality)
- Total children = Number of Parents × Amount
- Radius:
- How far children spread from parents
- 0.0: Children exactly on parent paths
- 1.0: Children spread widely
- Typical: 0.2-0.5 for natural variation
- Roundness:
- Distribution pattern around parent
- 0.0: Linear distribution
- 1.0: Circular/spherical distribution
- Affects clumping appearance
- Seed:
- Random variation seed
- Change for different random distribution
- Same seed = same pattern
Simple vs. Interpolated children:
| Type | Behavior | Best For |
|---|---|---|
| Simple | Each child follows one parent closely | Short fur, grass, fiber textures |
| Interpolated | Children blend between multiple parents | Long hair, smooth flowing styles |
💡 Pro Tip: Viewport vs. Render Children
Always use different counts:
- Display: 10-25 (fast viewport, enough to preview)
- Render: 100-500 (dense, realistic final output)
- This workflow keeps viewport responsive
- Switch to rendered view to preview final density
- Test render small areas before full render
Vertex Groups for Control
🎯 Precise Emission Control
What vertex groups do for hair:
- Control density variation across surface
- Define hair length variation by region
- Mask where hair appears (emission areas)
- Control clumping, roughness per area
- Essential for realistic results
Creating density vertex group (example):
- Enter Weight Paint mode:
- Select mesh
- Mode menu → Weight Paint (or Ctrl+Tab)
- Create vertex group:
- Object Data Properties → Vertex Groups
- Click "+" to add group
- Name: "Hair_Density"
- Paint weights:
- Red (1.0) = full density
- Blue (0.0) = no hair
- Gradient = gradual transition
- Paint where hair should be dense/sparse
- Assign to particle system:
- Particle Properties → Vertex Groups
- Density: Select "Hair_Density"
- Hair now follows painted density
Common vertex group uses:
- Density:
- More hair on top of head
- Less on sides
- None on face (exclude areas)
- Length:
- Longer hair on scalp top
- Shorter at nape of neck
- Gradual transitions
- Clump:
- More clumping in certain areas
- Wet look vs. dry look regions
Hair Length and Variation
📏 Controlling Strand Length
Base length setting:
- Emission → Hair Length:
- Sets uniform length for all strands
- Good starting point
- Can be refined later
Length variation (randomness):
- Children → Length:
- Varies child hair lengths
- 0.0: All children same length
- 1.0: Maximum variation
- Typical: 0.2-0.4 for natural look
- Length Random (threshold):
- Parent strand length randomness
- Applied before children
Vertex group length control:
- Paint weight map for length variation
- Red = full length, Blue = zero length
- Assign: Particle Properties → Vertex Groups → Length
- Powerful for realistic variation (longer top, shorter sides)
Per-strand editing (manual control):
- Particle Edit mode has Length tool
- Cut individual strands to exact length
- Most precise but time-intensive
- Used for hero hair, final polish
Typical length values:
- Stubble/Short fur: 0.05-0.2
- Buzz cut: 0.2-0.5
- Short hair: 1.0-3.0
- Shoulder-length: 4.0-8.0
- Long hair: 10.0-20.0+
- Grass: 0.1-0.5
- Long grass/wheat: 1.0-3.0
✅ Length Best Practices
- Start with uniform base length
- Add subtle randomness (0.2-0.3)
- Use vertex groups for regional variation
- Fine-tune with Particle Edit for final touches
- Remember: Longer hair = more segments needed for smooth curves
Viewport Display Options
👁️ Optimizing Preview
Viewport Display panel:
- Display As:
- None: Hidden (turn off while working on other things)
- Rendered: Full render preview (heavy)
- Path: Show strand curves (recommended for editing)
- Point: Just root points (very fast, no shape preview)
- Amount:
- Percentage of particles shown
- 100%: All particles (can be slow)
- 10-25%: Fast preview while grooming
- Doesn't affect render
- Steps:
- Viewport curve resolution
- Lower = faster, more angular
- Higher = smoother preview, slower
- 3-5 typical for editing
- Color:
- Viewport strand color
- Choose contrast against background
- Doesn't affect render
Performance optimization workflow:
- During grooming:
- Display Amount: 10-25%
- Children Display: 0-10
- Steps: 3-5
- Fast, responsive editing
- Preview check:
- Display Amount: 100%
- Children Display: 25-50
- See closer to final result
- Render:
- All settings at final values
- Display settings don't affect render
⚠️ Viewport Performance Tips
- Hide when not editing: Click eye icon in outliner
- Low display counts: 10-25% while working
- Solid shading: Faster than Material Preview during editing
- Disable physics: Turn off dynamics while grooming
- Isolate object: Hide other complex objects
💡 Foundation Determines Everything: Every professional hair system starts here. Basic settings. Children. Vertex groups. Display optimization. Unglamorous work. But critical work. Skip foundation and grooming fights you. Counts too high—viewport crawls. Children wrong—density looks artificial. Length uniform—hair looks fake. Get basics right first. Then grooming becomes creative process. Not technical struggle. Professionals spend time on setup. Amateurs rush to grooming. Professionals work efficiently. Amateurs fight tools. Difference isn't talent. It's workflow. Understanding that these settings aren't obstacles. They're tools. Each parameter solves specific problem. Number controls coverage. Children enable density. Vertex groups add variation. Display settings maintain speed. Master basics. Build proper foundation. Then build anything on top of it. That's how great hair happens.
🌱 Emission and Distribution
Hair doesn't just appear randomly. Emission determines where strands grow, how they're distributed, and how they orient themselves. Real hair follows anatomical patterns—direction flows around scalp curves, density varies by region, growth patterns affect final appearance. Understanding emission and distribution means controlling these patterns precisely.
Emission Methods
📍 Where Hair Grows
Emit From options:
- Faces (most common):
- Hair distributed across face surfaces
- Even coverage regardless of vertex density
- Good for: Organic surfaces, varied topology
- Default and recommended for most hair
- Vertices:
- One strand per vertex point
- Follows mesh topology exactly
- Density depends on subdivision level
- Good for: Precise control, uniform meshes
- Use when: You want exact topology-based placement
Distribution patterns:
- Jittered (recommended):
- Grid-based with randomization
- Even coverage, no obvious patterns
- Natural-looking distribution
- Prevents clustering and gaps
- Best for realistic hair/fur
- Random:
- Fully random placement
- Can create clusters and sparse areas
- Less predictable
- Use for: Stylized or irregular coverage
- Grid:
- Perfect regular pattern
- Looks artificial
- Rarely used for organic hair
- Maybe for: Synthetic fibers, technical visualizations
| Setting | Character Hair | Animal Fur | Grass |
|---|---|---|---|
| Emit From | Faces | Faces | Faces |
| Distribution | Jittered | Jittered | Jittered or Random |
| Density Control | Vertex groups (scalp regions) | Vertex groups (body regions) | Optional (paths, bare spots) |
Surface Normals and Orientation
🧭 Hair Direction Control
How normals affect hair:
- Hair emits perpendicular to surface
- Follows face normal direction
- Incorrect normals = hair pointing wrong way
- Critical for natural appearance
Checking and fixing normals:
- Visualize normals:
- Edit Mode → Overlays → Face Orientation (enable)
- Blue = correct (outward)
- Red = flipped (inward)
- Or: Mesh → Normals → Display (set size to see normal lines)
- Recalculate normals:
- Edit Mode → Select All (A)
- Mesh → Normals → Recalculate Outside (Shift+N)
- Fixes most normal issues
- Manual flip (if needed):
- Select problematic faces
- Mesh → Normals → Flip
- Use for specific areas
Hair Points Outward] B --> D[Flipped Normal:
Hair Points Inward] style C fill:#4CAF50,stroke:#333,stroke-width:2px,color:#fff style D fill:#f44336,stroke:#333,stroke-width:2px,color:#fff
Initial orientation settings:
- Rotation → Orientation Axis:
- Normal-Tangent: Follow surface normal (default, usually correct)
- Velocity / Hair: Use velocity direction (for dynamic effects)
- Global X/Y/Z: Align to world axis (special cases)
- Typically: Leave on Normal-Tangent for hair
- Phase:
- Rotation offset around normal
- Usually 0.0
- Adjust if hair spirals incorrectly
- Randomize Phase:
- Random rotation variation
- 0.0-0.5 typical
- Adds natural irregularity
Density Variation with Vertex Groups
🎨 Painting Hair Distribution
Why density variation matters:
- Real hair isn't uniform across surfaces
- Hairlines recede or thin in areas
- Fur density varies by body region
- Grass has paths, bare spots, clusters
- Vertex groups enable this variation
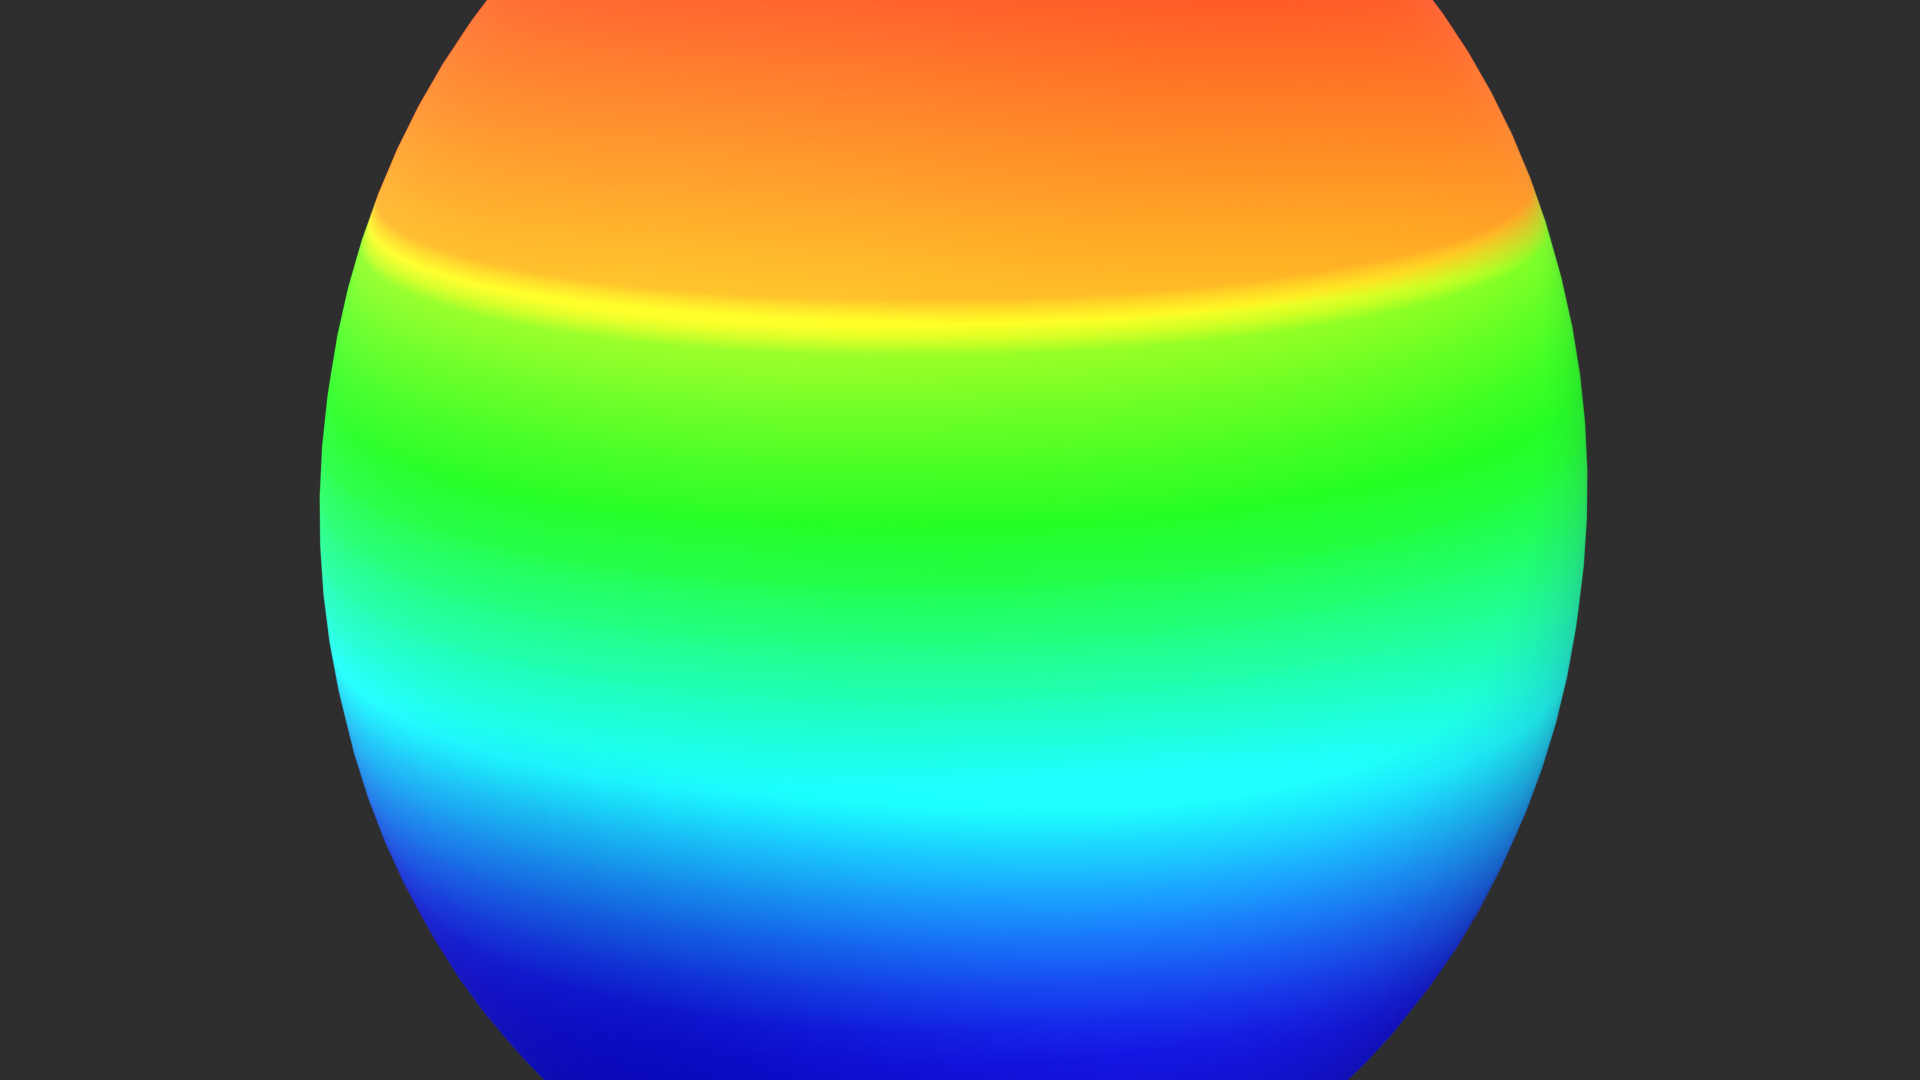
Creating density map (detailed workflow):
- Prepare mesh:
- Select emission object
- Ensure clean geometry
- Create vertex group:
- Object Data Properties (green triangle icon)
- Vertex Groups section
- Click "+" button
- Name: "Hair_Density" (or descriptive name)
- Enter Weight Paint mode:
- Mode dropdown → Weight Paint
- Or keyboard: Ctrl+Tab → Weight Paint
- Mesh displays in blue (zero weight)
- Select vertex group:
- Sidebar (N panel) → Tool → Vertex Groups
- Select "Hair_Density" from list
- Now painting affects this group
- Configure brush:
- Weight: 1.0 for adding hair density
- Strength: 0.5-1.0 (how strongly it paints)
- Radius: Adjust brush size ([ and ] keys)
- Blend: Mix (default)
- Paint density:
- Red (1.0): Full hair density
- Green (0.5): Half density
- Blue (0.0): No hair
- Paint where hair should be dense
- Leave unpainted (blue) where no hair
- Use gradients for smooth transitions
- Assign to particle system:
- Object Mode → Particle Properties
- Vertex Groups section (expand if collapsed)
- Density: Select "Hair_Density"
- Hair now follows painted weights
- Red areas dense, blue areas bare
Common density patterns:
- Human head:
- Full density on scalp crown/top
- Reduced at temples (especially male pattern)
- Zero on face (except eyebrows, facial hair)
- Gradual falloff at hairline
- Animal body:
- Denser on back and sides
- Sparser on belly
- Variable on legs (species-dependent)
- None on nose, paw pads, etc.
- Grass field:
- Zero on paths/roads
- Reduced in worn areas
- Full in untouched areas
- Random variation for natural look
💡 Pro Tip: Gradual Transitions
Avoid hard edges in weight painting:
- Hairlines should fade gradually (red → orange → yellow → blue)
- Use lower brush strength (0.3-0.5) for subtle buildup
- Blur tool (Weights → Blur) smooths transitions
- Natural hair doesn't have sharp boundaries
- Soft transitions = realistic results
Length Variation with Vertex Groups
📏 Regional Length Control
Why vary length by region:
- Hairstyles have shape (not uniform length)
- Undercuts = very short sides, longer top
- Animal fur varies by body part
- Grass taller in some areas than others
- Adds realism and style
Creating length vertex group:
- Same process as density vertex group
- Create group: "Hair_Length"
- Weight Paint mode
- Paint interpretation:
- Red (1.0): Full base length
- Green (0.5): Half base length
- Blue (0.0): Zero length (invisible strands)
- Assign: Particle Properties → Vertex Groups → Length
Example: Undercut hairstyle
- Top of head: Paint red (full length: 8 units)
- Transition zone: Paint gradient (red → green)
- Sides and back: Paint blue-green (very short: 0.5 units)
- Neck nape: Paint blue (buzzed: 0.1 units)
- Result: Long top flows into short sides
Combining density and length:
- Can use both vertex groups simultaneously
- Density controls where hair appears
- Length controls how long it grows
- Independent control = maximum flexibility
- Example: Sparse AND short on sides, dense AND long on top
Advanced Emission Controls
🎛️ Fine-Tuning Distribution
Use Modifier Stack:
- When enabled: Particles emit from modified mesh
- When disabled: Particles emit from base mesh
- Use case:
- Subdivision modifier adds topology
- Enable to distribute hair across subdivided surface
- More even distribution on smooth surfaces
- Warning: Changing modifier stack after hair created can disrupt emission
Even Distribution toggle:
- When enabled: Equal particles per face (regardless of face size)
- When disabled: Particles proportional to face area (larger faces = more particles)
- Usually disable for organic meshes (maintains even density)
- Enable if you want deliberate face-based control
Seed value:
- Controls random distribution pattern
- Same seed = same placement
- Different seed = different random arrangement
- Change if distribution looks wrong
- Useful for getting "just right" randomness
Invert vertex group:
- Checkbox next to vertex group assignment
- Flips weight interpretation
- Blue becomes red, red becomes blue
- Useful if you painted opposite of what you wanted
Object coordinates:
- Advanced: Use texture to control density/length
- Black/white image mapped to surface
- Procedural control at scale
- Beyond scope of this lesson (covered in advanced hair topics)
Emission Troubleshooting
🔧 Common Emission Issues
Hair pointing wrong direction:
- Cause: Flipped normals
- Fix: Edit Mode → Shift+N (Recalculate Normals Outside)
- Check: Overlays → Face Orientation (blue = correct)
Uneven distribution (clusters and gaps):
- Cause: Random distribution mode or bad topology
- Fix: Change Distribution to "Jittered"
- Or: Improve mesh topology (even quad flow)
- Or: Change Seed value
No hair in certain areas:
- Cause: Vertex group painted zero (blue)
- Fix: Weight Paint those areas red/green
- Or: Remove vertex group assignment temporarily
- Check: Vertex Groups → Density (is one assigned?)
Hair count doesn't match Number setting:
- Cause: Vertex group reducing emission
- Explanation: Number = maximum possible, vertex group scales down
- Solution: Increase Number to compensate, or paint more red areas
Hair disappears after modifier changes:
- Cause: Emission tied to mesh topology
- Prevention: Apply modifiers before adding hair
- Or: Keep modifiers stable during hair work
- Recovery: May need to recreate hair system
Hair too dense/sparse everywhere:
- Too dense: Lower Number value
- Too sparse: Increase Number value
- Remember: Children add bulk of visual density later
- Tip: Parents are just guides; keep count reasonable (1000-5000)
⚠️ Emission Stability
Keep emission stable during production:
- Apply scale and rotation to mesh before hair (Ctrl+A)
- Don't change mesh topology after hair created
- Finalize modifiers before hair work
- Changing emission settings is safe; changing mesh is risky
- Save file before major emission changes
💡 Emission Is Foundation of Form: Before grooming. Before styling. Before physics. Emission determines where hair grows. Pattern locked at this stage. Can't comb hair where none exists. Can't lengthen strands that weren't emitted long. Emission is blueprint. Everything else is refinement. Professional hair artists spend time here. Getting density right. Painting careful weight maps. Testing normal directions. Adjusting counts. Not rushing to grooming. Because good emission means easy grooming. Bad emission means constant fighting. Weight painting feels tedious. But pays off enormously. That gradient hairline. Those density variations. That's what makes hair look real. Not grown. Planned. Controlled. Professional. Master emission. Build that solid foundation. Then grooming becomes art instead of struggle. That's the difference between amateur hair that looks CG and professional hair that looks grown.
✂️ Grooming and Styling Tools
Emission creates raw hair. Grooming transforms it into styled hair. This is where art happens. Where straight becomes curly. Where uniform becomes shaped. Where generic becomes character. Blender's Particle Edit mode provides professional grooming tools—combing, cutting, styling, shaping. Understanding these tools means controlling every strand. Creating any hairstyle imaginable.
Entering Particle Edit Mode
🎨 Accessing Grooming Tools
How to enter Particle Edit mode:
- Select object with hair system
- Mode dropdown (top-left): Select "Particle Edit"
- Or use Tab if already in Object mode with particles
- Hair becomes editable:
- Orange lines show selected strands
- Root points visible
- Tools appear in left toolbar
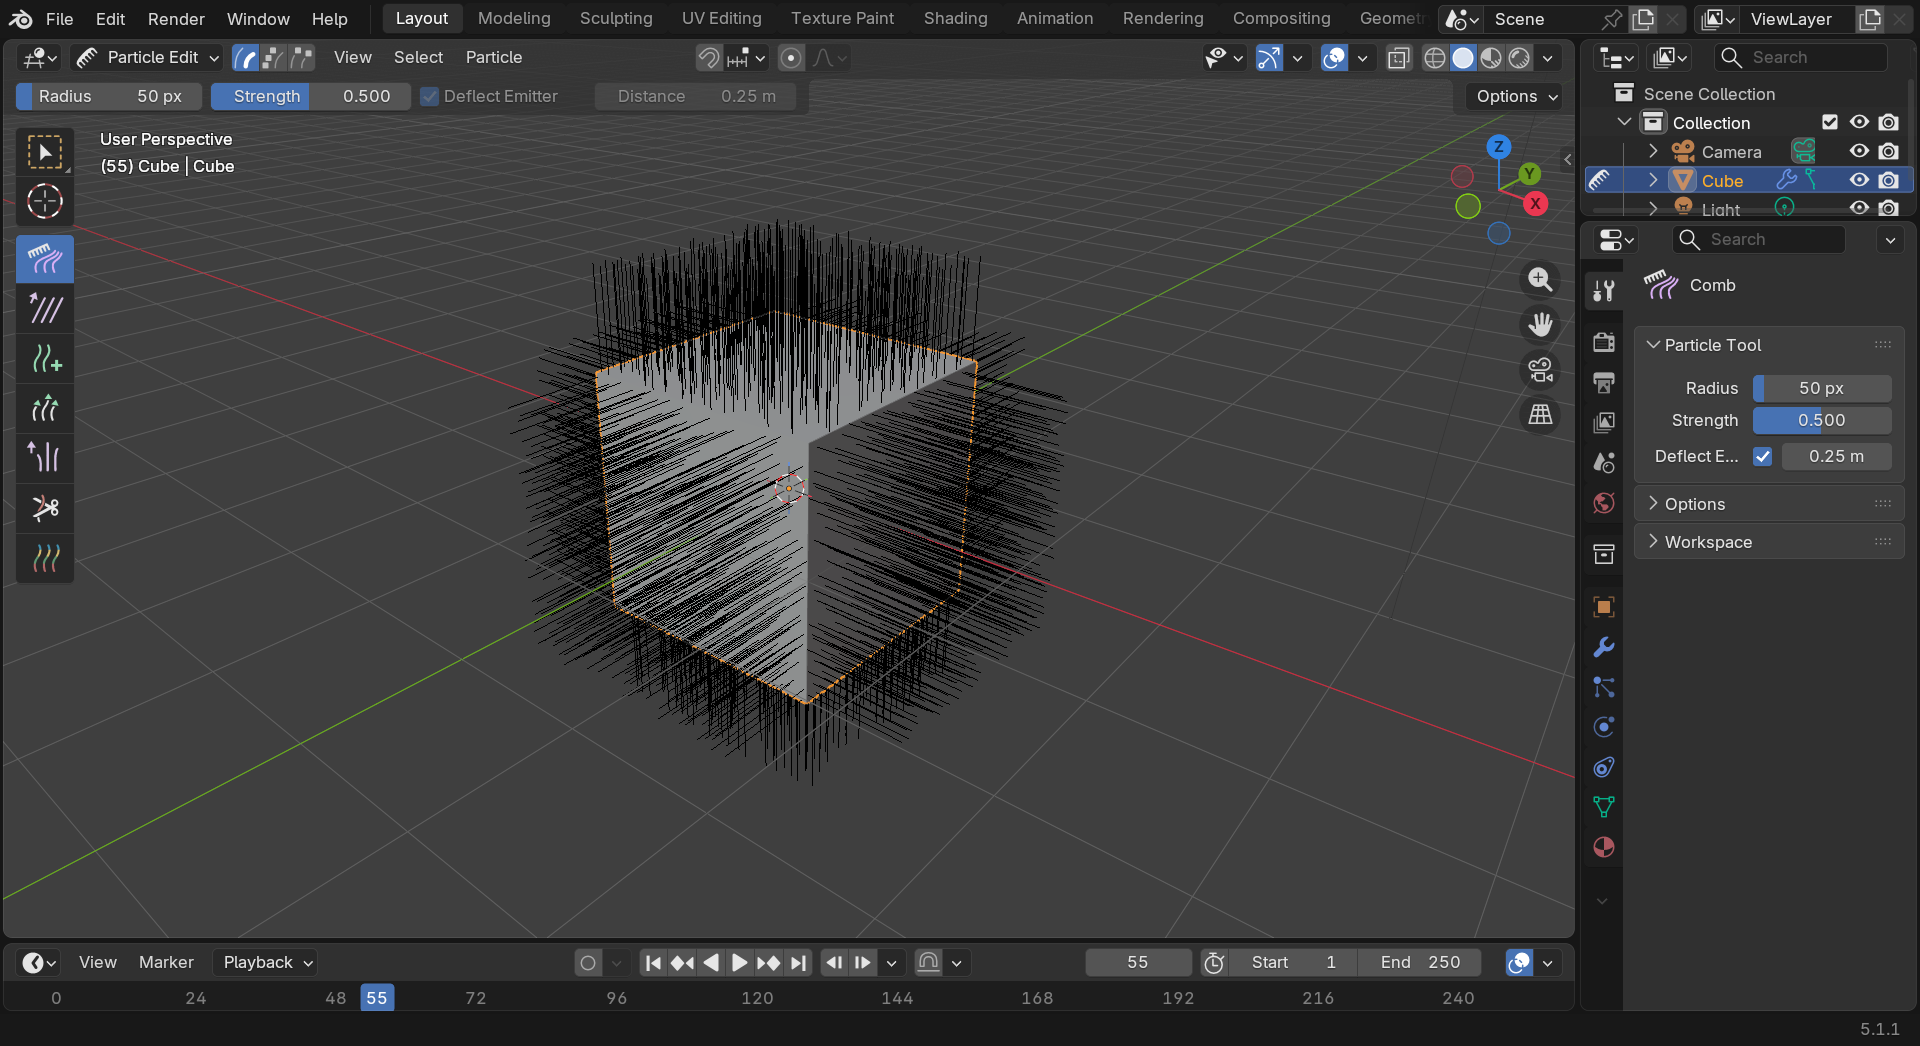
Particle Edit interface:
- Toolbar (left side):
- Grooming tools (Comb, Cut, Length, etc.)
- Selection tools
- Click tool icon to activate
- Properties panel (right side, N):
- Tool settings
- Strength, radius adjustments
- Brush options
- Header (top):
- Particle system selector (if multiple)
- View options
- Selection modes
Important mode behaviors:
- Only parent hairs are editable (children follow automatically)
- Changes apply in real-time
- All grooming is non-destructive (can undo)
- Exit mode: Switch to Object/Edit mode (Mode dropdown)
💡 Pro Tip: Reduce Children While Grooming
Optimize viewport for grooming:
- Children → Display Amount: 0-10 (minimal or none)
- See parent hairs clearly without clutter
- Grooming affects parents; children follow automatically
- Increase children later to preview final density
- Faster, clearer workflow
Core Grooming Tools
🛠️ Essential Styling Tools
1. Comb Tool
- Function: Brush/comb hair in direction of stroke
- Hotkey: None (select from toolbar)
- Usage:
- Click and drag across hair
- Strands follow cursor movement
- Most frequently used tool
- Creates flow and direction
- Settings:
- Radius: Brush size (adjust with [ and ])
- Strength: How strongly hair follows stroke (0.1-1.0)
- Count: Number of strands affected per stroke
- Best for: General shaping, creating flow, styling direction
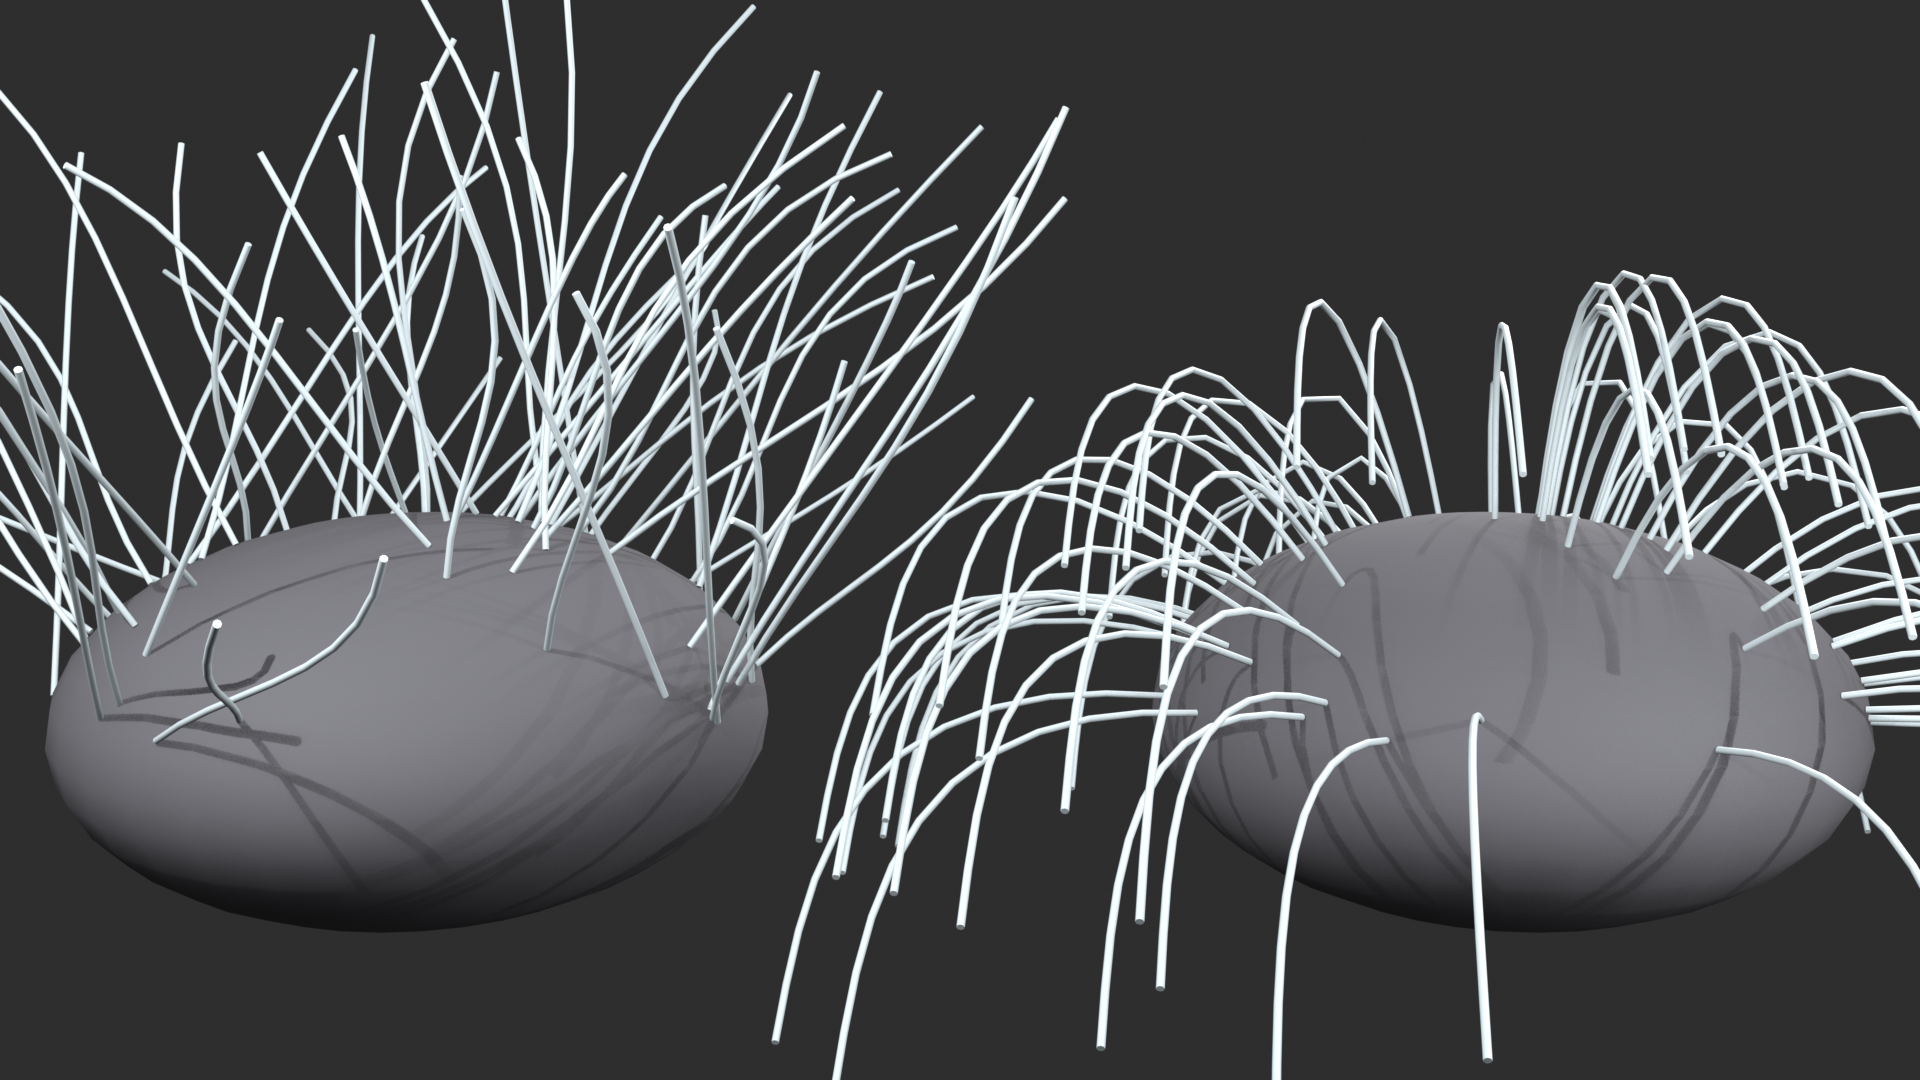
2. Smooth Tool
- Function: Smooths and averages hair curves
- Usage:
- Brush over rough or kinked areas
- Reduces extreme angles
- Creates flowing, natural curves
- Settings:
- Strength: Smoothing intensity
- Lower strength (0.3-0.5) = gentle smoothing
- Higher strength (0.8-1.0) = aggressive smoothing
- Best for: Fixing messy combing, creating sleek styles, reducing jitter
3. Cut Tool
- Function: Cuts hair strands at cursor location
- Usage:
- Click on strand to cut at that point
- Everything beyond cut point disappears
- Creates length variation
- Shapes silhouette
- Technique:
- Click individual strands for precision
- Or brush across many for batch cutting
- Cut in layers for natural taper
- Best for: Trimming length, creating shape, bob cuts, bangs
4. Length Tool
- Function: Adjusts strand length by shrinking/growing
- Usage:
- Brush over hair to change length
- Grows or shrinks from tip
- More controlled than Cut tool
- Settings:
- Length Mode: Grow or Shrink
- Strength: Rate of length change
- Best for: Fine-tuning length, gradual tapering, length variation
5. Puff Tool
- Function: Pushes hair outward from surface (adds volume)
- Usage:
- Brush over hair to inflate/deflate
- Positive strength: Pushes outward (volume)
- Negative strength: Pulls inward (flatten)
- Settings:
- Strength: -1.0 to +1.0
- Positive = puff out
- Negative = push down
- Best for: Adding volume, creating lift at roots, afros, puffy styles
6. Add Tool
- Function: Manually adds new hair strands
- Usage:
- Click on surface to place new strand
- Strand appears at cursor location
- Useful for filling gaps
- Settings:
- Count: Strands added per click
- Interpolate: Blend with nearby hair
- Best for: Filling sparse areas, adding detail strands, fixing gaps
7. Weight Tool
- Function: Adjusts hair weight (for physics simulation)
- Usage:
- Paint weight values on strands
- Higher weight = less affected by physics
- Lower weight = more dynamic movement
- Best for: Controlling physics response (covered in dynamics section)
Direction & Flow] A --> C[Smooth:
Refine Curves] A --> D[Cut:
Length Control] A --> E[Puff:
Volume Control] style B fill:#888,stroke:#333,stroke-width:2px,color:#fff style C fill:#4CAF50,stroke:#333,stroke-width:2px,color:#fff
Selection Tools
🎯 Targeting Specific Hair
Why selection matters:
- Groom specific regions without affecting others
- Work on bangs separately from back
- Style sections independently
- Essential for complex hairstyles
Selection methods:
- Select tool:
- Click to select individual strands
- Shift+Click: Add to selection
- Alt+Click: Deselect
- Selected strands appear orange/highlighted
- Box Select:
- B key → drag box
- Selects all strands within rectangle
- Fast area selection
- Circle Select:
- C key → circular brush
- Click or drag to select
- Middle Mouse: Deselect mode
- Scroll wheel: Change circle size
- Esc or Right Click: Exit tool
- Select All:
- A: Select all strands
- Alt+A: Deselect all
- Invert Selection:
- Ctrl+I: Flip selected/unselected
Selection workflow:
- Use selection tool to isolate region
- Switch to grooming tool (Comb, Cut, etc.)
- Tool only affects selected strands
- Unselected strands protected
- Work on section, then move to next
Selection + grooming combinations:
- Top of head: Box select → Comb backward for volume
- Bangs: Circle select → Cut to desired length
- Side sections: Select → Comb downward
- Back: Select all except previously worked → Style remainder
✅ Selection Best Practice
Work in sections for complex styles:
- Divide hair mentally into sections (top, sides, back, bangs)
- Select and complete one section at a time
- Prevents accidentally messing up completed areas
- Professional hairstylists work in sections—so should you
- Use H to hide unselected (focus on selection only)
Grooming Techniques
🎨 Professional Styling Workflows
Basic grooming workflow:
- Rough shape (Comb):
- Large brush radius (3-5 units)
- Lower strength (0.3-0.5)
- Establish overall direction and flow
- Don't worry about details yet
- Refine flow (Comb + Smooth):
- Medium brush radius (1-3 units)
- Higher strength (0.6-0.8)
- Define major curves and direction
- Smooth out rough areas
- Length control (Cut/Length):
- Establish silhouette shape
- Cut layers for depth
- Create length variation
- Volume adjustment (Puff):
- Add lift at roots if needed
- Create volume in flat areas
- Push down overly puffy sections
- Detail work (Comb, small brush):
- Small brush radius (0.5-1.0)
- High strength (0.8-1.0)
- Refine individual strands
- Fix stray hairs
- Add character details
- Final polish (Smooth):
- Low strength smooth (0.2-0.4)
- Remove jitter and kinks
- Create flowing transitions
Large Brush] B --> C[Refine Flow
Medium Brush] C --> D[Length Control
Cut/Trim] D --> E[Volume Adjust
Puff Tool] E --> F[Detail Work
Small Brush] F --> G[Final Polish
Smooth] G --> H[Styled Hair] style A fill:#888,stroke:#333,stroke-width:2px,color:#fff style H fill:#4CAF50,stroke:#333,stroke-width:2px,color:#fff
Specific techniques:
- Creating waves/curls:
- Comb in S-curve patterns
- Alternate direction with each stroke
- Smooth slightly to refine curves
- Use lower strength for gentle waves
- Slicked-back hair:
- Comb straight backward from forehead
- High strength for smooth flow
- Use Smooth heavily for sleek appearance
- Flatten with Puff (negative strength)
- Messy/tousled styles:
- Random directional combing
- Avoid smoothing (keep rough)
- Vary length more
- Add puff in random areas
- Bangs:
- Select front hair section
- Comb forward and down
- Cut to forehead or eye level
- Add subtle side sweep if desired
- Ponytail/updo:
- Comb all hair toward gathering point
- Strong smooth for tight gather
- Can manually model tie/band (not hair)
- Advanced: Use constraints for physics
Brush Settings and Control
⚙️ Fine-Tuning Tools
Radius (brush size):
- Controls area of effect
- Adjust with [ (decrease) and ] (increase)
- Or: Properties panel → Tool → Radius slider
- Large radius (3-10): Broad strokes, general shaping
- Medium radius (1-3): Section work, defined areas
- Small radius (0.3-1): Detail work, individual strands
Strength:
- How strongly tool affects hair
- Range: 0.0 (no effect) to 1.0 (maximum effect)
- Low strength (0.1-0.3): Gentle adjustments, subtle changes
- Medium strength (0.4-0.7): Balanced control, most work
- High strength (0.8-1.0): Strong effect, quick changes
- Can be adjusted per tool
Count:
- Number of strands affected per brush action
- Higher = more strands at once (faster but less precise)
- Lower = fewer strands (slower but more control)
- Typical: 10-50 depending on task
Falloff:
- How effect strength decreases from brush center to edge
- Smooth: Gradual falloff (default, most natural)
- Sharp: Consistent strength across brush
- Root: More effect near brush center
- Rarely need to change from default
Keep Lengths (checkbox):
- When enabled: Hair length preserved during combing
- When disabled: Combing can change length
- Usually keep enabled for controlled work
- Disable for more fluid, natural combing
Keep Root (checkbox):
- When enabled: Root stays fixed at emission point
- When disabled: Root can move (usually not desired)
- Keep enabled almost always
Common Grooming Challenges
🔧 Solving Grooming Problems
Hair won't stay combed in direction:
- Cause: Strength too low or count too low
- Fix: Increase Strength to 0.7-0.9
- Or: Make multiple passes in same direction
- Or: Smooth afterward to lock in shape
Hair looks kinked/angular:
- Cause: Too few segments or harsh combing
- Fix: Use Smooth tool heavily
- Or: Increase Segments in particle settings (5 → 10)
- Prevention: Use gentler strength (0.4-0.6)
Can't see what I'm doing (too much hair):
- Fix: Reduce Children Display to 0-5
- Or: Reduce Display Amount to 25-50%
- Or: Use selection to work on sections
- Or: Hide unselected strands (H)
Accidentally messed up section while working on another:
- Prevention: Use selection more
- Undo: Ctrl+Z works in Particle Edit
- Recovery: Revert to saved version if needed
- Workflow: Save incremental versions (.blend backups)
Hair sticks straight out unnaturally:
- Cause: Following normals exactly, no flow
- Fix: Comb in more natural direction
- Add: Slight randomness to rotation (particle settings)
- Reference: Study real hair flow patterns
Symmetry is hard to maintain:
- Technique: Work on one side carefully
- Then: Mirror particle system (advanced)
- Or: Accept asymmetry (natural hair isn't perfectly symmetric)
- Professional: Slight asymmetry looks more realistic
⚠️ Save Often During Grooming
Grooming takes time—protect your work:
- Save every 15-20 minutes (Ctrl+S)
- Grooming is time-intensive and valuable
- Can't easily recreate exact styling
- Blender's auto-save helps but isn't enough
- Save incremental versions (hair_v01, hair_v02, etc.)
- Can always revert to earlier version if needed
💡 Grooming Is Where Character Emerges: Generic emission becomes specific person. Default straight becomes signature style. Technical setup becomes artistic expression. This is why professionals spend most time grooming. Not because it's difficult. Because it matters. Same mesh. Same particle count. Different grooming creates completely different character. Slicked back executive. Wild artist. Military buzz cut. Flowing romantic. All possible from same foundation. Grooming decides which. Tools are simple. Comb, smooth, cut, puff. But mastery takes practice. Understanding how hair flows. How styles work. What looks natural versus artificial. Study real hair. Notice direction. See how it curves around head. How it clusters and separates. Observe lengths and layers. Then replicate with tools. Good grooming looks effortless. Like hair just grew that way. But hours went into it. Every section considered. Every curve intentional. That's professional work. Worth the time. Worth the patience. Worth learning properly.
🌀 Hair Dynamics and Physics
Static hair is fine for portraits. But animation demands motion. Hair that sways with movement. Flows with wind. Responds to gravity. Bounces and settles realistically. Hair dynamics transforms groomed strands into living, breathing elements. Understanding physics settings means controlling how hair moves—from subtle drift to wild windblown chaos.
Enabling Hair Dynamics
🚀 Activating Physics Simulation
Basic activation:
- Select object with hair system
- Particle Properties → Hair Dynamics section
- Enable "Hair Dynamics" checkbox
- Hair now simulates:
- Responds to gravity
- Affected by movement
- Bounces and settles
- Simulation runs on timeline playback
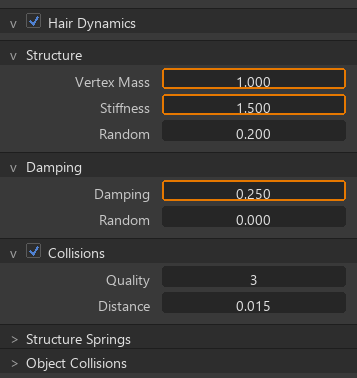
What happens when enabled:
- Groomed shape becomes rest state
- Physics calculates motion from rest state
- Play animation (Spacebar) to see simulation
- Hair moves based on physics settings
- Returns toward rest state when forces removed
Performance impact:
- Simulation calculated per frame
- Each parent strand segment simulated
- Children inherit motion (not individually simulated)
- Can slow playback significantly
- Baking recommended for smooth playback
💡 Pro Tip: Groom First, Physics Second
Workflow order matters:
- Complete all grooming with dynamics OFF
- Groomed shape = rest pose for physics
- Enable dynamics only after styling complete
- Adjust physics to enhance, not fix, grooming
- If dynamics look wrong, fix grooming first
Core Dynamics Settings
⚙️ Controlling Hair Behavior
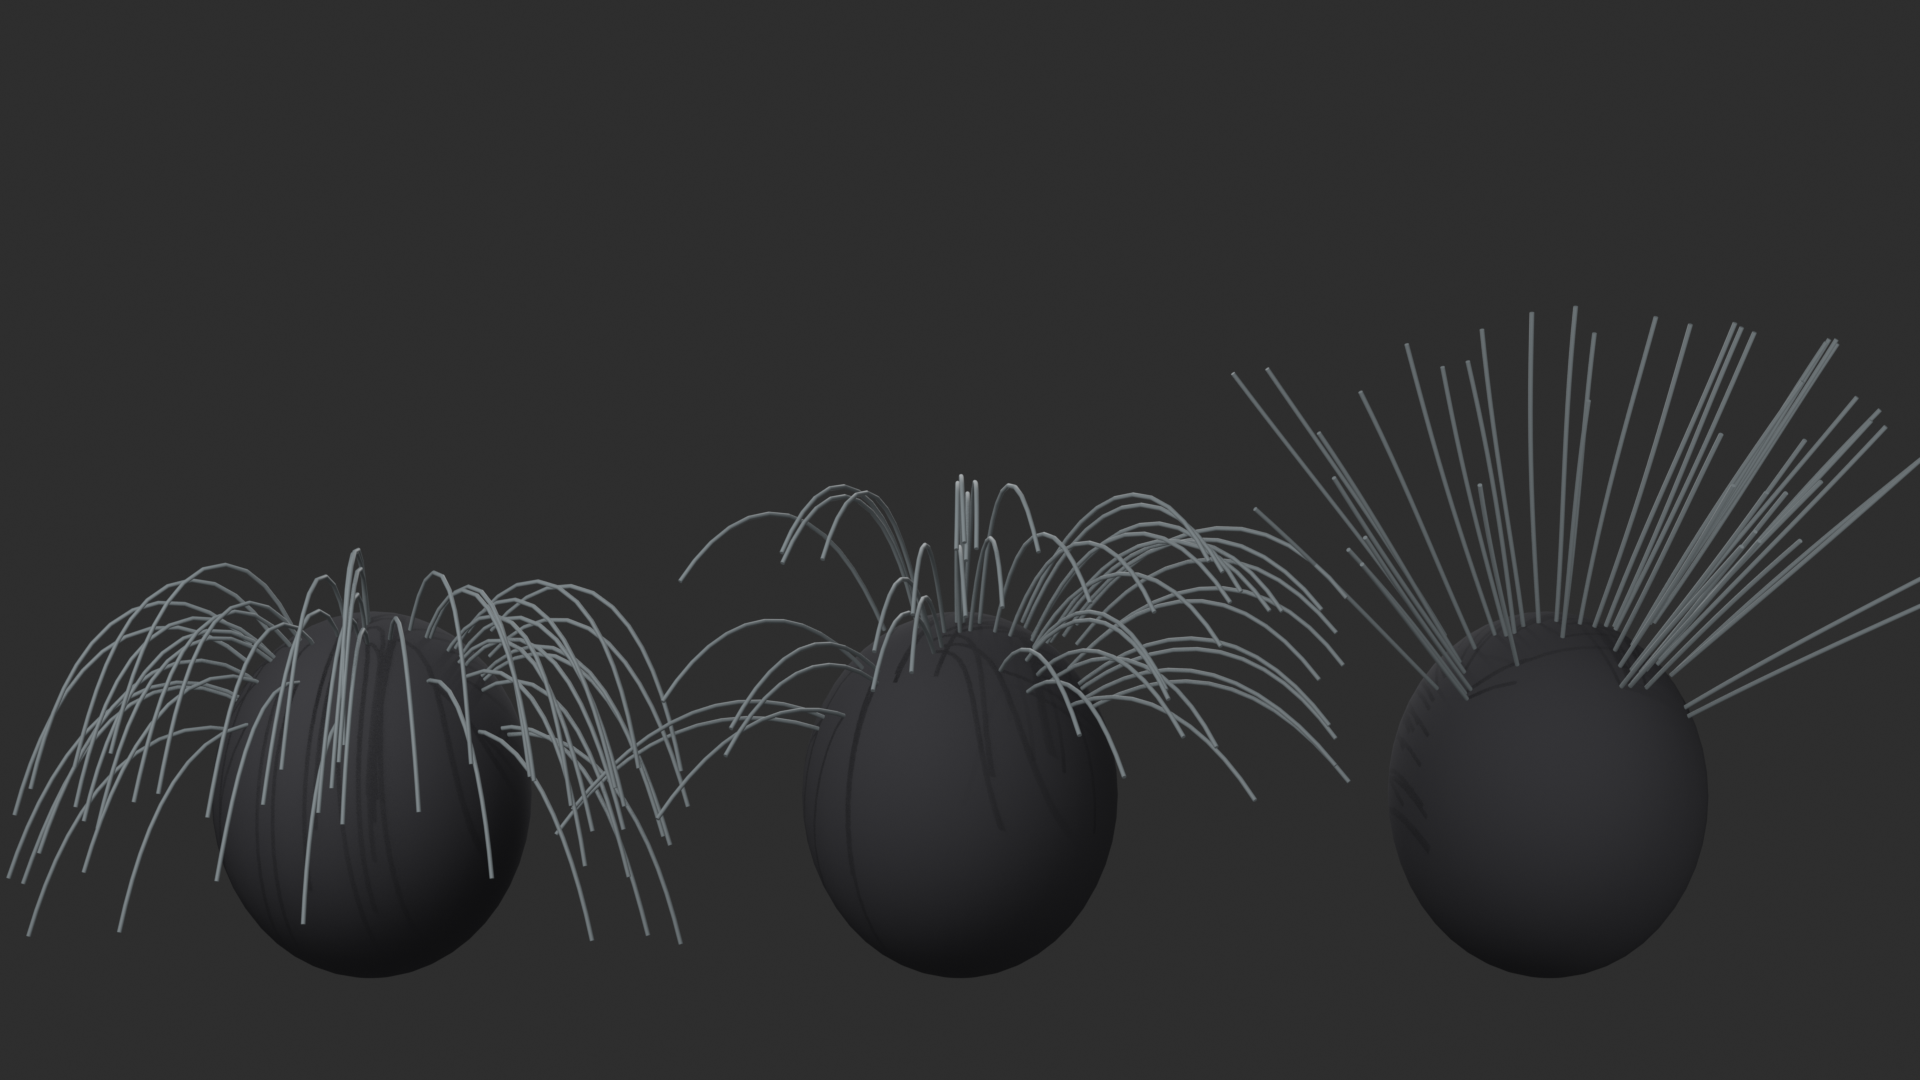
Structure section:
- Mass:
- Hair weight/density
- Default: 1.0
- Higher = heavier hair (less motion, more pull down)
- Lower = lighter hair (more fluid motion)
- Typical range: 0.5-2.0
- Use cases:
- Heavy: 1.5-2.0 (wet hair, thick dreadlocks)
- Normal: 0.8-1.2 (typical human hair)
- Light: 0.3-0.7 (fairy hair, wispy strands)
- Stiffness:
- Resistance to bending
- Default: 1.0
- Range: 0.0 (no resistance, very flexible) to 10.0+ (rigid)
- Higher = hair stays closer to groomed shape
- Lower = hair flows and deforms easily
- Use cases:
- Stiff: 5.0-10.0 (short hair, gel/spray, spines)
- Normal: 1.0-3.0 (typical hair)
- Flexible: 0.1-0.8 (flowing hair, fur, grass)
- Random:
- Variation in stiffness per strand
- 0.0: All strands same stiffness
- 1.0: Maximum variation
- Adds natural irregularity
- Typical: 0.1-0.3
Damping section:
- Damping:
- Friction/air resistance
- Reduces motion over time
- Default: 0.1
- Range: 0.0 (no damping, perpetual motion) to 1.0 (high resistance)
- Higher = hair settles faster, less bouncy
- Lower = hair moves more freely, longer settling
- Typical values:
- Underwater: 0.8-1.0
- Air (normal): 0.1-0.3
- Space/fantasy: 0.0-0.05
Goal section (spring-back force):
- Goal Strength:
- Force pulling hair back toward groomed position
- Default: 0.1
- Range: 0.0 (no pull back) to 1.0 (strong pull)
- Higher = hair returns to rest pose quickly
- Lower = hair stays deformed after motion
- Use cases:
- High goal (0.3-0.6): Styled hair maintains shape
- Low goal (0.0-0.2): Flowing, loose hair
- Goal Damping:
- Damping of spring-back motion
- Prevents oscillation/bouncing
- Higher = smoother return to rest
- Usually leave at default (0.1)
Weight] A --> C[Stiffness:
Bend Resistance] A --> D[Damping:
Air Resistance] A --> E[Goal:
Spring-back] B --> F[Heavy = Less Motion] C --> G[Stiff = Keep Shape] D --> H[High = Quick Settle] E --> I[High = Return to Rest] style A fill:#888,stroke:#333,stroke-width:2px,color:#fff
Collision Detection
💥 Hair Interacting with Objects
Why collision matters:
- Prevents hair passing through head/body
- Hair rests on shoulders
- Hair wraps around objects
- Essential for realistic character animation
Setting up collision:
- On hair system:
- Particle Properties → Hair Dynamics → Collision
- Enable "Collision" checkbox
- Hair can now collide with objects
- On collision objects (head, body, etc.):
- Select object (e.g., character head)
- Physics Properties → Collision
- Enable "Collision" checkbox
- Object now blocks hair
Collision settings (hair side):
- Collision Quality Steps:
- Substeps for collision detection
- Default: 3
- Higher = more accurate (3-5 typical)
- Increase if hair passes through objects
- Collision Distance:
- Offset from collision surface
- Prevents interpenetration
- Too low: Hair pokes through
- Too high: Hair floats off surface
- Adjust based on hair thickness
Collision settings (object side):
- Damping:
- Energy loss on collision
- 0.0: Bouncy collision
- 1.0: No bounce (absorbs energy)
- Typical: 0.5-0.8 for hair on skin/clothes
- Friction:
- Surface drag
- Higher = hair grips surface more
- Typical: 0.0-0.5
Common collision objects:
- Character head: Primary collision (always enable)
- Body/torso: For long hair reaching shoulders/back
- Clothing: If hair interacts with clothes
- Props: Hats, headbands, accessories
⚠️ Collision Performance Cost
Collision is expensive:
- Each hair segment checks against collision objects
- Complex collision meshes slow simulation significantly
- Optimization:
- Use simplified collision proxy meshes (low-poly versions)
- Only enable collision on essential objects
- Reduce Collision Quality Steps if too slow
- Bake simulation for smooth playback
Self-Collision
🔄 Hair Strands Interacting
What self-collision does:
- Prevents hair strands from passing through each other
- Creates volume (hair pushes itself apart)
- More realistic clumping and separation
- Essential for dense, long hair
Enabling self-collision:
- Hair Dynamics → Collision → Self Collision
- Enable checkbox
- Hair now collides with itself
Self-collision settings:
- Calculation Type:
- Approximate: Faster, less accurate
- Exact: Slower, more accurate
- Use Approximate unless problems occur
- Size:
- Collision radius around each strand
- Larger = more volume, faster separation
- Smaller = tighter clumping
- Adjust based on visual hair thickness
- Impulse Clamping:
- Limits collision forces
- Prevents explosive separation
- Leave at default (0.0) usually
When to use self-collision:
- Yes: Dense, long hair where clumping matters
- Yes: Hair that needs to maintain volume
- Maybe: Medium-length hair (test performance)
- No: Short hair (minimal interaction)
- No: Performance-critical scenes (very expensive)
✅ Self-Collision Best Practices
- Start with self-collision OFF
- Get basic dynamics working first
- Enable self-collision only if needed
- Use minimal Size value that works
- Consider disabling for distant shots
- Always bake when using self-collision
Pinning and Weight Painting
📌 Controlling Which Parts Move
The pin weight concept:
- Hair strands have weight values (0.0 to 1.0)
- Weight 0.0: Fully dynamic (moves freely)
- Weight 1.0: Fully pinned (doesn't move at all)
- Weight 0.5: Partially dynamic (limited movement)
- Controls physics response per strand or region
Default behavior:
- Root: Pinned (weight 1.0) - never moves
- Along strand: Gradually decreases to 0.0 at tip
- Tip: Fully dynamic (weight 0.0) - moves freely
- This default works for most cases
Painting pin weights (custom control):
- Enter Particle Edit mode
- Select Weight tool from toolbar
- Brush over hair strands:
- Click/drag to paint weight values
- Properties panel: Weight value (0.0-1.0)
- Higher weight = less movement
- Use cases:
- Pin bangs to forehead more (higher weight)
- Allow back hair to flow freely (lower weight)
- Pin hair near hair ties/accessories
- Create stiff sections in otherwise flowing hair
Practical examples:
- Styled updo:
- High weight (0.8-1.0) where hair gathered/pinned
- Low weight (0.0-0.2) on loose strands
- Headband:
- High weight where band contacts hair
- Keeps hair from sliding through band
- Partially styled:
- Medium weight (0.4-0.6) on styled sections
- Maintains general shape but allows some motion
Simulation Quality and Baking
⚡ Performance and Accuracy
Simulation quality settings:
- Quality Steps:
- Substeps per frame
- Default: 5
- Higher = more accurate, slower
- Increase (7-10) if hair looks unstable or jittery
- Decrease (3-4) for faster preview (less accurate)
- Pin Goal:
- When enabled: Roots stay exactly at emission points
- Usually keep enabled
Cache and baking:
- Automatic cache:
- Blender caches simulation as you play
- Memory-based (not saved with file by default)
- Speeds up replay
- Baking simulation:
- Cache → Bake button
- Calculates entire animation
- Saves to disk (persistent)
- Required before rendering animation
- Locks simulation (can't change settings until freed)
- Free Bake:
- Deletes baked cache
- Allows editing dynamics settings again
- Must re-bake after changes
Baking workflow:
- Set frame range (Start/End in scene properties)
- Adjust dynamics settings until satisfied
- Cache → Bake (wait for completion)
- Scrub timeline—smooth playback now
- Render animation
- If changes needed: Free Bake → adjust → re-bake
💡 Pro Tip: Always Bake Before Rendering
Baking ensures consistency:
- Unbaked simulations can vary between plays
- Rendering may produce different results than viewport
- Baking locks simulation to exact cached state
- Guarantees identical results every render
- Essential for production work
Common Dynamics Problems
🔧 Troubleshooting Physics Issues
Hair explodes/flies away:
- Cause: Stiffness too low or collisions overlapping
- Fix: Increase Stiffness (try 3.0-5.0)
- Or: Increase Goal Strength (0.3-0.5)
- Or: Check collision meshes don't overlap hair at frame 1
Hair too stiff/doesn't move:
- Cause: Stiffness too high or goal too strong
- Fix: Lower Stiffness (try 0.5-1.5)
- Or: Lower Goal Strength (0.0-0.1)
- Or: Check pin weights aren't too high
Hair passes through head/body:
- Cause: Collision not enabled or quality too low
- Fix: Enable collision on both hair and object
- Or: Increase Collision Quality Steps (5-7)
- Or: Increase Collision Distance slightly
Hair jittery/unstable:
- Cause: Quality steps too low or timestep issues
- Fix: Increase Quality Steps (7-10)
- Or: Increase Damping (0.2-0.4)
- Or: Reduce animation speed/forces
Hair settles too slowly/bounces forever:
- Cause: Damping too low
- Fix: Increase Damping (0.3-0.5)
- Or: Increase Goal Strength to pull back faster
Self-collision causes clumping/separation issues:
- Cause: Size value incorrect
- Fix: Adjust Self Collision Size
- Or: Switch between Approximate/Exact calculation
- Or: Disable self-collision if too problematic
Simulation too slow:
- Reduce: Parent strand count
- Reduce: Children display (0-10 while testing)
- Disable: Self-collision if not essential
- Lower: Quality Steps to 3-4 for preview
- Bake: Full simulation for smooth playback
💡 Physics Brings Hair to Life: Static hair is sculpture. Dynamic hair is performance. Movement reveals character. Confident stride—hair bounces with rhythm. Sudden turn—hair sweeps and follows. Wind gust—hair flows and settles. Physics adds that final layer of believability. But physics is also challenge. Balance between motion and control. Too loose—hair flies wildly. Too stiff—looks frozen. Sweet spot between chaos and constraint. That's where realism lives. Professional artists tune carefully. Test extensively. Small adjustments make huge difference. Stiffness 1.0 versus 2.0—completely different feel. Goal 0.1 versus 0.3—different character. Takes experimentation. Takes patience. Takes understanding what each parameter does. But when dialed in correctly—magic happens. Hair doesn't just move. It performs. Enhances animation. Sells motion. Makes characters feel alive. Worth mastering. Worth perfecting.
🎨 Materials and Rendering
Groomed hair with physics is impressive. But rendering determines final appearance. How light interacts with strands. How color varies root to tip. How translucency creates that characteristic glow. Hair materials are specialized—different from standard surface shaders. Understanding hair rendering means creating convincing, photorealistic results.
Hair BSDF Shader
🌟 Specialized Hair Shader
Why Hair BSDF is different:
- Hair strands are cylindrical (not flat surfaces)
- Light scatters differently along curves
- Requires specialized shading model
- Principled BSDF doesn't handle hair correctly
- Hair BSDF designed specifically for strands
Accessing Hair BSDF:
- Select object with hair system
- Shading workspace (top menu tabs)
- Material Properties:
- Click "+" to add material slot
- Click "New" to create material
- Material applies to hair
- Shader Editor (bottom panel):
- Delete default Principled BSDF node
- Add → Shader → Hair BSDF
- Connect to Material Output → Surface
Hair BSDF parameters:
- Color:
- Base hair color
- RGB values or hex color
- Examples: Brown (0.2, 0.1, 0.05), Blonde (0.8, 0.7, 0.4), Black (0.05, 0.05, 0.05)
- Component:
- Reflection: Surface reflection (most common)
- Transmission: Light passing through hair (advanced)
- Usually use Reflection
- Offset:
- Shifts highlight along strand
- Creates hair shine appearance
- Range: -90° to +90°
- Typical: 0° to 10°
- Roughness U / Roughness V:
- Controls reflection sharpness
- U: Along strand
- V: Around strand circumference
- Lower = sharper highlights (0.1-0.3)
- Higher = diffuse, matte appearance (0.5-0.8)
- Typical: U=0.2, V=0.3
- Tangent:
- Defines strand direction (usually auto-calculated)
- Leave disconnected for automatic
Base Tone] A --> C[Roughness:
Shine Amount] A --> D[Offset:
Highlight Position] B --> E[Natural Hair Color] C --> F[Glossy vs Matte] D --> G[Shine Location] style A fill:#888,stroke:#333,stroke-width:2px,color:#fff
Basic Hair Material Setup
🎨 Simple Hair Material
Standard hair material (starting point):
- Add Hair BSDF node
- Set Color:
- Choose natural hair color
- Reference photos for realistic tones
- Adjust Roughness:
- Roughness U: 0.2 (moderate shine along strand)
- Roughness V: 0.3 (slight diffusion around strand)
- Connect to output:
- Hair BSDF → Material Output (Surface)
- Test render:
- Viewport shading: Rendered mode
- Or press F12 for full render
- Adjust based on results
Common hair colors (RGB values):
| Hair Type | RGB Values | Notes |
|---|---|---|
| Black | 0.05, 0.05, 0.05 | Not pure black (too dark) |
| Dark Brown | 0.15, 0.08, 0.04 | Rich brown tone |
| Medium Brown | 0.25, 0.15, 0.08 | Common natural color |
| Auburn/Red | 0.4, 0.15, 0.08 | Reddish brown |
| Blonde | 0.8, 0.7, 0.4 | Golden blonde |
| Platinum Blonde | 0.9, 0.9, 0.85 | Very light, almost white |
| Gray | 0.5, 0.5, 0.5 | Neutral gray |
| White | 0.95, 0.95, 0.95 | Elderly/stylized |
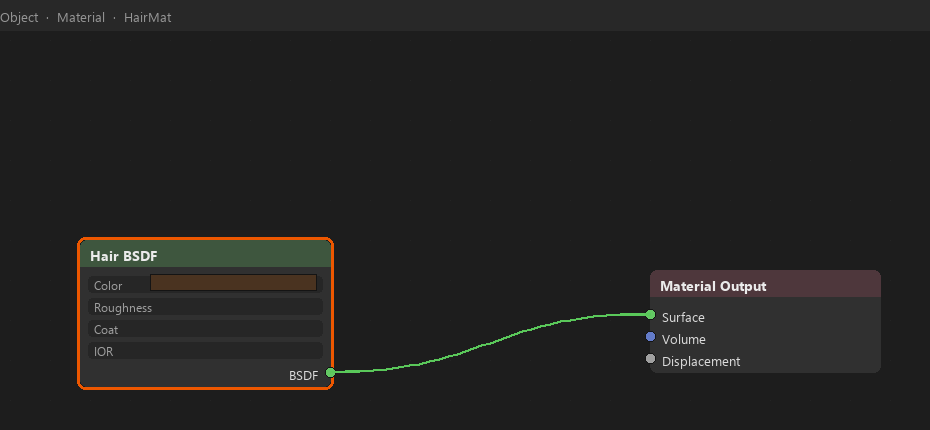
💡 Pro Tip: Hair Is Never Pure Black or White
Natural hair always has subtle color:
- Black hair: Actually very dark brown (0.05, 0.05, 0.05)
- White hair: Slightly off-white with warm tone (0.95, 0.95, 0.9)
- Pure values (0,0,0) or (1,1,1) look artificial
- Add subtle color variation for realism
Advanced Hair Materials
🔬 Adding Variation and Realism
Root-to-tip color gradient:
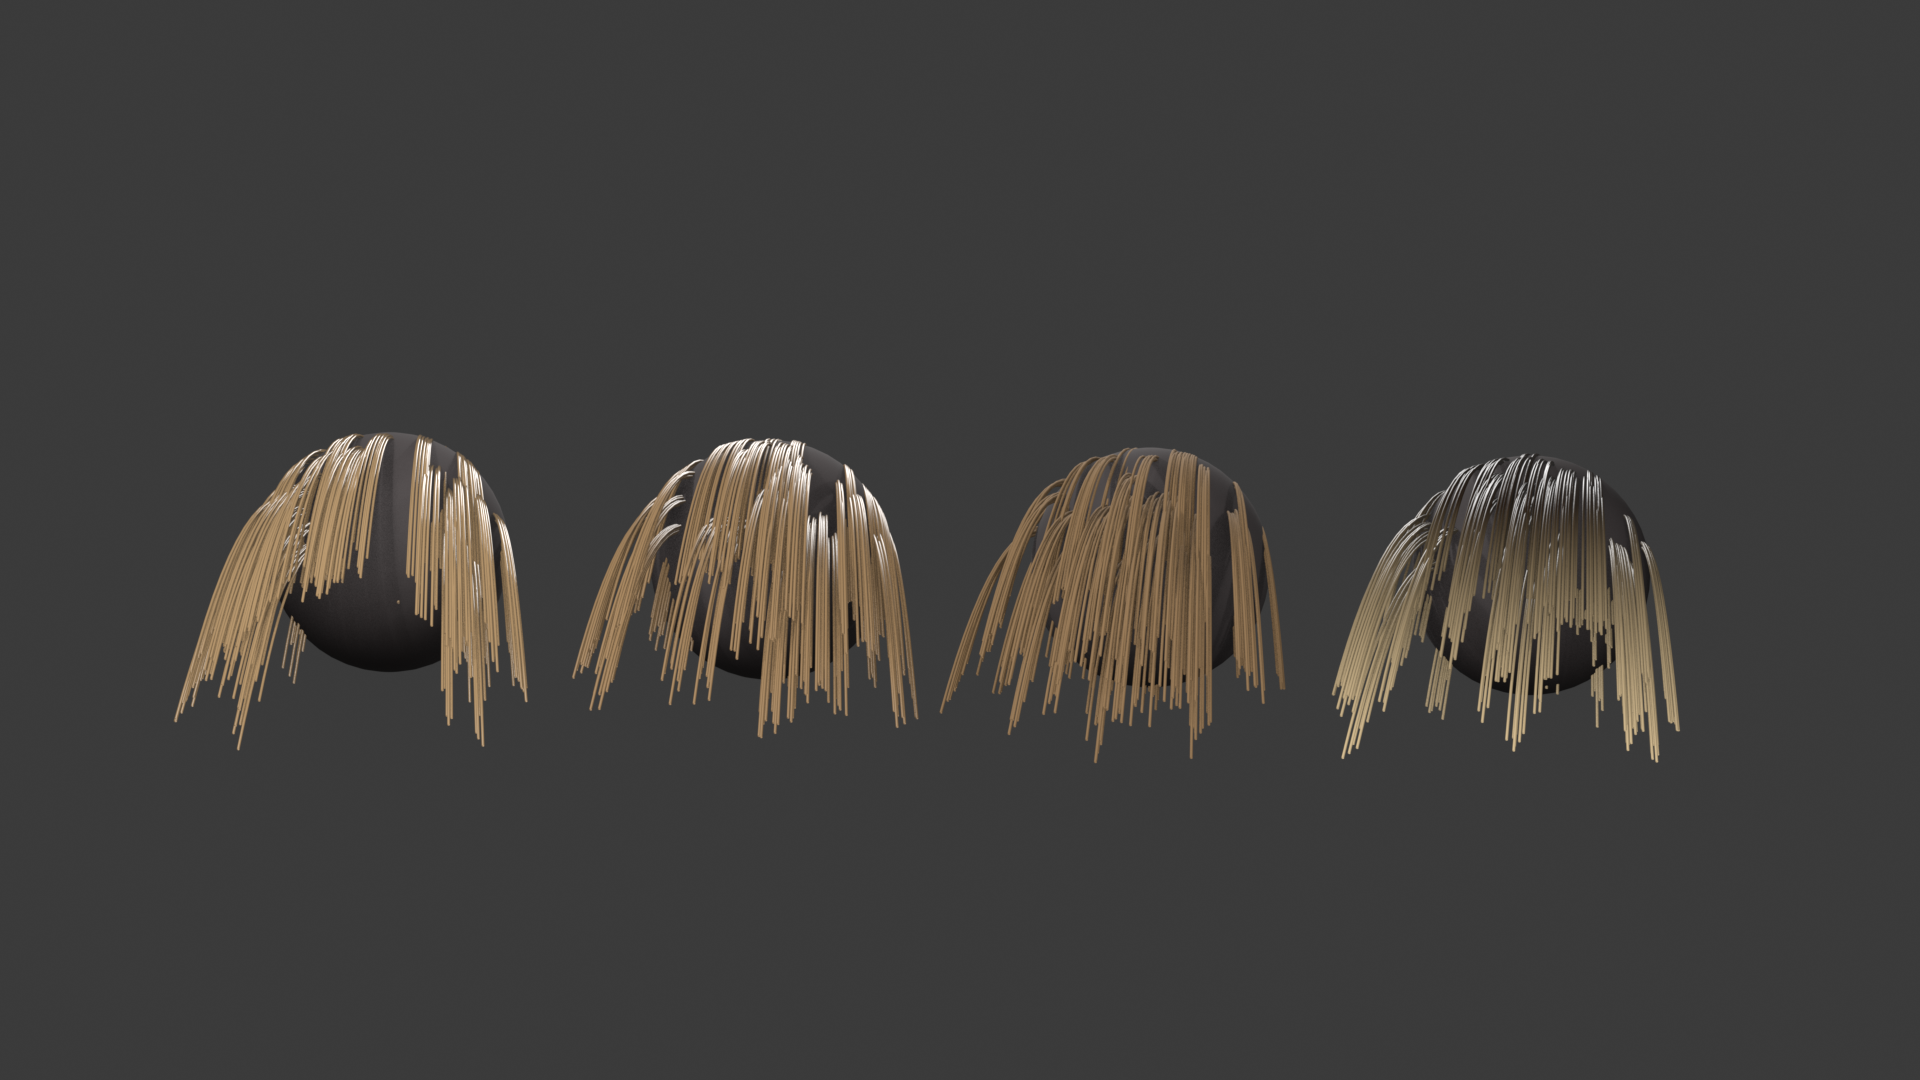
- Why vary color:
- Natural hair lighter at tips (sun exposure)
- Roots often darker
- Adds depth and realism
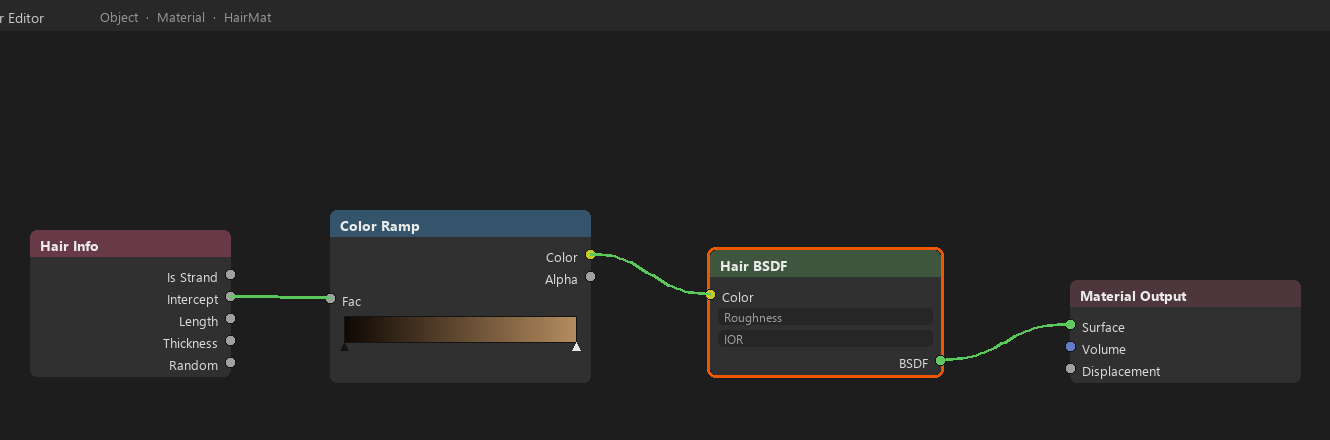
- Setup:
- Add → Input → Hair Info node
- Add → Converter → ColorRamp node
- Connect Hair Info "Intercept" → ColorRamp "Fac"
- Connect ColorRamp "Color" → Hair BSDF "Color"
- Adjust ColorRamp:
- Left stop (0.0): Root color (darker)
- Right stop (1.0): Tip color (lighter)
- Example: Dark brown to light brown
- Root (0.0): RGB(0.15, 0.08, 0.04)
- Tip (1.0): RGB(0.3, 0.2, 0.12)
Random color variation per strand:
- Why randomize:
- Real hair isn't uniform color
- Subtle variation adds realism
- Prevents "plastic" appearance
- Setup:
- Add → Input → Hair Info node
- Add → Converter → ColorRamp
- Connect Hair Info "Random" → ColorRamp "Fac"
- Set ColorRamp to narrow range:
- Left (0.45): Slightly darker base color
- Right (0.55): Slightly lighter base color
- Use this as color source or mix with gradient
- Keep subtle: 10-15% variation maximum
Combining gradient and randomness:
- Add → Color → Mix (or MixRGB in older Blender)
- Factor: 0.3 (30% random, 70% gradient)
- Input 1: Root-to-tip gradient
- Input 2: Random variation
- Output → Hair BSDF Color
- Result: Natural variation with depth
Roughness variation:
- Add Hair Info → Random
- Add Math node (Multiply)
- Connect Random × 0.1 (subtle variation)
- Add to base roughness value
- Some strands shinier, some more matte
Position along strand] A --> C[Random:
Per-strand variation] B --> D[ColorRamp:
Root → Tip gradient] C --> E[ColorRamp:
Color variation] D --> F[Mix] E --> F F --> G[Hair BSDF Color] style A fill:#888,stroke:#333,stroke-width:2px,color:#fff style G fill:#4CAF50,stroke:#333,stroke-width:2px,color:#fff
Rendering Hair
📸 Render Settings for Hair
Render engine choice:
- Cycles (recommended):
- Accurate light interaction
- Proper strand shading
- Transmission/transparency correct
- Best quality but slower
- Eevee:
- Fast preview
- Limited hair shader support
- Good for quick tests
- Not recommended for final renders
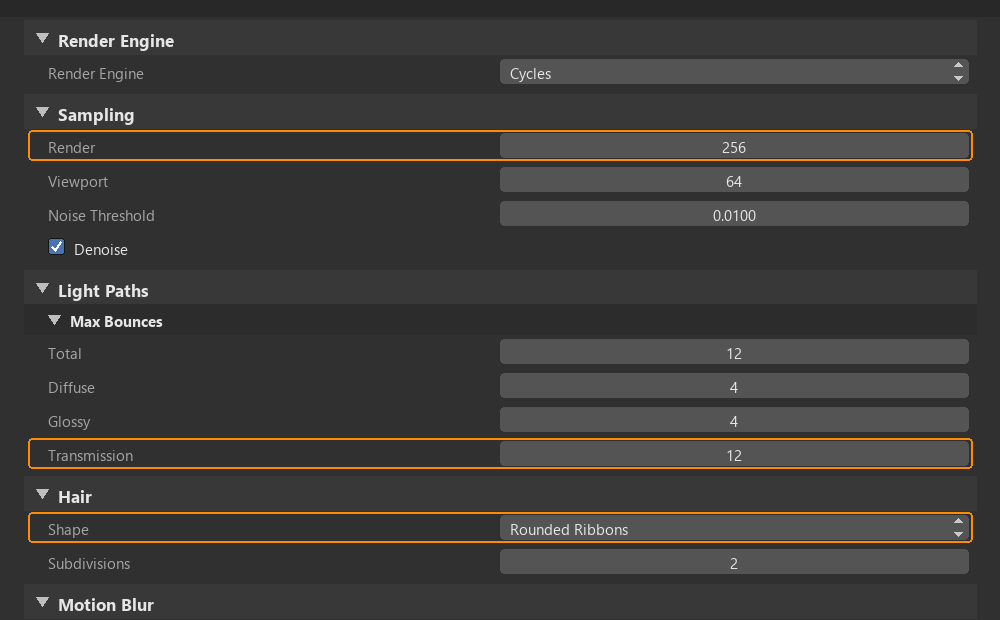
Cycles render settings (Render Properties):
- Samples:
- Render: 256-512 (hair needs more samples than surfaces)
- Viewport: 64-128 (for preview)
- Higher samples = less noise but slower
- Light Paths → Max Bounces:
- Transmission: 8-12 (if using transparent hair)
- Diffuse: 4-8
- Glossy: 4-8
- Hair needs adequate bounces for light scattering
- Hair → Shape:
- Rounded Ribbons: Default, good quality
- 3D Curves: Best quality, slower
- Use Rounded Ribbons for most work
- Hair → Subdivisions:
- Render-time curve smoothing
- 2-3 typical
- Higher = smoother but slower
Motion blur for hair:
- Render Properties → Motion Blur
- Enable checkbox
- Essential for animated hair
- Creates natural blur on moving strands
- Significantly increases render time
Denoising:
- Render Properties → Sampling → Denoising
- Enable for cleaner results with fewer samples
- OptiX or OpenImageDenoise
- Helps with hair noise (common issue)
Lighting Considerations
💡 Lighting Hair Effectively
Hair lighting challenges:
- Thin strands create complex shadows
- Requires adequate lighting to see detail
- Can appear too dark without proper setup
- Highlights crucial for showing shape and flow
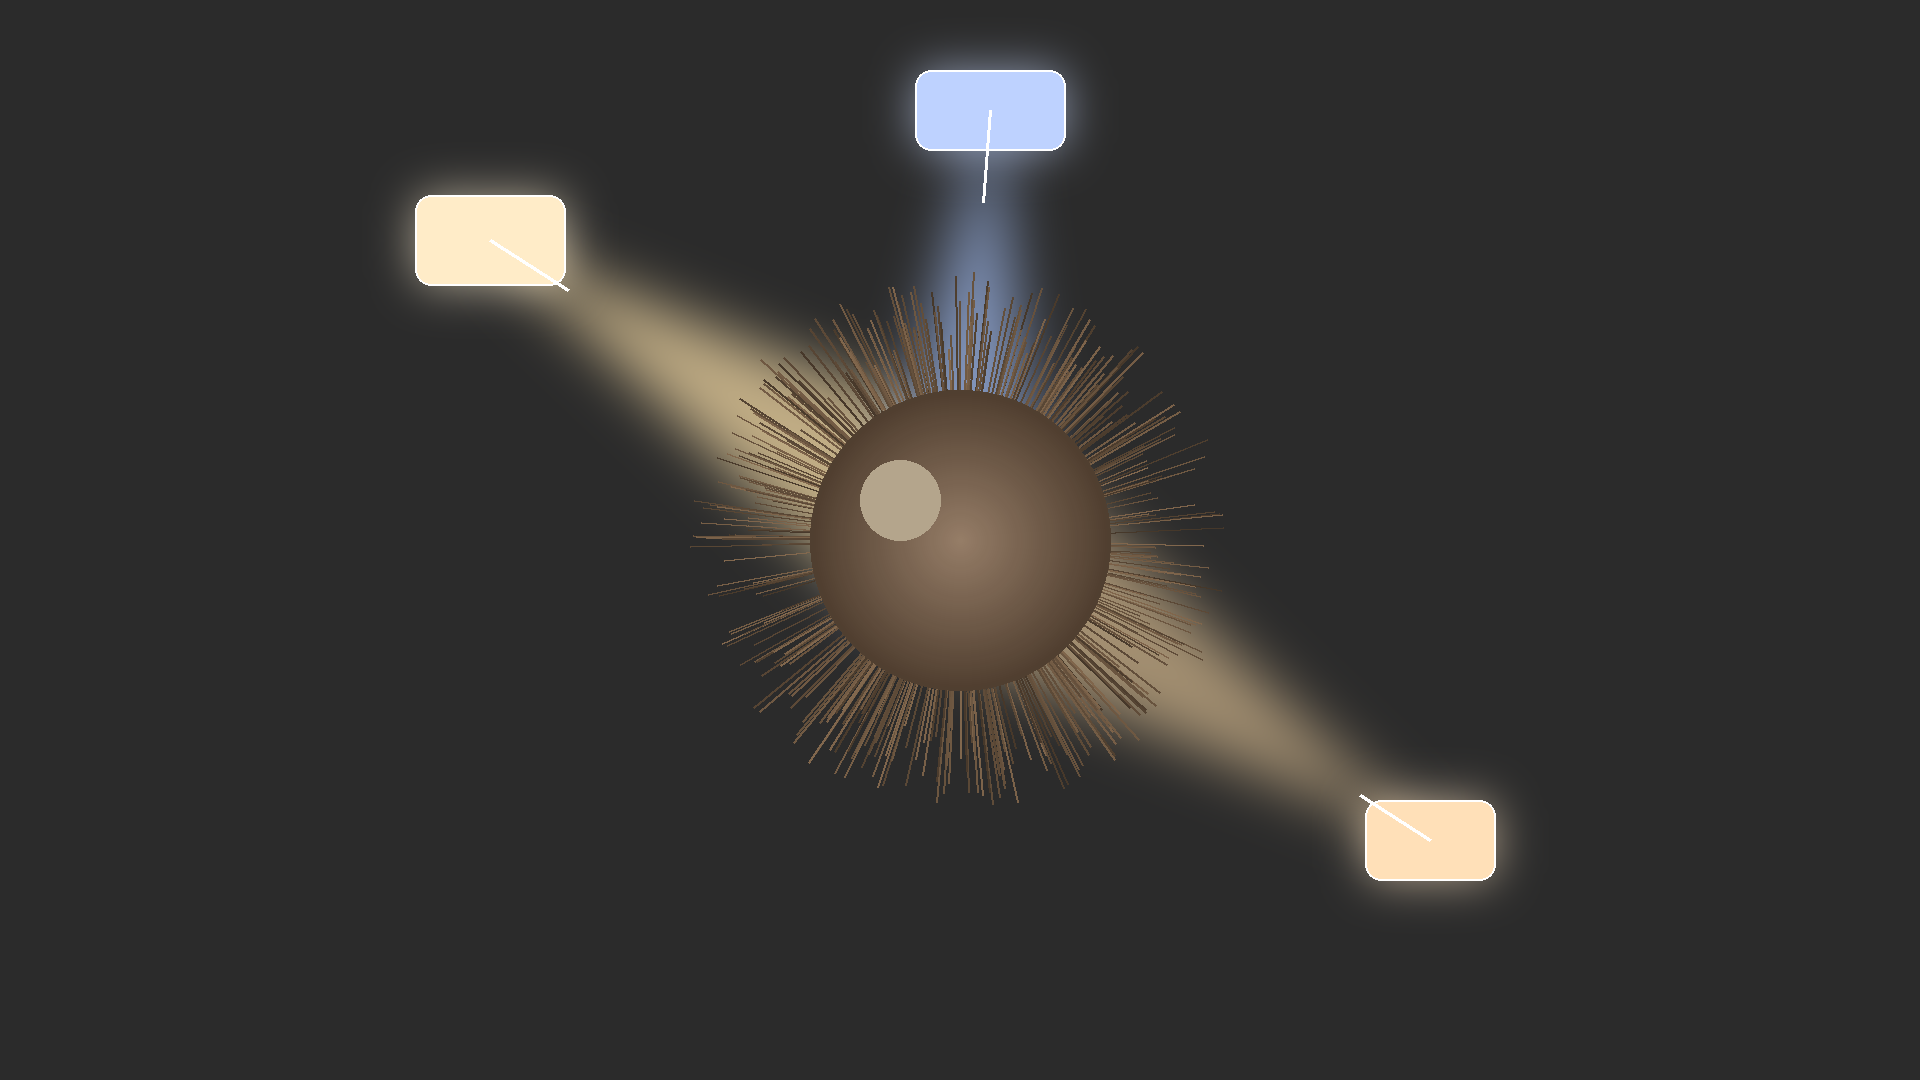
Effective lighting setups:
- Key light:
- Main light source
- Creates primary highlights on hair
- Position 45° above and to side
- Shows hair direction and flow
- Rim/back light:
- Behind and above subject
- Creates edge lighting on hair
- Separates hair from background
- Shows hair volume and mass
- Critical for hair
- Fill light:
- Soft, low-intensity
- Reduces shadow darkness
- Shows detail in dark hair
- Optional but helpful
HDRI environment lighting:
- World Properties → Surface → Environment Texture
- Load HDRI image (outdoor scene works well)
- Provides natural ambient lighting
- Good for realistic hair appearance
- Supplement with area lights for highlights
Hair-specific lighting tips:
- Avoid pure overhead lighting: Creates flat appearance
- Use rim lights: Essential for separating hair mass
- Warm key, cool rim: Temperature contrast adds interest
- Test with different angles: Hair appearance changes dramatically with light position
- Preview in viewport: Rendered view shows lighting effect on hair
Optimization for Performance
⚡ Faster Renders
Hair rendering is expensive—optimize wisely:
- Children count:
- Biggest performance impact
- Start low (Render: 50-100) and increase gradually
- Test render quality vs. performance
- More isn't always better visually
- Hair segments:
- Fewer segments = faster render
- 5-7 segments sufficient for most hair
- Only increase for extreme close-ups
- Render samples:
- Balance quality and time
- Start 128, increase if too noisy
- Use denoising to reduce needed samples
- Simplified collision:
- Use low-poly collision meshes
- Only essential objects need collision
- Distance-based simplification:
- Reduce hair count for distant characters
- Background characters: Half normal counts
- Close-ups: Full detail
Render strategy:
- Test render small area: Border render (Ctrl+B in camera view)
- Evaluate quality: Are children count, samples sufficient?
- Adjust settings: Increase only if needed
- Full render: After optimization
⚠️ Render Time Reality Check
Hair renders are slow—this is normal:
- 100,000+ strands each calculating light interaction
- Hair material more complex than simple surfaces
- Motion blur and transparency multiply time
- A character with hair might take 10-30 minutes per frame (1080p, 256 samples)
- Professional productions allocate significant render time for hair
- Plan accordingly—don't panic if renders take time
Material Troubleshooting
🔧 Common Material Issues
Hair appears black/too dark:
- Cause: Insufficient lighting or samples
- Fix: Add more lights (especially rim light)
- Or: Increase render samples (256-512)
- Or: Lighten hair color slightly
Hair looks plastic/fake:
- Cause: Too uniform, no variation
- Fix: Add color gradient (root to tip)
- Or: Add random per-strand variation
- Or: Adjust roughness (less shiny)
Hair has no definition/looks mushy:
- Cause: Poor lighting or too many children
- Fix: Add rim/back light to separate strands
- Or: Reduce children count slightly
- Or: Increase render samples
Fireflies (bright pixels) in render:
- Cause: Caustics from hair shader
- Fix: Enable denoising
- Or: Light Paths → Clamp Indirect (3.0)
- Or: Increase samples
Hair doesn't match viewport preview:
- Cause: Display children vs. render children different
- Expected: Render always denser than viewport
- Check: Children → Display vs. Render counts
Render takes forever:
- Normal: Hair is render-intensive
- Optimize: Reduce children render count
- Or: Lower samples (use denoising)
- Or: Disable motion blur for tests
- Or: Render smaller resolution for previews
💡 Materials Complete the Illusion: Perfect grooming with bad materials still looks CG. Good materials with average grooming can look convincing. Materials are final translation layer. From geometry to image. From strands to hair. Shader determines how light scatters. How color varies. How shine appears. Professional artists understand this. Spend time on materials. Study real hair. Notice how it catches light. How highlights work. How color isn't uniform. Then replicate with nodes. Hair Info node is powerful tool. Intercept gives you position along strand. Random gives variation. Use them. Create gradients. Add randomness. Make hair feel alive. And lighting matters enormously. Rim light isn't optional for hair. It's essential. Separates mass. Shows volume. Makes hair pop. Without it—flat, undefined. With it—dimensional, real. Master materials and lighting together. They're inseparable for hair. Get both right and magic happens. Your CG hair looks photographed. Not rendered. That's the goal.
🎭 Common Applications
Hair systems aren't one-size-fits-all. Character hair demands different approach than animal fur. Grass requires different thinking than fabric fibers. Understanding application-specific techniques means knowing which settings matter for each use case. Let's explore the most common applications and their specialized workflows.
Character Hair
👤 Human Hairstyles
Character hair characteristics:
- Medium to long length (1-20 units typical)
- Requires extensive grooming
- Style defines character personality
- Often animated (needs dynamics)
- Close-up camera scrutiny
- Highest quality requirements
Recommended settings for character hair:
- Emission:
- Number (parents): 2000-5000
- Hair Length: 4-12 (shoulder to long)
- Segments: 7-12 (smooth curves needed)
- Emit From: Faces, Jittered distribution
- Children:
- Type: Interpolated (smooth blending)
- Display: 10-25 (viewport)
- Render: 100-300 (final quality)
- Radius: 0.3-0.5 (moderate spread)
- Dynamics (if animated):
- Mass: 0.8-1.2
- Stiffness: 1.0-2.0 (styled hair higher)
- Damping: 0.2-0.3
- Goal Strength: 0.1-0.3 (maintains style)
- Enable collision with head
- Materials:
- Hair BSDF with root-to-tip gradient
- Random color variation (subtle: 10%)
- Roughness U: 0.2, V: 0.3
Common hairstyles and approaches:
| Style | Key Techniques | Grooming Focus |
|---|---|---|
| Long flowing | High segment count (10-12), smooth heavily | Directional flow, layered cutting |
| Bob/short | Precise length control, vertex group density | Clean silhouette, uniform length sections |
| Curly/wavy | S-curve combing, avoid over-smoothing | Wave patterns, volume with Puff |
| Slicked back | High smooth, flatten with Puff, increase stiffness | Tight uniform direction, sleek appearance |
| Undercut | Vertex group length (short sides, long top) | Sharp length transitions, volume on top |
| Ponytail | Comb toward gathering point, pin weights | Tight gather, model tie separately |
✅ Character Hair Workflow
Professional character hair pipeline:
- Reference gathering (photos of desired style)
- Low-count emission setup (500-1000 parents)
- Rough grooming with few children
- Increase parents to final count (2000-5000)
- Detail grooming (most time here)
- Add children for density (100-300 render)
- Materials and color
- Test dynamics if animated
- Final render tests and optimization
Animal Fur
🦊 Realistic Fur Coverage
Fur characteristics:
- Full body coverage (not just head)
- Shorter length than human hair (0.2-3 units typical)
- Higher density requirements
- Direction follows body contours
- Varies by body region
- Less grooming, more distribution focus
Recommended settings for fur:
- Emission:
- Number (parents): 5000-15000 (full body)
- Hair Length: 0.5-2.0 (short fur)
- Segments: 5-7 (adequate for short strands)
- Emit From: Faces
- Children:
- Type: Simple (less interpolation needed for short fur)
- Display: 5-15
- Render: 200-500 (dense coverage)
- Radius: 0.2-0.3 (tighter than hair)
- Dynamics:
- Mass: 1.0-1.5 (fur is denser)
- Stiffness: 3.0-6.0 (short fur stiffer)
- Damping: 0.3-0.5
- Often don't need dynamics for very short fur
- Materials:
- Hair BSDF with subtle color variation
- Root slightly darker than tip
- Higher roughness (0.4-0.6) - fur less shiny
Regional fur variation techniques:
- Density vertex groups:
- Denser on back, sides (full coverage)
- Sparser on belly (often lighter)
- None on nose, paw pads, inner ears
- Paint weights carefully per body region
- Length vertex groups:
- Longer on mane/ruff (lions, wolves)
- Shorter on face, legs
- Very short on ears (except tips)
- Smooth transitions between regions
- Direction combing:
- Follow anatomical flow
- Back: Head toward tail
- Legs: Top to bottom
- Chest: Outward from center
- Gravity plays role (hangs downward)
Fur-specific tips:
- Multiple particle systems for different body regions often easier
- Short fur doesn't need many segments (5 is plenty)
- Higher children counts essential (fur is very dense)
- Collision with body critical for realistic look
- Self-collision rarely needed (fur too short)
- Study reference photos of specific species
Grass and Vegetation
🌿 Ground Coverage
Grass characteristics:
- Very short length (0.1-1.0 units)
- Extremely high counts (millions possible)
- Mostly vertical orientation
- Natural clustering and variation
- Often distant from camera (less detail needed)
- Minimal grooming required
Recommended settings for grass:
- Emission:
- Number (parents): 10000-50000 (large areas)
- Hair Length: 0.2-0.8 (lawn grass)
- Segments: 3-5 (grass is stiff)
- Emit From: Faces, Random distribution
- Children:
- Type: Simple
- Display: 10-25
- Render: 300-1000 (very dense)
- Radius: 0.15-0.25 (tight clusters)
- Dynamics (optional for wind):
- Mass: 0.5-0.8 (light)
- Stiffness: 8.0-15.0 (grass is very stiff)
- Damping: 0.4-0.6
- Add Wind force field for motion
- Materials:
- Hair BSDF or Principled BSDF (both work)
- Green color (0.2, 0.4, 0.1) with variation
- Lighter tips, darker at base (sun exposure)
- Higher roughness (0.6-0.8) - grass is matte
Grass-specific techniques:
- Vertex group for paths/bare areas:
- Paint zero density on walkways
- Reduced density where worn
- Full density in untouched areas
- Creates natural variation
- Random rotation:
- Rotation → Randomize: 0.5-1.0
- Grass blades face all directions
- Prevents uniform appearance
- Length randomness:
- Children → Length Random: 0.3-0.5
- Varied heights look natural
- Simulates mowing irregularity
- Clumping (optional):
- Children → Clump: 0.1-0.3
- Creates grass tufts
- More realistic for unmowed grass
Performance for large grass fields:
- Use lower counts for distant areas
- Multiple particle systems with different densities
- Close to camera: Full density
- Distance: Half density or less
- Very distant: Use texture/displacement instead
💡 Pro Tip: Grass LOD (Level of Detail)
Smart grass distribution strategy:
- Near camera (0-5m): Full particle grass (50k parents, 500 children)
- Mid-distance (5-20m): Reduced grass (20k parents, 200 children)
- Far distance (20m+): Texture-based grass (displacement map)
- Multiple particle systems with vertex group falloff
- Saves enormous render time with minimal quality loss
Eyebrows and Eyelashes
👁️ Facial Details
Small but crucial details:
- Separate particle systems for each
- Very short, precise placement
- Often modeled geometry works better for stylized
- Particles for photorealistic close-ups
Eyebrows setup:
- Emission:
- Number: 50-200 per eyebrow
- Length: 0.3-0.8
- Segments: 3-5
- Emit from small face selection or vertex group
- Children: 5-20 render (relatively sparse)
- Grooming:
- Comb from inner edge outward
- Slight arch shape
- Taper length toward outer edge
- Material: Match head hair or darker
Eyelashes setup:
- Emission:
- Number: 30-100 per eyelid
- Length: 0.4-1.0
- Segments: 3-5
- Emit from eyelid edge only
- Children: 0-10 (eyelashes are individual)
- Grooming:
- Upper lashes: Comb outward and upward (curl)
- Lower lashes: Comb slightly downward
- Natural clumping (slight)
- Material: Dark, high shine (0.1-0.2 roughness)
- Dynamics: Usually disabled (too small, too stiff)
Alternative approach (modeled):
- Model eyelash/eyebrow as mesh curve
- Array modifier for multiple lashes
- Faster to set up, easier to control
- Works well for stylized characters
- Less realistic for close photorealistic shots
Quick Reference by Application
📋 Settings Summary Table
| Application | Parents | Length | Segments | Children (Render) | Stiffness |
|---|---|---|---|---|---|
| Character Hair | 2000-5000 | 4-12 | 7-12 | 100-300 | 1.0-2.0 |
| Animal Fur | 5000-15000 | 0.5-2.0 | 5-7 | 200-500 | 3.0-6.0 |
| Grass | 10000-50000 | 0.2-0.8 | 3-5 | 300-1000 | 8.0-15.0 |
| Eyebrows | 50-200 | 0.3-0.8 | 3-5 | 5-20 | 5.0-8.0 |
| Eyelashes | 30-100 | 0.4-1.0 | 3-5 | 0-10 | 10.0+ |
Remember: These are starting points. Adjust based on your specific needs, reference, and artistic vision. Test and iterate for best results.
💡 Each Application Has Its Rules: Character hair isn't animal fur. Grass isn't eyelashes. Seems obvious but matters enormously. Try to groom grass like hair—waste time. Try grass settings on character hair—disaster. Each application evolved specific techniques. Professional artists know these patterns. Start with right template. Character hair needs grooming time. Fur needs regional variation. Grass needs extreme counts. Eyelashes need precision. Understanding application determines workflow. Efficiency versus struggle. Quality versus compromise. Learn these patterns. Build mental library. "Character hair? Start here. Animal fur? These settings. Grass field? That approach." Then customize for specific case. But foundation matters. Right starting point means half the work is done. Wrong starting point means fighting uphill. Smart artists work smarter. Use proven patterns. Adapt as needed. But always start from solid foundation. That's how professionals work fast and well.
🎯 Hands-On Project: Stylized Character Hair
Time to synthesize everything learned. This project creates complete character hairstyle from emission through grooming to final render. You'll build foundation, style hair, add dynamics, and produce polished result. Real workflow. Professional techniques. Complete hair system start to finish.
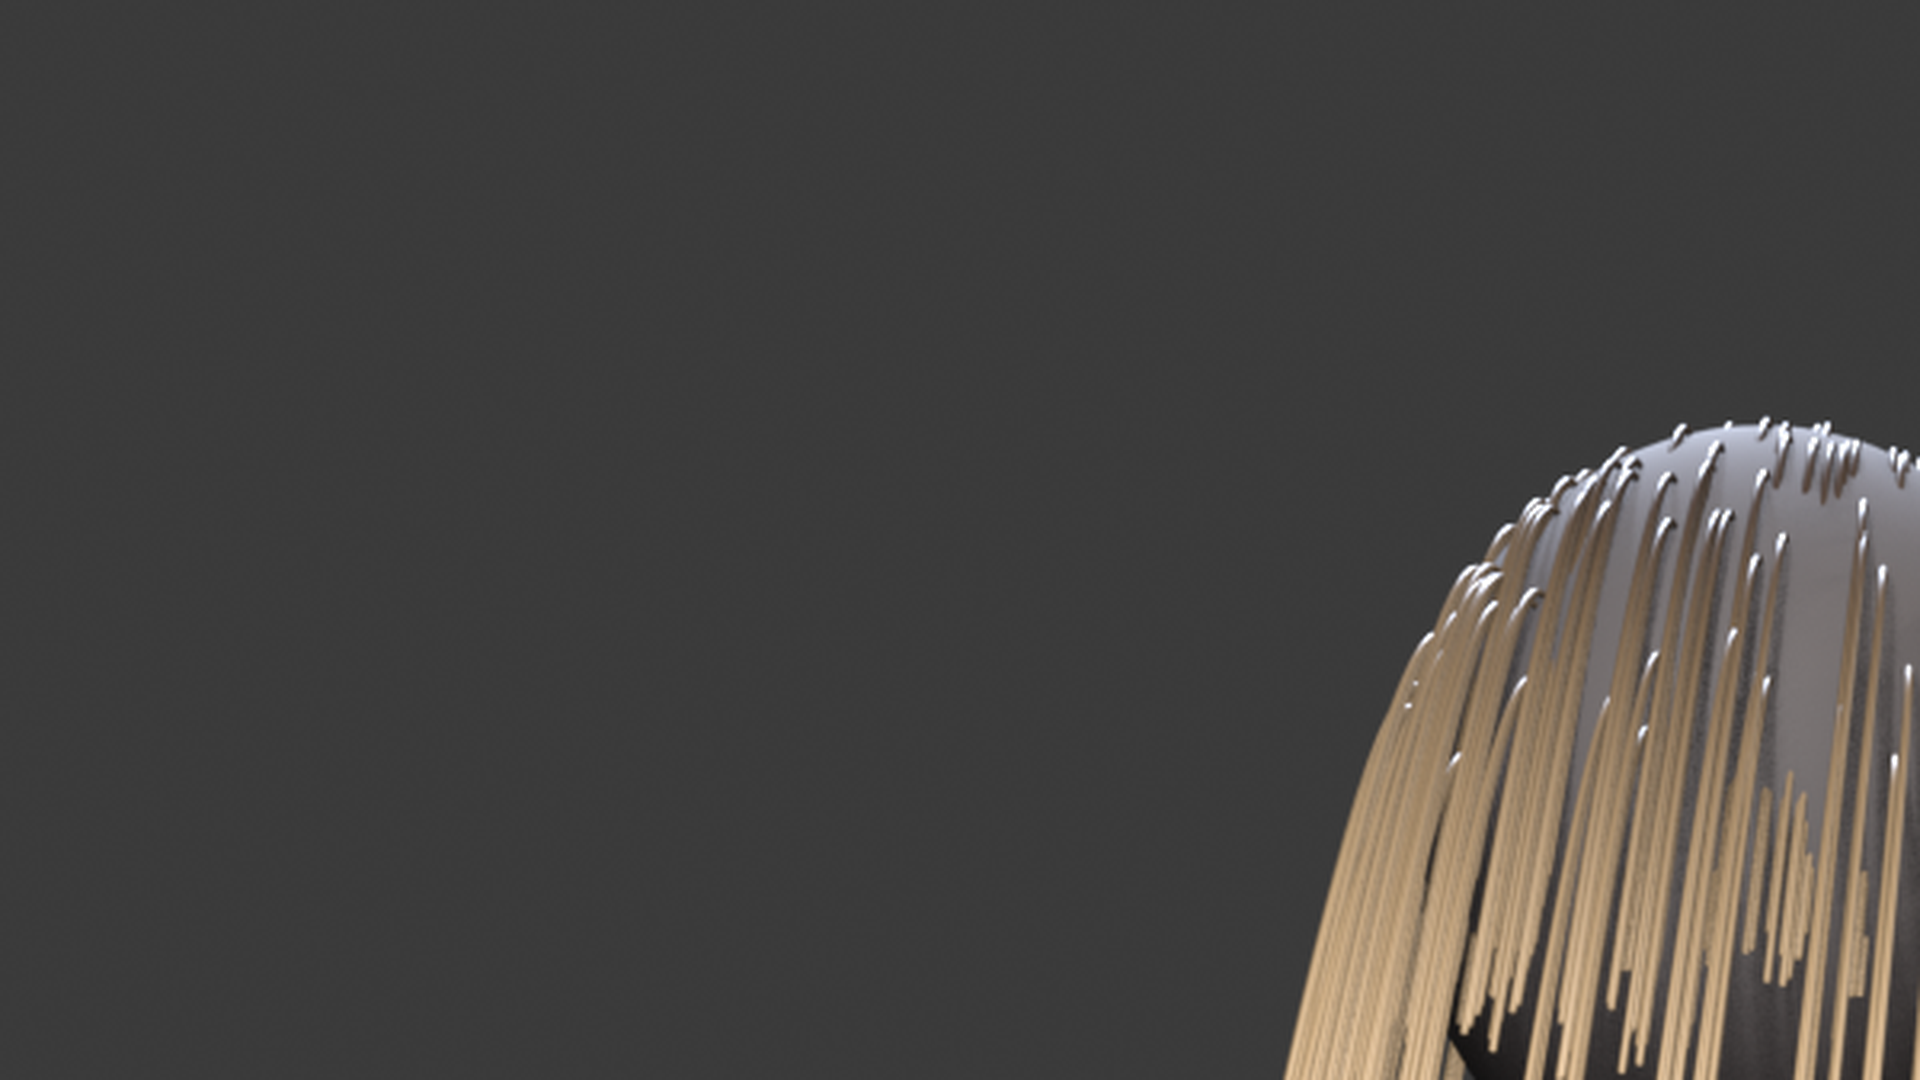
🎨 Project Goal
Create a short-to-medium length hairstyle with:
- Proper emission and distribution
- Professional grooming and styling
- Dynamic hair physics (optional movement)
- Realistic material with color gradient
- Polished render-ready result
Skills practiced: Complete hair workflow from setup to final render
Project Setup
🏗️ Preparing the Scene
Step 1: Create emission surface
- Start fresh:
- File → New → General
- Delete default cube
- Keep camera and light
- Add head substitute:
- Add → Mesh → UV Sphere
- Scale slightly: S, 1.2, Enter
- Represents head for this project
- Or use actual head model if available
- Prepare topology:
- Edit Mode → Select All (A)
- Mesh → Normals → Recalculate Outside (Shift+N)
- Object Mode → Apply scale (Ctrl+A → Scale)
- Position camera:
- Select camera
- G, Z, 3, Enter (move up)
- R, X, 80, Enter (angle down)
- Numpad 0 to view through camera
- Adjust to frame head nicely
Part 1: Emission and Basic Setup
🌱 Creating the Hair System
Step 2: Add hair particle system
- Select sphere (head)
- Particle Properties → "+"
- Change Type: Emitter → Hair
- Hair appears instantly
Step 3: Configure emission
- Emission panel:
- Number: 1000 (start low for grooming)
- Hair Length: 4.0
- Segments: 8
- Source:
- Emit From: Faces
- Distribution: Jittered
- Rotation:
- Randomize Phase: 0.3 (subtle variation)
Step 4: Initial children setup
- Children panel:
- Render: Interpolated
- Display Amount: 10 (low for viewport)
- Render Amount: 150 (will increase later)
- Radius: 0.3
Step 5: Viewport display optimization
- Viewport Display:
- Display As: Path
- Amount: 100% (show all parents while grooming)
- Steps: 5
Part 2: Grooming and Styling
✂️ Creating the Hairstyle
Step 6: Enter Particle Edit mode
- Mode dropdown → Particle Edit
- Hair becomes editable (orange selected strands)
- Tools appear in left toolbar
Step 7: Rough shape (Comb tool)
- Select Comb tool (toolbar)
- Settings:
- Radius: 3.0 (large brush)
- Strength: 0.5
- Comb general direction:
- Top of head: Backward and downward
- Sides: Downward along head curve
- Back: Straight down
- Create overall flow direction
- Multiple passes:
- Don't expect perfection first pass
- Build up shape gradually
- Work entire head evenly
Step 8: Refine with Smooth
- Select Smooth tool
- Settings:
- Strength: 0.4
- Brush over entire head:
- Removes kinks and jitter
- Creates flowing curves
- Don't over-smooth (can look too perfect)
Step 9: Add volume (Puff tool)
- Select Puff tool
- Settings:
- Strength: 0.3 (positive)
- Brush on top of head:
- Add lift at crown area
- Create natural volume
- Avoid flat-to-head appearance
Step 10: Detail work
- Switch to Comb tool
- Small brush settings:
- Radius: 0.8 (small)
- Strength: 0.8 (high)
- Refine sections:
- Fix any stray hairs
- Define specific areas
- Add character with intentional imperfections
Step 11: Optional length variation (Cut tool)
- Select Cut tool
- Click strands to trim
- Create subtle length variation
- Especially around edges for natural look
Part 3: Materials and Color
🎨 Adding Realistic Materials
Step 12: Switch to Shading workspace
- Top menu → Shading tab
- Shader Editor visible at bottom
Step 13: Create hair material
- Material Properties:
- Click "+" then "New"
- Rename: "Hair_Material"
- In Shader Editor:
- Delete Principled BSDF node (X key)
- Add → Shader → Hair BSDF
- Connect Hair BSDF → Material Output (Surface)
Step 14: Basic hair color
- Hair BSDF node:
- Color: Choose natural hair color
- Brown: (0.2, 0.12, 0.06)
- Or your preferred color
- Roughness U: 0.2
- Roughness V: 0.3
- Color: Choose natural hair color
Step 15: Add root-to-tip gradient
- Add nodes:
- Add → Input → Hair Info
- Add → Converter → ColorRamp
- Connect:
- Hair Info "Intercept" → ColorRamp "Fac"
- ColorRamp "Color" → Hair BSDF "Color"
- Adjust ColorRamp:
- Left stop (root): Dark brown (0.15, 0.08, 0.04)
- Right stop (tip): Lighter brown (0.3, 0.2, 0.12)
- Creates natural sun-lightened effect
Step 16: Test render in viewport
- Top-right viewport shading: Rendered mode
- See material on hair
- Adjust colors if needed
Part 4: Dynamics (Optional)
🌀 Adding Movement
Step 17: Enable hair dynamics
- Particle Properties → Hair Dynamics
- Enable "Hair Dynamics" checkbox
- Hair now responds to physics
Step 18: Configure dynamics
- Structure:
- Mass: 1.0
- Stiffness: 1.5 (slightly styled)
- Random: 0.2
- Damping: 0.25
- Goal Strength: 0.2 (gentle pull back to groomed shape)
Step 19: Add collision
- Hair collision:
- Hair Dynamics → Collision → Enable
- Head collision:
- Select sphere
- Physics Properties → Collision → Enable
- Hair won't pass through head
Step 20: Test dynamics
- Press Spacebar to play animation
- Hair should settle naturally
- If too loose/stiff: Adjust Stiffness
- If doesn't settle: Increase Damping
Step 21: Bake simulation (if animating)
- Particle Properties → Cache
- Click "Bake All Dynamics"
- Wait for completion
- Smooth playback now
Part 5: Final Polish and Render
✨ Completing the Project
Step 22: Increase children for final quality
- Particle Properties → Children
- Render Amount: 250-300
- More density for final render
- Keep Display low (10-20) for viewport performance
Step 23: Lighting setup
- Key light:
- Select existing light
- Change to Area light
- Position: 45° above and to side
- Strength: 500W
- Add rim light:
- Add → Light → Area
- Position: Behind and above head
- Strength: 300W
- Creates hair edge highlights
Step 24: Render settings
- Render Properties:
- Render Engine: Cycles
- Samples: 256
- Denoising: Enable (OpenImageDenoise)
- Output Properties:
- Resolution: 1920×1080
- Frame Rate: 24fps (if animated)
Step 25: Final render
- Test render small area:
- Camera view (Numpad 0)
- Ctrl+B to draw border
- F12 to render selection
- Check quality, adjust if needed
- Full render:
- Clear border (Ctrl+Alt+B)
- F12 for final render
- Save image: Image → Save As
Success Checklist
✅ Project Completion Checklist
Your hair system should have:
- ☐ Clean emission from head surface
- ☐ Proper segment count (8) for smooth curves
- ☐ Professional grooming (directional flow, volume, refinement)
- ☐ Children particles for density (250-300 render)
- ☐ Hair BSDF material with root-to-tip gradient
- ☐ Natural color variation
- ☐ Proper lighting (key + rim lights)
- ☐ Optional: Working dynamics with collision
- ☐ Clean final render
If something isn't working:
- Hair too sparse: Increase children Render Amount
- Hair looks rough: Use Smooth tool more, increase Segments
- Can't see hair well: Add rim light, increase key light strength
- Dynamics explode: Increase Stiffness to 3.0-5.0
- Render too slow: Reduce children count, lower samples to 128
Bonus Challenges
🚀 Taking It Further
If you completed the basic project:
- Add bangs:
- Select front section (Circle Select: C)
- Comb forward and downward
- Cut to desired length
- Create undercut style:
- Create vertex group for length control
- Paint short on sides (blue), long on top (red)
- Assign to Length vertex group
- Add color highlights:
- Create second Mix node in shader
- Use Hair Info "Random" for per-strand variation
- Mix in accent color (e.g., blonde streaks in brown)
- Animate with wind:
- Add → Force Field → Wind
- Rotate for direction
- Strength: 2-5
- Animate wind strength for gusts
- Add second hair system:
- Create facial hair (beard/mustache)
- Different emission area, shorter length
- Practice multi-system workflow
💡 Projects Build Mastery: Reading about hair teaches theory. Creating hair teaches reality. This project walked you through complete workflow. But real learning happens when you do it again. And again. Different styles. Different characters. Different challenges. Each iteration teaches lessons. What works. What fails. Where time goes. How to optimize. First attempt takes hours. Fifth attempt takes less. Tenth attempt feels natural. That's how mastery builds. Through repetition with variation. Not identical copying. But exploring. Experimenting. Pushing boundaries. Try punk mohawk. Try elegant updo. Try wild curls. Each teaches different lessons. Mohawk teaches stiffness and shape. Updo teaches weight painting. Curls teach grooming subtlety. Build portfolio of hairstyles. Not for showing off. For learning. Each one problem solved. Technique mastered. Understanding deepened. That's how professionals got good. By doing. By making. By iterating. Keep building hair. Keep learning. Keep improving.
📚 Lesson Summary
Hair systems transform smooth surfaces into living, textured reality. You've journeyed from basic concepts through grooming tools to final rendering. Foundation established. Skills practiced. Hair no longer mystery—it's tool you understand and control.
Key Concepts Mastered
💡 Core Hair System Knowledge
- Hair vs. emitter particles: Rooted strands vs. free-flying elements
- Parent/child system: Guide hairs vs. render density
- Emission fundamentals: Distribution, normals, vertex group control
- Grooming tools: Comb, Smooth, Cut, Puff, Length for styling
- Hair dynamics: Mass, stiffness, damping, collision
- Materials: Hair BSDF, gradients, variation techniques
- Application-specific approaches: Character vs. fur vs. grass
The workflow that matters:
- Emission setup (start low counts)
- Grooming (where time goes)
- Children addition (density)
- Materials (realism)
- Dynamics (if needed)
- Optimization and render
Essential Takeaways
🎯 What You Must Remember
- Grooming takes time—that's normal:
- 60% of hair work is grooming
- Can't rush good styling
- Professional results require patience
- Build incrementally, save often
- Parent/child split is crucial:
- Work on parents (1000-5000)
- Render with children (100-500)
- This balance enables workflow
- Fighting this system fights efficiency
- Vertex groups unlock control:
- Density variation looks natural
- Length variation creates style
- Worth learning weight painting
- Professionals use vertex groups extensively
- Materials matter as much as grooming:
- Hair BSDF, not Principled BSDF
- Root-to-tip gradients essential
- Subtle variation prevents plastic look
- Lighting especially critical for hair
- Each application has patterns:
- Character hair: Grooming-intensive
- Fur: Distribution and regional focus
- Grass: High counts, minimal grooming
- Learn these templates, customize as needed
What's Next?
🚀 Continuing Your Hair Journey
Upcoming lessons in Particles and Simulations:
- Lesson 34: Cloth Simulation
- Fabric physics and draping
- Collision and self-collision
- Character clothing workflow
- Lesson 35: Rigid Body Physics
- Object collision and stacking
- Destruction simulations
- Constraints and connections
Practice recommendations:
- Create 5 different hairstyles (variety builds skill)
- Add fur to simple animal model
- Create grass field with path through it
- Combine hair with character animation
- Experiment with extreme styles (fantasy, sci-fi)
Advanced topics for self-study:
- Geometry Nodes for procedural hair placement
- Advanced grooming with curves
- Hair cards for game engines (baked hair textures)
- Production hair pipelines (Alembic caching)
- Specialized grooming software (Xgen, Yeti, Ornatrix)
🎉 Congratulations!
You've completed Lesson 33: Hair and Fur!
You now understand:
- ✓ Hair particle system fundamentals
- ✓ Complete grooming workflow and tools
- ✓ Hair dynamics and physics simulation
- ✓ Professional material and rendering techniques
- ✓ Application-specific approaches
This knowledge transforms your ability to create characters, creatures, and environments. Hair adds life. Fur adds realism. Vegetation adds atmosphere. You now control these essential elements. Keep practicing. Keep experimenting. Keep building. Every hairstyle makes you better. Every fur coat teaches lessons. Every grass field refines technique. The foundation is solid. Build on it.
Ready to tackle cloth and rigid body physics? Onward to Lesson 34!