🎯 Learning Objectives
By the end of this lesson, you will be able to:
- Animate camera position and rotation using keyframes
- Create classic camera movements (dolly, crane, pan, tilt, orbit)
- Use camera constraints for following objects and paths
- Apply easing and timing for natural, cinematic motion
- Build handheld camera shake and stabilized professional moves
- Combine camera animation with depth of field for focus pulling
- Design multi-camera sequences and shot transitions
📋 What You'll Learn
- Time Required: 90-120 minutes
- Difficulty: Intermediate
- Prerequisites: Lessons 20-22 (Camera basics, composition, DoF)
- Project: Cinematic sequence with multiple camera moves
In This Lesson
🎯 Why Camera Animation Matters
Static cameras are fine—they've made countless great films and renders. But moving cameras? They transform your work from "nice image" to "immersive experience." Camera movement adds energy, reveals space, directs attention over time, and creates emotional connection with viewers.
The Power of Movement
🎬 What Camera Movement Does
Reveals information progressively:
- Static shot shows everything at once
- Moving camera reveals scene element by element
- Creates discovery, anticipation, surprise
- Viewer experiences scene unfolding in real-time
Creates energy and dynamism:
- Motion = life, excitement, action
- Even slow camera moves add visual interest
- Fast moves create urgency, tension
- Camera movement itself becomes part of storytelling
Shows spatial relationships:
- Static shot: flat, 2D feeling
- Moving camera: depth, 3D space revealed
- Parallax (foreground moves faster than background) creates depth
- Viewer understands scene geography through motion
Guides attention over time:
- Pan from character to what they're looking at
- Dolly forward to emphasize important element
- Orbit around subject to show all angles
- Camera movement = pointing arrow for viewer's eye
Creates emotional impact:
- Slow push-in = increasing tension or intimacy
- Pull-back = revealing context, loss, isolation
- Rapid movement = chaos, excitement, urgency
- Smooth glide = elegance, beauty, serenity
When to Use Camera Movement
📐 Movement vs Static: The Decision
Use camera movement when you want to:
- Reveal information progressively (discovery)
- Follow action or moving subjects
- Show relationships between multiple elements
- Create energy in otherwise static scene
- Emphasize important moment (push-in on reaction)
- Establish sense of place (orbit or reveal shot)
- Transition between subjects or locations
Use static camera when you want to:
- Let action play out without distraction
- Create contemplative, observational mood
- Show product or subject clearly (commercial work)
- Emphasize stability, control, calmness
- Let composition speak for itself
The golden rule:
- Camera movement should have purpose
- Ask: "Why is the camera moving?"
- If answer is "because I can," don't move it
- If answer serves story/product/message, move it
- Motivated movement > arbitrary movement
Camera Movement in Different Contexts
🎨 Genre and Purpose
Narrative/cinematic work:
- Camera movement drives storytelling
- Reveals, follows, emphasizes, transitions
- Intentional, choreographed moves
- Often combined with character movement/action
Product visualization:
- Slow, smooth orbits showing product from all angles
- Reveals product features progressively
- Professional, controlled movement
- Hero shot: slow push-in on product
Architectural visualization:
- Walkthroughs showing interior spaces
- Fly-arounds showing exterior design
- Smooth, steady movement (like steadicam)
- Shows spatial flow and relationships
Explainer/technical animations:
- Camera movement directs focus to specific features
- Orbits for 360° view
- Close-ups for detail examination
- Clear, intentional moves (not artistic flair)
Artistic/experimental work:
- Camera movement can be extreme, unusual
- Breaking conventions intentionally
- Movement creates mood, not just reveals info
- More freedom, less rules
The Language of Camera Movement
📖 What Different Moves Communicate
Push-in (dolly toward subject):
- Increasing importance, tension, or intimacy
- "Pay attention to this"
- Can be aggressive (fast) or gentle (slow)
- Often used for reactions or realizations
Pull-back (dolly away from subject):
- Revealing context, showing isolation
- "This is where they are, this is the bigger picture"
- Can create feeling of abandonment or loneliness
- Often used for endings or shocking revelations
Orbit/circle:
- Showcasing subject from all angles
- Hero moment, product reveal
- 360° view establishes presence
- Can be triumphant or ominous depending on context
Pan (horizontal rotation):
- Following action or showing environment
- Connecting two subjects ("she looks, pan to what she sees")
- Establishing spatial relationships
- Natural human head movement
Tilt (vertical rotation):
- Revealing vertical space (ground to sky)
- Showing scale (tilt up tall building)
- Less common than pan but impactful when used
Crane up/down:
- God's eye view (crane up) or intimate view (crane down)
- Dramatic reveals
- Changing perspective on scene
- Often combined with other movements
Tracking/follow:
- Staying with moving subject
- Viewer becomes companion to character
- Creates immediacy and engagement
- Common in action sequences
💡 The Invisible Art of Camera Movement: The best camera movement doesn't call attention to itself. Viewers shouldn't think "wow, cool camera move"—they should be so immersed in the story that they don't consciously notice the camera at all. The camera should feel like an intelligent observer, always in the right place at the right time, revealing exactly what needs to be seen. That's the goal: motivated, purposeful movement that serves the content, not movement for movement's sake. When you nail it, the camera becomes invisible but the impact is undeniable.
🎬 Camera Animation Fundamentals
Before diving into specific camera moves, let's understand the core concepts of camera animation in Blender. Understanding these fundamentals will make every subsequent technique easier to master.
What Can Be Animated
🎯 Animatable Camera Properties
Transform properties:
- Location (X, Y, Z): Camera position in 3D space
- Rotation (X, Y, Z): Camera orientation (where it points)
- Scale: Rarely used (doesn't affect render)
Camera-specific properties:
- Focal Length: Create zoom effect (though dolly is usually better)
- Focus Distance: Rack focus (covered in Lesson 22)
- F-Stop: Animate DoF amount (creative effect)
- Sensor Size: Rarely animated
What you'll animate most:
- 90% of camera animation: Location and Rotation
- Location changes = dolly, crane, tracking moves
- Rotation changes = pan, tilt, roll
- Often combined: dolly + pan, crane + tilt, etc.
The Animation Workflow
⚙️ Basic Process
Standard animation workflow:
- Set start frame: Move timeline to frame 1 (or wherever movement starts)
- Position camera for beginning: Set location and rotation
- Insert keyframe: Press
I→ Location & Rotation (or specific property) - Move to end frame: Advance timeline to where movement should end
- Move camera to ending position: Reposition and reorient camera
- Insert keyframe: Press
Iagain - Blender interpolates: Automatic smooth movement between keyframes
- Refine timing: Adjust keyframe positions, add easing
Viewing your animation:
- Scrub timeline: Drag timeline indicator to preview
- Play animation: Press
Spacebarto play/pause - View in camera:
Numpad 0to see camera view while animating - Lock camera to view:
N→ View → Lock Camera to View (move viewport = move camera)
Keyframe Types
🔑 What to Keyframe
When pressing I (Insert Keyframe), you have options:
Location:
- Keyframes camera position (X, Y, Z)
- Use for: Dolly, crane, tracking moves
- Most common for moving camera through space
Rotation:
- Keyframes camera orientation
- Use for: Pan, tilt, roll (rotation only, no position change)
- Common for stationary camera that rotates
Location & Rotation (LocRot):
- Keyframes both position and orientation
- Use for: Complex moves combining position and rotation
- Most versatile option—use this by default
- Ensures camera position and aim both animate smoothly
Scale:
- Rarely used for cameras (doesn't affect render)
- Only useful if parenting other objects to camera
Individual properties:
- Can keyframe individual axes (Location X, Rotation Z, etc.)
- Advanced technique for precise control
- Most beginners stick with Location & Rotation
Pro tip:
- When in doubt, use
I→ Location & Rotation - Captures complete camera state
- Prevents "floating" or unexpected rotations
Timeline and Playback
⏱️ Working with Time
Understanding frames:
- Default: 24 fps (frames per second) for film
- Or 30 fps for video
- Frame 1 to 250 = ~10 seconds at 24fps
- Each keyframe represents a point in time
Setting frame range:
- Timeline header shows Start and End frames
- Default: 1 to 250 frames
- Change to match your needs (30 frames = ~1 second)
- Render Properties → Frame Range for final output
Playback controls:
Spacebar: Play/Pause animationLeft/Right Arrow: Step forward/backward one frameShift+Left/Right Arrow: Jump 10 framesShift+Ctrl+Spacebar: Play animation in reverse
Typical camera move durations:
- Quick move: 30-60 frames (1-2 seconds)
- Standard move: 60-120 frames (2-5 seconds)
- Slow reveal: 120-240 frames (5-10 seconds)
- Full scene: 240+ frames (10+ seconds)

Visualizing Camera Path
👁️ Seeing the Motion Path
Enable motion path visualization:
- Select camera
- Object Properties → Motion Paths → Calculate
- Shows dotted line of camera movement through 3D space
- Helps visualize if camera movement is smooth or erratic
Camera display in viewport:
- Camera Properties → Viewport Display
- Limits: Shows camera frustum (field of view)
- Size: Visual size of camera icon in viewport
- Passepartout: Dims area outside camera frame
Onion skinning (advanced):
- Shows ghosted camera positions at different frames
- Visualize camera positions throughout animation
- Helpful for complex multi-position moves
✅ Animation Fundamentals Checklist
Before creating your first camera animation:
- ✓ Understand keyframes = snapshots of camera state at specific times
- ✓ Know that Blender interpolates smoothly between keyframes
- ✓ Default keyframe type: Location & Rotation (most versatile)
- ✓ Typical frame rate: 24 or 30 fps
- ✓ Typical camera move: 60-120 frames (2-5 seconds)
- ✓ Press
Ito insert keyframe,Spacebarto play - ✓ View through camera (
Numpad 0) while animating
💡 Keyframe Animation is Drawing with Time: Think of keyframes as anchor points. You're not manually moving the camera for every single frame—that would be madness (24 positions per second!). Instead, you say "at frame 1, be here; at frame 120, be there" and Blender draws the smooth path between them. It's like drawing a curve: you place a few points, and the computer creates a smooth line through them. This is the power of keyframe animation—you define the destination, the timing, and the computer handles the journey. Master this concept and you can animate anything, not just cameras.
🎥 Classic Camera Movements
Cinema has developed a vocabulary of standard camera movements over the past century. These aren't arbitrary—they're proven techniques that communicate specific things to viewers. Let's master the classics before getting creative.
Overview of Standard Moves
📋 The Essential Camera Movements
Dolly Movement (Forward/Backward)
🎬 Moving Toward or Away from Subject
What it is:
- Camera moves forward (dolly in) or backward (dolly out)
- Also called "push-in" or "pull-back"
- Physical position change along camera's forward axis
- Different from zoom (which changes focal length)
Visual effect:
- Perspective changes as camera moves
- Parallax effect (foreground and background separate)
- Creates depth, reveals 3D space
- More dramatic than zoom
Common uses:
- Dolly in: Emphasize subject, build tension, increase intimacy
- Dolly out: Reveal context, show isolation, create distance
- Reaction shots (dolly in on character's realization)
- Product reveals (slow dolly in on hero product)
Timing and speed:
- Slow dolly (5+ seconds): Deliberate, dramatic, contemplative
- Medium dolly (2-5 seconds): Standard pace, natural feel
- Fast dolly (1-2 seconds): Urgent, aggressive, shocking
- Speed ramp: Start slow, accelerate (or reverse)
How to create in Blender:
- Select camera, position at starting point
- Frame 1: Insert keyframe (
I→ Location & Rotation) - Move timeline to end frame (e.g., frame 120)
- Move camera forward or backward (keep it aimed at subject)
- Insert keyframe again
- Camera now dollies between positions
Tracking/Trucking (Left/Right)
🎬 Moving Parallel to Subject
What it is:
- Camera moves sideways (left or right)
- Also called "trucking" or "lateral movement"
- Maintains distance from subject while moving parallel
- Often used to follow moving subjects
Visual effect:
- Strong parallax (foreground moves fast, background slow)
- Creates cinematic, "film" look
- Reveals environment as camera passes
- Subject can stay centered while background slides
Common uses:
- Following character walking
- Revealing environment while keeping subject framed
- Product showcase (tracking past product lineup)
- Transition between scenes or subjects
Variations:
- Pure tracking: Subject stays centered, background slides
- Tracking + pan: Camera tracks AND rotates to follow action
- Tracking reveal: Camera tracks to reveal something new in frame
How to create in Blender:
- Position camera at start, aimed at subject
- Keyframe location & rotation at frame 1
- Move to end frame
- Move camera sideways (perpendicular to aim direction)
- Rotate camera to keep subject centered (if desired)
- Keyframe again
Crane/Boom (Up/Down)
🎬 Vertical Movement
What it is:
- Camera moves vertically (up or down)
- Also called "boom up/down" or "pedestal up/down"
- Named after crane equipment used in film production
- Changes viewing angle and perspective
Visual effect:
- Reveals vertical space (floor to ceiling, ground to sky)
- Changes power dynamic (high = dominant, low = submissive)
- Creates drama through changing perspective
- Can combine with tilt for more dramatic effect
Common uses:
- Crane up: Reveal scale, transition to god's-eye view, heroic reveal
- Crane down: Descend into scene, focus on detail, intimate reveal
- Opening/closing shots (crane up to establish, crane down to end)
- Showing vertical architecture (buildings, cliffs, towers)
Emotional impact:
- Crane up: Expansive, freeing, revealing bigger picture
- Crane down: Focusing, narrowing, getting intimate
- Combined with character action (character stands, camera cranes up)
How to create in Blender:
- Position camera at start height
- Keyframe at frame 1
- Move to end frame
- Move camera up or down (Z-axis)
- Optionally tilt camera to maintain subject framing
- Keyframe again
Pan (Horizontal Rotation)
🎬 Rotating Left/Right
What it is:
- Camera rotates horizontally (left or right)
- Camera position stays fixed, only direction changes
- Most natural camera movement (like turning your head)
- Z-axis rotation in Blender
Visual effect:
- Reveals horizontal space
- Less parallax than dolly or tracking
- Background appears to slide past
- Natural, comfortable movement
Common uses:
- Following action horizontally
- Connecting two subjects ("look from A to B")
- Revealing environment progressively
- Showing character's perspective (what they're looking at)
- Establishing scene geography
Speed variations:
- Slow pan: Contemplative, revealing, establishing
- Medium pan: Following action naturally
- Whip pan: Extremely fast pan (blur), transition or shock
- Motivated pan: Following character's gaze or movement
How to create in Blender:
- Position camera, keyframe rotation at frame 1
- Move to end frame
- Rotate camera left or right (don't move position)
- Keyframe rotation again
- Camera now pans between orientations
Tilt (Vertical Rotation)
🎬 Rotating Up/Down
What it is:
- Camera rotates vertically (up or down)
- Camera position fixed, only angle changes
- Like nodding your head yes
- X-axis rotation in Blender
Visual effect:
- Reveals vertical space
- Less common than pan but impactful
- Can create dramatic reveals
- Changes power perspective
Common uses:
- Tilt up: Reveal height, show scale, awe moment
- Tilt down: From sky to subject, reveal what's below
- Character looking up/down (show their POV)
- Tall structures (tilt up skyscraper)
Classic tilt shots:
- Start on character's feet, tilt up to face (hero reveal)
- Start on sky, tilt down to scene (establishing shot)
- Character looks up, camera tilts to show what they see
How to create in Blender:
- Position camera, keyframe rotation at frame 1
- Move to end frame
- Rotate camera up or down (X-axis)
- Keyframe rotation again
Roll (Axis Rotation)
🎬 Rotating Around Lens Axis
What it is:
- Camera rotates around its forward-facing axis
- Like tilting your head sideways
- Horizon rotates in frame
- Y-axis rotation in Blender
Visual effect:
- Disorienting, unusual perspective
- Dutch angle (tilted horizon)
- Creates unease or dynamism
- Rarely used in "normal" scenes
Common uses:
- Static dutch angle: Tension, unease, madness
- Rolling during action: Barrel roll, falling, chaos
- Leveling from dutch: Resolution, stability returning
- Music videos/commercials: Dynamic, stylized look
Use sparingly:
- Most shots should have level horizon
- Roll draws attention to itself
- Save for moments that justify it
- Overuse becomes gimmicky
Orbit (Circular Movement)
🎬 Circling Around Subject
What it is:
- Camera moves in circle around fixed subject
- Combines position movement with continuous rotation
- Maintains constant distance from subject
- 360° view of subject
Visual effect:
- Showcases subject from all angles
- Strong depth perception (parallax throughout)
- Dynamic, energetic feeling
- Subject appears stationary while world rotates
Common uses:
- Product visualization: Show product from all sides
- Hero moments: Dramatic character reveal or triumph
- 360° showcase: Architecture, design, character
- Action sequences: Dynamic "bullet time" style shots
Orbit variations:
- Full orbit: Complete 360° circle
- Partial orbit: 90° or 180° arc around subject
- Spiral orbit: Orbit while rising or descending
- Speed variations: Constant speed vs accelerating/decelerating
How to create in Blender (multiple methods):
- Manual keyframing: Position camera at 4-8 points around circle, keyframe each
- Parent to Empty: Parent camera to Empty, rotate Empty (easier, cleaner)
- Follow Path: Create circle curve, camera follows path (most control)
- We'll cover these techniques in detail in upcoming sections
Zoom vs Dolly
⚠️ Important Distinction
Zoom (changing focal length):
- Camera position stays fixed
- Focal length changes (35mm → 85mm → 135mm)
- Field of view narrows or widens
- NO perspective change—everything scales equally
- Flat, unnatural feeling (like binoculars)
- Rarely used in professional cinematography
Dolly (moving camera):
- Camera physically moves toward/away from subject
- Focal length stays constant
- Field of view stays constant
- Perspective changes—parallax creates depth
- Natural, cinematic feeling
- Standard for professional work
The golden rule:
- Almost always use dolly, not zoom
- Dolly looks professional, zoom looks amateurish
- Only zoom if you want that specific flat effect
- Some directors use zoom intentionally (Kubrick, Spielberg "dolly zoom")
Dolly zoom (advanced effect):
- Dolly AND zoom simultaneously in opposite directions
- Subject stays same size, but background compresses/expands
- Vertigo effect, disorienting, dramatic
- Difficult to execute, save for special moments
💡 Quick Reference: Classic Camera Moves
| Move | Type | Effect | Common Use |
|---|---|---|---|
| Dolly | Position (Forward/Back) | Parallax, depth | Emphasis, intimacy |
| Track | Position (Left/Right) | Strong parallax | Follow action, reveal |
| Crane | Position (Up/Down) | Change perspective | Scale, drama |
| Pan | Rotation (Horizontal) | Reveal horizontal | Follow, connect |
| Tilt | Rotation (Vertical) | Reveal vertical | Show height, scale |
| Roll | Rotation (Axis) | Disorienting | Tension, stylized |
| Orbit | Combined (Circle) | 360° view | Showcase, hero |
💡 The Grammar of Camera Movement: These classic moves aren't rules—they're vocabulary. Just like you learn vocabulary before writing poetry, you learn these standard moves before creating your own style. Every acclaimed cinematographer knows these moves inside and out. Then they combine them, modify them, or break them intentionally. A dolly-pan-crane move that follows a character while revealing environment? That's combining vocabulary words into a sentence. The more vocabulary you know, the more complex and nuanced your visual storytelling becomes. Master the classics first, innovate second.
🔑 Keyframing Camera Movement
Now let's get hands-on. Keyframing is the foundation of all camera animation in Blender. Once you master this workflow, you can create any camera movement you can imagine.
Basic Keyframing Workflow
⚙️ Step-by-Step Process
Creating a simple dolly shot (push-in):
- Set up scene:
- Create simple subject (cube, Suzanne, whatever)
- Add camera (
Shift+A→ Camera) - Position camera 10 units from subject
- Aim camera at subject (
Alt+G, then rotate)
- Set starting position (frame 1):
- Ensure timeline at frame 1
- Select camera
- Press
I(Insert Keyframe menu appears) - Choose "Location & Rotation"
- Camera now has keyframe at frame 1 (diamond appears in timeline)
- Move to end frame:
- In timeline, click on frame 120 (or your chosen end)
- Or drag timeline playhead
- Timeline now shows frame 120
- Move camera to ending position:
- With camera selected, press
G(grab/move) - Move camera closer to subject (dolly in)
- Or press
GthenYthen-5for precise movement - Rotate camera slightly if needed to keep subject centered
- With camera selected, press
- Insert ending keyframe:
- Press
Iagain - Choose "Location & Rotation"
- Second keyframe created at frame 120
- Press
- Preview animation:
- Return timeline to frame 1
- Press
Numpad 0for camera view - Press
Spacebarto play - Camera smoothly dollies from start to end
Success! You just created your first camera animation.
Keyframe Shortcuts and Tips
⌨️ Essential Hotkeys
Keyframe insertion:
I: Insert Keyframe menu- Most common choice: "Location & Rotation"
- Alt: "Location" only or "Rotation" only
- Keyframe appears as diamond in timeline
Keyframe management:
Alt+I: Delete keyframe at current frameShift+Alt+I: Clear all keyframes from object- Click diamond in timeline: Jump to that keyframe
- Drag diamond: Move keyframe to different frame
Timeline navigation:
Spacebar: Play/Pause animationLeft/Right Arrow: Previous/Next frameShift+Left/Right: Jump to previous/next keyframeShift+Ctrl+Spacebar: Play in reverseHome: Jump to frame 1End: Jump to last frame
Viewport tools:
Numpad 0: Toggle camera viewN→ View → Lock Camera to View: Move viewport = animate camera- This is incredibly useful for setting up shots
Lock Camera to View (Game Changer)
✅ Pro Technique: Intuitive Camera Animation
What it does:
- Locks camera to viewport navigation
- Moving viewport = moving camera
- Rotating viewport = rotating camera
- Zooming viewport = dollying camera
How to enable:
- Press
Numpad 0to enter camera view - Press
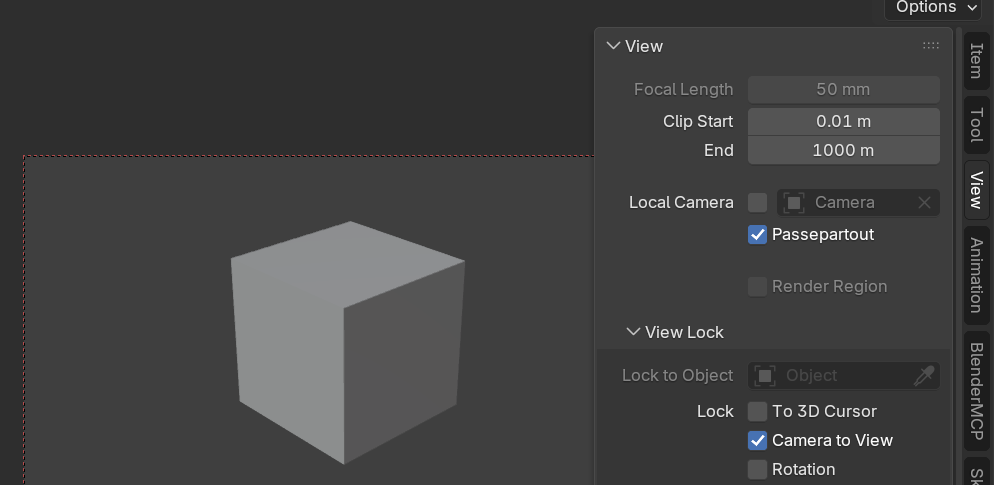
Nto open side panel - View tab → View Lock section
- Check "Lock Camera to View"
- Now viewport navigation controls camera directly
Workflow with Lock Camera to View:
- Enable Lock Camera to View
- Navigate viewport to desired camera position (frame 1)
- Press
I→ Location & Rotation - Move timeline to end frame
- Navigate viewport to ending camera position
- Press
Iagain - Done! Smooth animation created intuitively
Why it's amazing:
- Most natural way to position camera
- See exactly what camera sees while positioning
- No math, no guessing distances
- "What you see is what you get"
- Professional workflow, saves tons of time
Remember to disable when done:
- Uncheck Lock Camera to View after keyframing
- Otherwise viewport navigation will keep moving camera
- Or exit camera view (
Numpad 0)
Multiple Keyframes (Complex Paths)
🛤️ Creating Multi-Point Camera Paths
Beyond simple A-to-B movement:
- Two keyframes = straight path A → B
- Three+ keyframes = curved path A → B → C → D
- Each keyframe is a point camera passes through
- Blender creates smooth curves between all points
Example: Orbit-style movement with keyframes:
- Frame 1: Camera at front of subject, keyframe
- Frame 40: Camera at right side of subject, keyframe
- Frame 80: Camera at back of subject, keyframe
- Frame 120: Camera at left side of subject, keyframe
- Result: Camera orbits around subject smoothly
Best practices for multiple keyframes:
- More keyframes = tighter control, but more work
- 4-8 keyframes usually sufficient for complex moves
- Too many keyframes = path becomes erratic
- Use Graph Editor to refine curves between keyframes
When to use multiple keyframes:
- Camera needs to pass through specific points
- Complex choreography (dodge obstacles, reveal multiple subjects)
- Combining multiple camera moves (dolly + pan + crane)
- Matching reference footage or specific timing
Viewing and Editing Keyframes
📊 Timeline vs Dope Sheet vs Graph Editor
Timeline (main timeline at bottom):
- Shows keyframes as diamonds
- Quick overview of animation timing
- Can drag keyframes to adjust timing
- Best for: Playback and rough timing
Dope Sheet (separate editor):
- Change editor type to Dope Sheet
- Shows all keyframes for all properties
- Each property row (Location X, Y, Z, Rotation, etc.)
- Drag keyframes to adjust timing
- Scale keyframes (select multiple, press
S) - Best for: Timing adjustments, keyframe management
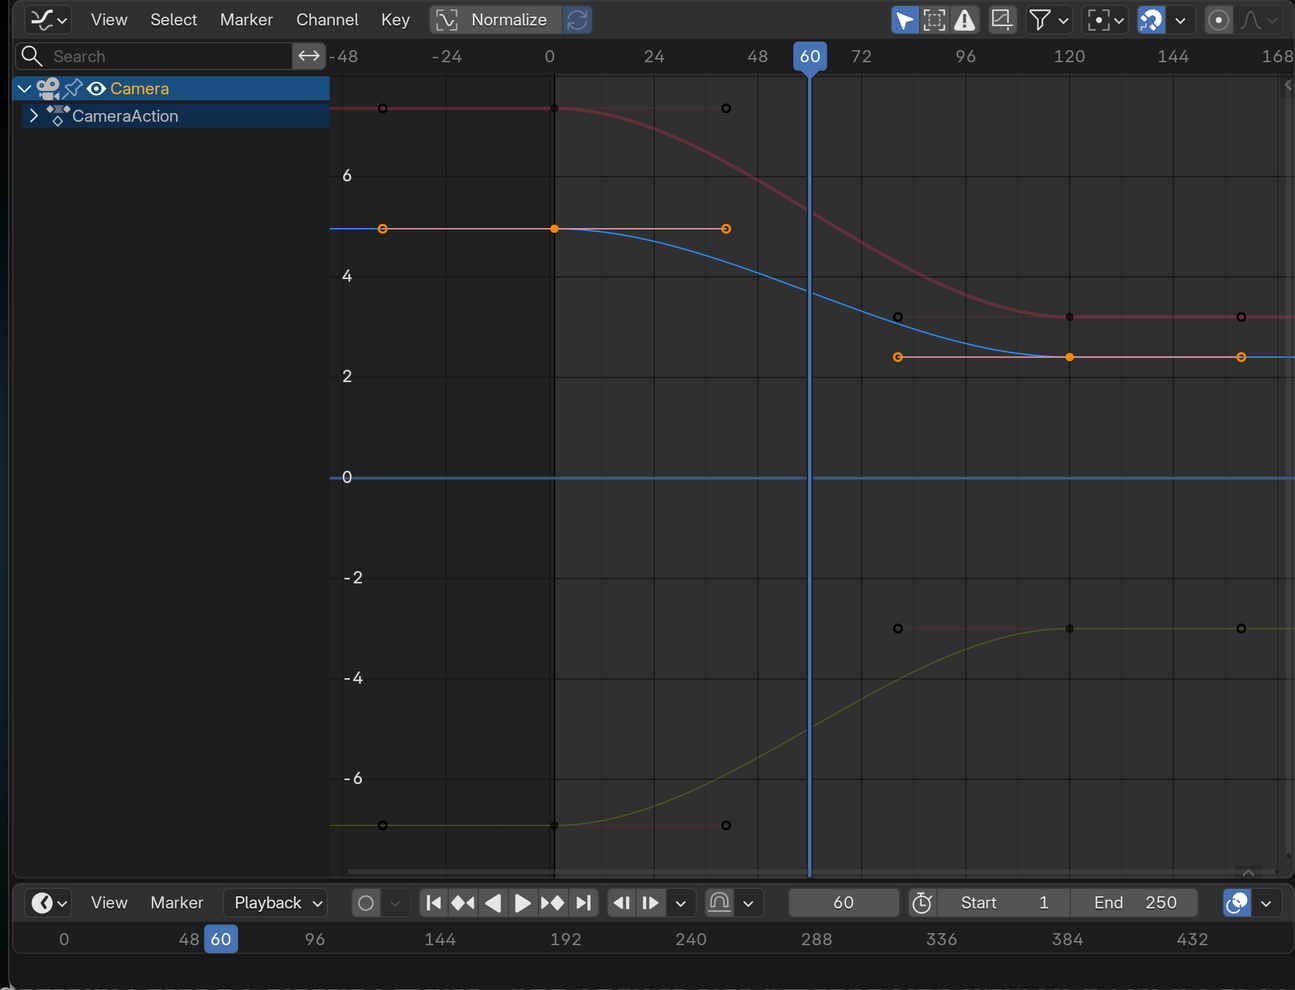
Graph Editor (separate editor):
- Change editor type to Graph Editor
- Shows interpolation curves between keyframes
- Adjust curve handles for easing
- Fine control over acceleration/deceleration
- Best for: Smooth motion, easing, refinement
- We'll cover this in detail in next section
Which to use when:
- Timeline: Playback, rough keyframe placement
- Dope Sheet: Adjusting timing, copying keyframes
- Graph Editor: Smoothing motion, professional polish
Common Keyframing Mistakes
⚠️ Pitfalls to Avoid
Mistake 1: Only keyframing Location (forgetting Rotation)
- Camera moves but doesn't stay aimed at subject
- Solution: Always keyframe "Location & Rotation" together
- Or keyframe Rotation separately if needed
Mistake 2: Too few keyframes for complex path
- Camera takes shortcut, cuts corners
- Solution: Add intermediate keyframes to define path
- 4-8 points usually sufficient
Mistake 3: Too many keyframes (overanimated)
- Camera path becomes jittery, erratic
- Solution: Simplify, remove unnecessary keyframes
- Use constraints or follow path instead
Mistake 4: Keyframes too close together
- Camera barely moves between frames
- Solution: Spread keyframes out (60-120 frame intervals)
- Or speed up animation by scaling keyframes
Mistake 5: Not previewing from frame 1
- Animation looks wrong because starting mid-motion
- Solution: Always return to frame 1 before playing
- Or set preview range in timeline
Mistake 6: Linear interpolation (robotic motion)
- Camera moves at constant speed (unnatural)
- Solution: Add easing (covered in next section)
- Use Bezier or ease in/out interpolation
Mistake 7: Forgetting to set frame range
- Animation extends beyond visible timeline
- Or renders wrong duration
- Solution: Set End frame in timeline to match animation length
- Render Properties → Frame Range must match
Keyframe Copying and Reuse
📋 Efficiency Techniques
Copying keyframes to other cameras:
- Select animated camera
- Open Dope Sheet editor
- Select all keyframes (
A) - Copy keyframes (
Ctrl+C) - Select target camera
- Paste keyframes (
Ctrl+V) - Adjust as needed
Mirroring animation (reverse direction):
- Select all keyframes in Dope Sheet
- Duplicate (
Shift+D) - Scale by -1 (
S, then-1,Enter) - Animation now runs in reverse
Saving camera animation as preset:
- Blender doesn't have built-in camera preset system
- Workaround: Save .blend file with animated cameras
- File → Append to bring cameras into new projects
- Or use NLA Editor for animation library
Looping animation:
- Make last keyframe = first keyframe position
- Creates seamless loop
- Common for product turntables, orbit shots
Practical Exercise: Your First Camera Move
🎯 Try It Now: Simple Dolly Shot
Goal: Create a slow, dramatic dolly-in on Suzanne (monkey head)
Setup (1 minute):
- New Blender file
- Delete default cube
- Add Suzanne (
Shift+A→ Mesh → Monkey) - Add Subdivision Surface modifier (smooth her out)
- Position camera 15 units away, aimed at Suzanne
Animation (2 minutes):
- Timeline to frame 1
- Select camera, press
I→ Location & Rotation - Timeline to frame 180 (6 seconds at 30fps)
- Move camera closer (5 units from Suzanne)
- Press
I→ Location & Rotation again - Return to frame 1, press
Spacebar
Success criteria:
- ✓ Camera smoothly moves toward Suzanne
- ✓ Suzanne stays centered in frame
- ✓ Takes approximately 6 seconds
- ✓ Motion is smooth, no jumps
Bonus challenges:
- Add third keyframe at frame 90 (camera slightly to the side)
- Try Lock Camera to View method instead
- Add simple lighting (Area light above and to side)
- Render animation (Render → Render Animation)
💡 Keyframes: Your Time Machine: Every keyframe is a snapshot of "camera state at this moment." The magic is that Blender fills in all the moments in between. You define the destinations, Blender plots the journey. This is incredibly powerful because it means you can create complex 60-second camera moves by only defining 4-5 key moments. The computer does thousands of calculations to smooth everything between those moments. Professional animators think in keyframes—not individual frames. They ask "where should the camera be at the beginning, middle, and end?" Then they let interpolation do the heavy lifting. Master this mindset and animation becomes surprisingly simple.
⏱️ Timing and Easing
A camera move from Point A to Point B can feel energetic, dramatic, lazy, or natural—all depending on timing and easing. These concepts separate amateur animation from professional cinematography.
Understanding Interpolation
📈 How Blender Fills the Gaps
What is interpolation?
- Method Blender uses to calculate in-between frames
- You set keyframes at frame 1 and 120
- Blender calculates positions for frames 2, 3, 4... 119
- Different interpolation types = different motion feel
Interpolation types in Blender:
- Linear: Constant speed, no acceleration (robotic)
- Bezier: Smooth curves, customizable (most versatile)
- Ease In/Out: Starts/ends slow, speeds in middle
- Constant: No interpolation (instant jump)
Default is usually Bezier—which is good!
- Bezier creates smooth, natural motion
- Automatically adds slight easing
- Can be refined in Graph Editor
Linear vs Eased Motion
🤖 vs 🎬 Robotic vs Cinematic
Linear interpolation (constant speed):
- Camera moves at exactly same speed entire time
- No acceleration, no deceleration
- Feels mechanical, unnatural
- Like a robot moving camera
- Rarely desired (except maybe security camera feel)
Eased interpolation (acceleration/deceleration):
- Camera starts slow, speeds up, ends slow
- Or variations: ease in, ease out, custom curves
- Mimics natural human movement
- Professional, cinematic feel
- Almost always preferred
Why easing matters:
- Real cameras operated by humans don't move at constant speed
- Dolly grips gradually accelerate, then decelerate
- Even motorized camera moves have soft starts/stops
- Instant full speed = jarring, amateurish
- Easing = organic, comfortable for viewer
Visual comparison:
- Linear: →→→→→→→→ (constant velocity)
- Ease In/Out: →→→→→→→→ (slow-fast-slow)
- The second feels more natural even though it covers same distance
Types of Easing
📊 Easing Variations
Ease In (slow start):
- Starts slow, gradually accelerates
- Ends at full speed
- Use for: Camera "taking off," building momentum
- Feels: Deliberate start, then urgent
Ease Out (slow end):
- Starts at full speed, gradually decelerates
- Ends slow/stopped
- Use for: Camera "arriving," settling into position
- Feels: Decisive, then gentle landing
Ease In/Out (both):
- Starts slow, speeds up middle, ends slow
- Most natural, organic motion
- Use for: Most camera moves (default choice)
- Feels: Smooth, professional, comfortable
- This is your go-to easing
Custom easing:
- Adjust curves in Graph Editor
- Can create any acceleration pattern
- Advanced: bounces, overshoots, complex curves
- Mostly for special effects
Setting Easing in Blender
🔧 Applying Easing to Keyframes
Method 1: Graph Editor (most control)
- Change editor type to Graph Editor
- Select animated camera
- See curves for Location/Rotation properties
- Select keyframes (all or specific)
- Press
T→ Set Keyframe Interpolation - Choose:
- Linear: Constant speed (usually avoid)
- Bezier: Smooth with adjustable handles
- Sine: Smooth ease in/out (good default)
- Quad/Cubic/Quart: Varying ease strengths
Method 2: Quick hotkey approach
- After inserting keyframes, still in Dope Sheet or Timeline
- Select keyframes
- Press
T→ Choose interpolation type - Faster but less visual feedback
Method 3: Handle adjustment (advanced)
- In Graph Editor, select keyframe
- Bezier interpolation shows handles
- Drag handles to adjust curve shape
- Longer handle = more gradual acceleration
- Shorter handle = quicker acceleration
- Professional control, takes practice
Recommended default:
- Use Sine or Bezier for most camera moves
- Creates natural ease in/out automatically
- Adjust handles only if needed
Timing: Speed and Duration
⏲️ How Long Should Moves Take?
General timing guidelines:
- Quick move: 30-60 frames (1-2 seconds)
- Energetic, dynamic
- Action sequences, quick reveals
- Risk: Too fast can be jarring
- Standard move: 60-120 frames (2-4 seconds)
- Most versatile timing
- Natural, comfortable pace
- Good for dolly, pan, tracking
- Slow move: 120-240 frames (4-8 seconds)
- Deliberate, dramatic
- Establishing shots, mood pieces
- Gives time to absorb visuals
- Very slow move: 240+ frames (8+ seconds)
- Contemplative, artistic
- Can feel boring if overused
- Only for specific dramatic moments
Context matters:
- Action scenes: Faster moves (30-90 frames)
- Drama/emotional: Slower moves (90-180 frames)
- Product visualization: Slow, controlled (120-240 frames)
- Architecture walkthroughs: Medium pace (60-120 frames per room)
Distance affects timing:
- Short dolly (2 units): 60 frames sufficient
- Long dolly (20 units): Needs 120-180 frames
- Covering more distance = needs more time
- Otherwise camera moves unnaturally fast
Speed Ramping
🎢 Variable Speed Motion
What is speed ramping?
- Changing camera speed during move
- Not just ease in/out—dramatic speed changes
- Start slow → accelerate dramatically → slow again
- Or reverse: fast → slow down to emphasize moment
How to create in Blender:
- Use multiple keyframes with varying spacing
- Close keyframes = slow motion
- Spread keyframes = fast motion
- Example:
- Frame 1-30: Slow (keyframes at 1, 15, 30)
- Frame 30-40: Fast (keyframe only at 40, big jump)
- Frame 40-60: Slow again (keyframes at 40, 50, 60)
Creative uses:
- Dramatic emphasis: Slow → speed up → slow at important reveal
- Time manipulation: Suggest time passing (fast) then slowing to present
- Energy burst: Slow contemplation then sudden fast movement
- Music sync: Speed changes match music beats/tempo changes
Use sparingly:
- Speed ramping calls attention to itself
- Stylized, not invisible technique
- Save for moments that warrant it
- More common in commercials/music videos than narrative film
✅ Timing and Easing Best Practices
Default approach for 90% of camera moves:
- ✓ Use Bezier or Sine interpolation (smooth ease in/out)
- ✓ Duration: 60-120 frames (2-4 seconds) for standard moves
- ✓ Avoid linear interpolation (feels robotic)
- ✓ Preview animation multiple times—trust your eye
- ✓ If movement feels "off," it probably is—adjust timing
When to deviate:
- Linear: Security camera, mechanical POV, intentional effect
- Very fast (<60 frames): Action, urgency, quick reveals
- Very slow (>180 frames): Drama, contemplation, establishing
- Custom curves: Specific matching to music or action
💡 Timing is Rhythm, Easing is Feel: Every camera move has a rhythm—the beat it moves to. Fast cuts with quick camera moves create staccato energy. Slow, deliberate moves create a flowing rhythm. Easing is the feel within that rhythm—whether each movement is sharp and angular or smooth and flowing. Professional cinematographers feel this intuitively: "This moment needs a slow, smooth push-in" or "This beat demands a quick, aggressive dolly." The technical execution (keyframes, interpolation curves) is just how you manifest that feeling. Start by asking "how should this movement feel?" then choose timing and easing that create that feeling. The math follows the emotion, not the other way around.
🔗 Camera Constraints and Targets
Constraints are powerful tools that automate camera behavior. Instead of manually keyframing every rotation to follow a subject, you can tell the camera "always look at this object." This saves enormous time and creates more natural motion.
Understanding Constraints
🎯 What Constraints Do
Constraint basics:
- Constraints are rules that control object behavior automatically
- "Always point at this object"
- "Always stay this distance from that object"
- "Follow this path"
- Reduces keyframing work dramatically
Why use constraints for cameras:
- Track To: Camera always aims at target (no rotation keyframes needed)
- Follow Path: Camera follows precise curve path
- Copy Location: Camera follows moving object position
- Damped Track: Smooth, natural tracking (less rigid than Track To)
The power of constraints:
- Animate camera position only—rotation handled automatically
- Follow moving characters without manual keyframing
- Create perfect circular orbits with single curve
- Professional results with less work
Track To Constraint (Always Aim at Target)
🎯 Automatic Camera Aiming
What it does:
- Camera always points at specified target object
- Target moves → camera automatically rotates to follow
- Camera moves → automatically maintains aim at target
- No rotation keyframes needed
How to set up Track To constraint:
- Create target object:
- Add Empty (
Shift+A→ Empty → Plain Axes) - Position Empty at subject you want camera to track
- Name it "Camera_Target" for clarity
- Add Empty (
- Add constraint to camera:
- Select camera
- Constraint Properties panel (chain link icon)
- Add Constraint → Track To
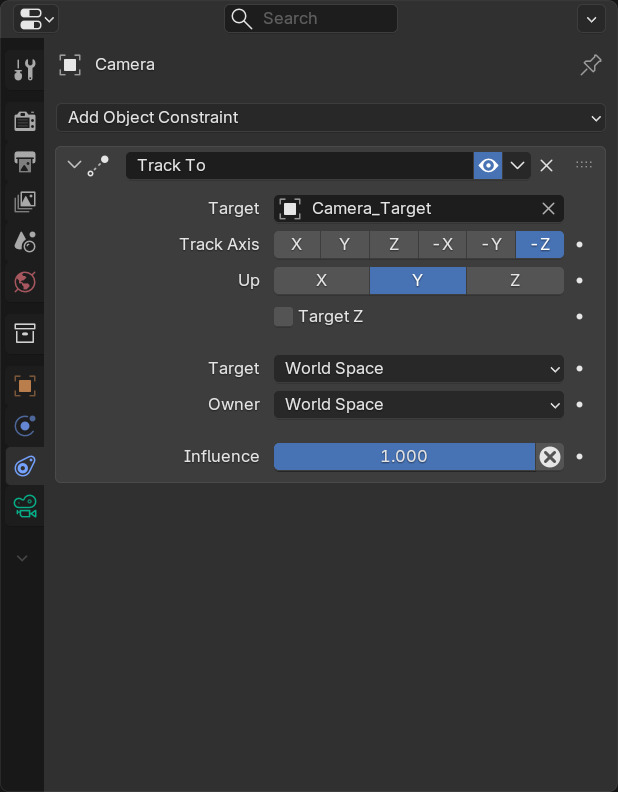
- Configure constraint:
- Target: Select your Empty (Camera_Target)
- To: -Z (camera's forward direction)
- Up: Y (camera's up direction)
- Camera now points at Empty automatically
- Test it:
- Move Empty around—camera follows with its aim
- Move camera around—always stays aimed at Empty
- No keyframing needed for rotation!
Common uses:
- Following animated character: Parent Empty to character, camera always looks at them
- Orbit shots: Animate camera position around subject, Track To keeps it aimed center
- Dolly with subject off-center: Camera can move diagonally while staying aimed at subject
- Product showcases: Camera orbits, always centered on product
Animating with Track To:
- Only keyframe camera Location (not rotation!)
- Constraint handles all rotation automatically
- Can animate target Empty position for dynamic tracking
- Creates perfect "camera operator following subject" feel
Damped Track Constraint (Smooth Tracking)
🎯 Natural, Damped Following
What it does:
- Similar to Track To but with smoother, more natural rotation
- Less "locked on" feeling
- Better for organic camera movement
- Preferred by many for character tracking
Track To vs Damped Track:
- Track To:
- Perfectly rigid aiming
- Camera exactly points at target always
- Can feel mechanical
- Good for: Product shots, precise tracking
- Damped Track:
- Softer, more organic tracking
- Slight lag/smoothness in rotation
- More natural feeling
- Good for: Character following, handheld style
How to set up Damped Track:
- Same setup as Track To (create Empty target)
- Select camera → Constraint Properties
- Add Constraint → Damped Track
- Target: Select Empty
- To: -Z (camera forward)
- Test: Move target, camera follows smoothly
When to use Damped Track:
- Following characters in action sequences
- Handheld-style camera movement
- When you want slightly imperfect tracking (more realistic)
- Combining with other constraints
Locked Track Constraint (Advanced)
🔒 Axis-Locked Tracking
What it does:
- Track target but lock specific axes
- Example: Track horizontally but not vertically
- Useful for constrained camera rigs
- Advanced technique, not needed for most work
Example use case:
- Camera on dolly track (can only move horizontally)
- Lock vertical rotation, allow horizontal rotation only
- Simulates real physical camera rig limitations
Parenting Camera to Empty (Orbit Rig)
🔄 The Orbit Camera Setup
What it does:
- Parent camera to Empty at scene center
- Rotate Empty → camera orbits around center point
- Perfect circles, no manual keyframing needed
- Professional technique for product shots
How to set up orbit rig:
- Position subject at origin (0,0,0):
- Your product/character at world center
- Or note its position for Empty placement
- Add Empty at subject location:
Shift+A→ Empty → Plain Axes- Position Empty exactly where subject is
- Name it "Orbit_Center"
- Position camera at desired distance:
- Move camera away from Empty (e.g., 10 units)
- This distance = orbit radius
- Parent camera to Empty:
- Select camera first
- Shift-select Empty second
- Press
Ctrl+P→ Object (Keep Transform) - Camera now child of Empty
- Add Track To constraint (optional but recommended):
- Select camera → Add Track To constraint
- Target: Empty
- Camera now always looks at orbit center
- Animate Empty rotation:
- Frame 1: Empty rotation Z = 0°, keyframe
- Frame 240: Empty rotation Z = 360°, keyframe
- Camera now orbits perfectly around subject
Why this is brilliant:
- Perfect circular orbit (no manual positioning)
- Easy to adjust: move camera closer/farther = change orbit radius
- Can animate Empty on multiple axes for complex orbits
- One parameter (Empty rotation) controls entire movement
- Professional product visualization technique
Variations:
- Spiral orbit: Animate Empty Z rotation + Z location (orbit while rising)
- Elliptical orbit: Parent camera at offset position
- Speed variations: Keyframe rotation with different easing
Copy Location Constraint (Follow Position)
📍 Matching Object Position
What it does:
- Camera copies position of target object
- Target moves → camera follows exactly
- Useful for first-person POV shots
- Can offset position for over-shoulder following
Setup:
- Select camera → Constraint Properties
- Add Constraint → Copy Location
- Target: Select object to follow (character, vehicle, etc.)
- Camera now matches target's position
Offset for following shots:
- Enable constraint but set Influence to 0.8-0.9
- Camera follows but lags slightly behind
- Or use Space: Local Space with offset
- Creates following camera that maintains distance
Combine with Track To:
- Copy Location: Follow character's position
- Track To: Aim at character (or separate target)
- Result: Camera follows character while looking at them
- Classic over-shoulder or chase camera setup
Practical Constraint Setups
🎬 Common Constraint Combinations
Setup 1: Product Turntable
- Empty at product center
- Camera parented to Empty, positioned at distance
- Track To constraint: Camera → Empty
- Animate: Empty Z rotation 0° to 360°
- Result: Perfect product orbit
Setup 2: Character Following (Over-Shoulder)
- Empty parented to character armature (head or chest bone)
- Camera with Copy Location constraint → Empty (offset behind/above)
- Damped Track constraint → Character
- Result: Camera follows behind character, looking at them
Setup 3: Dynamic Two-Subject Shot
- Empty_A at character A, Empty_B at character B
- Empty_Focus between them (average position)
- Camera with Track To → Empty_Focus
- Animate Empty_Focus position between A and B
- Result: Camera shifts attention between characters smoothly
Setup 4: Dolly Zoom (Vertigo Effect)
- Camera with Track To → Subject
- Keyframe: Camera location (dolly) + Focal length (zoom)
- Dolly in while zooming out (or reverse)
- Track To keeps subject framed during complex move
- Result: Disorienting Hitchcock effect
Constraint Tips and Tricks
💡 Mastering Constraints
Constraint influence:
- Every constraint has Influence slider (0.0 to 1.0)
- 1.0 = full constraint effect
- 0.5 = half effect (partial tracking, partial manual)
- Can animate Influence for constraint that fades in/out
- Useful: Start with manual control, transition to constraint
Multiple constraints:
- Camera can have multiple constraints simultaneously
- They apply in order (top to bottom in list)
- Reorder constraints by dragging
- Example: Follow Path + Track To (follow path while aiming at target)
Temporarily disabling constraints:
- Click eye icon to disable constraint without deleting
- Useful for manual camera positioning
- Re-enable when ready for automatic behavior
Constraints vs parenting:
- Parenting: Child inherits all parent transforms (position, rotation, scale)
- Constraints: More selective control (just position, just rotation, etc.)
- Often use both: Parent for position, constraint for rotation
⚠️ Common Constraint Mistakes
Mistake 1: Wrong axis configuration
- Track To constraint needs correct To and Up axes
- Default (-Z, Y) works for most cameras
- If camera aims wrong direction, adjust axes
Mistake 2: Keyframing constrained properties
- If Track To controls rotation, don't keyframe rotation
- Constraint overrides keyframes
- Either use constraint OR keyframes, not both
Mistake 3: Target object at origin when subject isn't
- Empty target must be at subject location
- If Empty at (0,0,0) but subject at (5,3,2), camera aims wrong
- Always position target where you want camera to look
Mistake 4: Forgetting to parent Empty to moving object
- If tracking animated character, Empty must follow character
- Parent Empty to character armature/bone
- Otherwise Empty stays static, camera doesn't track properly
💡 Constraints: Automation for the Win: Manually keyframing camera rotation to follow a walking character through a scene? That's dozens of keyframes, constant adjustment, endless tweaking. With a Track To constraint? Position one Empty, add one constraint, done. The camera automatically aims at the character no matter where they go. This is the difference between working hard and working smart. Constraints are how professionals create complex camera moves without going insane. A single Empty + Track To constraint can replace hundreds of rotation keyframes. Learn to think in constraints, not just keyframes. Your future self will thank you.
🛤️ Follow Path Animation
Want your camera to glide along a specific, complex path? Follow Path constraint is the answer. Draw a curve, attach the camera, and watch it smoothly travel along your custom trajectory. Perfect for architectural walkthroughs, flyovers, and any time you need precise camera choreography.
Understanding Follow Path
🎯 Path-Based Animation
What it does:
- Camera follows a curve path you draw in 3D space
- Path can be any shape: straight, curved, spiral, loop
- Precise control over camera trajectory
- Professional technique for complex camera moves
Why use Follow Path:
- Smooth complex paths: Curves smoother than keyframe positions
- Visualize path in viewport: See exact trajectory before animating
- Easy to edit: Adjust curve = adjust camera path
- Architectural walkthroughs: Walk through building following precise path
- Flyover shots: Landscape/cityscape flyovers
When to use Follow Path vs keyframes:
- Follow Path: Complex curves, architectural walkthroughs, predetermined precise paths
- Keyframes: Simple moves, organic motion, when path changes during animation
Creating a Follow Path Camera
🛠️ Step-by-Step Setup
Step 1: Create a path curve
Shift+A→ Curve → Path (or Bezier Curve)- Path appears as straight line with control points
- Enter Edit Mode (
Tab) to shape the path - Select control points, move/rotate to shape curve
- Add points:
Ctrl+Left Click - Delete points: Select, press
X→ Delete - Shape the curve to follow desired camera trajectory
Step 2: Position camera at path start
- Move camera to where you want animation to begin
- Usually at or near path's start point
- Don't worry about exact position—constraint will handle it
Step 3: Add Follow Path constraint
- Select camera
- Constraint Properties → Add Constraint → Follow Path
- Target: Select your curve path
- Forward Axis: -Z (camera's forward direction)
- Up Axis: Y (camera's up direction)
- Camera snaps to path start
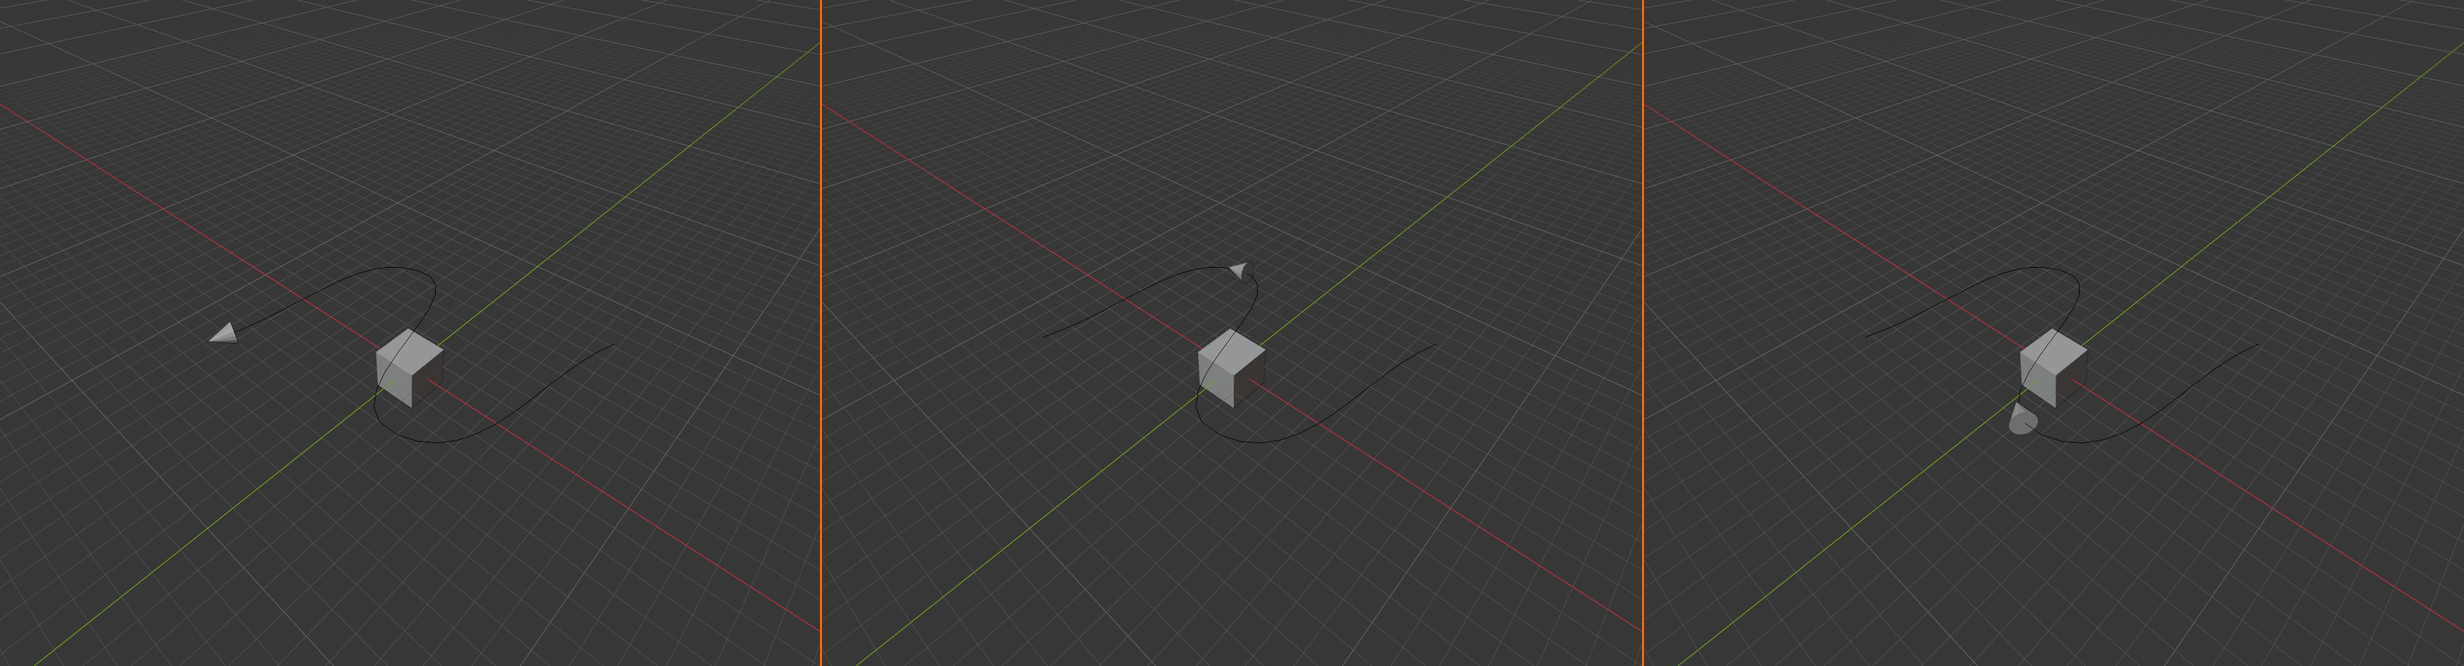
Step 4: Enable Follow Curve option
- In constraint, check "Follow Curve"
- Camera now rotates to align with curve direction
- Aims forward along path automatically
Step 5: Animate path progression
- Select the curve (not camera)
- Curve Properties → Path Animation section
- Check "Path Animation"
- Set Frames: Duration of animation (e.g., 240 frames)
- Curve now animates from 0% to 100% over specified frames
- Camera follows path automatically
Step 6: Test and refine
- Press
Spacebarto play animation - Camera travels along path
- Adjust curve shape in Edit Mode to refine path
- Adjust Frames value to change speed
Shaping the Path
✏️ Path Editing Techniques
In Edit Mode (Tab):
- Move points: Select point, press
G - Add points:
Ctrl+Left Clickon curve - Delete points: Select,
X→ Delete - Adjust handles: Select point, move handles to change curve shape
- Smooth curve: Select points,
Ctrl+T(tilt) or adjust handle types
Handle types (important!):
- Select point, press
V→ Set Handle Type - Automatic: Smooth automatic curves (easiest)
- Vector: Sharp corners
- Aligned: Manual smooth curves
- Free: Independent handle control
Common path shapes:
- Straight walkthrough: Linear path with few control points
- Curved flyover: Smooth S-curve with automatic handles
- Orbit path: Circle curve (Add → Curve → Circle)
- Spiral ascent: Helix shape (circle + vertical movement)
Path visualization:
- Curve Properties → Path Animation → Frames shows path duration
- Small dots appear on curve showing camera positions per frame
- Denser dots = slower movement, sparser = faster
Controlling Speed Along Path
⏱️ Speed Variations
Uniform speed (default):
- Camera travels path at constant speed
- Equal time spent on each segment
- Simple but potentially monotonous
Variable speed (advanced):
- Adjust path point density to control speed
- More points close together = camera slows down there
- Fewer points = camera speeds through
- Or use Graph Editor to adjust Evaluation Time curve
Speed adjustment methods:
- Method 1: Path point spacing
- Add extra points where you want camera to slow
- Remove points where you want speed
- Visual, intuitive approach
- Method 2: Evaluation Time keyframes
- Select curve → Object Data Properties
- Path Animation → Evaluation Time
- Keyframe Evaluation Time for custom speed
- 0 = path start, 100 = path end
- Keyframe with custom timing for variable speed
Speed ramping on path:
- Keyframe Evaluation Time at frames 1, 60, 120, 180
- Values: 0, 20, 80, 100
- Result: Slow start, fast middle, slow end
- Adjust keyframe spacing for desired rhythm
Combining Follow Path with Track To
🎯 Path Movement + Target Aiming
Why combine them:
- Follow Path controls camera position (where it moves)
- Track To controls camera rotation (where it looks)
- Result: Camera follows path but always looks at specific target
- Perfect for: Following character along path, architectural reveals
Setup:
- Create path, set up Follow Path constraint (as above)
- Add Empty at subject location
- Add Track To constraint to camera
- Target: Empty
- Camera now follows path while aiming at Empty
- Can animate Empty position for dynamic aiming
Important: Constraint order matters!
- Follow Path should be ABOVE Track To in constraint list
- This allows Track To to override path's rotation
- Drag constraints to reorder if needed
Practical example:
- Architectural walkthrough path through building
- Empty at point of interest (sculpture, view, focal point)
- Camera follows walkthrough path
- But always looks at focal point as it passes
- Natural "guided tour" feeling
Common Follow Path Use Cases
🎬 Professional Applications
Architectural walkthrough:
- Path follows hallway, through rooms
- Human walking speed (~1.5 units/second)
- Optional Track To for looking at features
- Smooth, steady motion (no handheld shake)
Landscape/cityscape flyover:
- Curved path over terrain or buildings
- Moderate speed (faster than walking, slower than plane)
- Often starts high, descends to specific location
- Combine with crane-up feeling
Product reveal (circular):
- Use Circle curve for perfect orbit
- Track To constraint at product center
- 360° showcase
- Adjust circle radius for camera distance
Roller coaster POV:
- Complex twisted path
- Fast speed (short frame duration)
- Follow Curve enabled for banking turns
- No Track To (camera faces forward along path)
Drone shot simulation:
- Smooth curved path with elevation changes
- Medium speed
- Track To for occasional focus on ground subjects
- Can add slight motion blur in post
✅ Follow Path Best Practices
- ✓ Plan path before creating: Sketch on paper or visualize route
- ✓ Start simple: Basic path first, refine complexity later
- ✓ Use automatic handles: Smoother curves, less fiddling
- ✓ Test early: Play animation after basic path, adjust before detailing
- ✓ Name curves clearly: "Camera_Path_Main" for organization
- ✓ Consider height: Don't forget Z-axis when shaping path
- ✓ Speed match context: Walking = slow, flying = fast
- ✓ Combine with Track To: Path + aiming = pro results
💡 Follow Path: Drawing in Time and Space: A Follow Path camera move is like drawing a line through your scene and saying "camera, travel along this line." The curve you draw IS the camera movement—visual, tactile, easy to understand. No math, no coordinates, just shape and form. This is how professionals do architectural flyovers, landscape reveals, and complex tracking shots. The curve editor becomes your choreography tool. Adjust a handle, the whole camera move shifts. Add a loop, camera loops. It's 3D animation at its most intuitive. And when you combine it with Track To? Pure magic—the camera follows your drawn path while looking wherever you tell it. That's the kind of control that separates professional work from amateur.
🎥 Handheld Camera Effects
Smooth, perfect camera moves are beautiful—but sometimes you want realism. Handheld camera shake adds energy, immediacy, and documentary feel. It's the difference between a polished commercial and raw, visceral footage.
Understanding Handheld Camera
📹 The Shake Aesthetic
What is handheld camera:
- Camera with subtle (or not-so-subtle) shake and movement
- Simulates human camera operator holding camera
- Organic, imperfect motion
- Opposite of locked-down, tripod-perfect shots
When to use handheld:
- Documentary style: Realism, immediacy, authenticity
- Action sequences: Chaos, urgency, being "in the moment"
- Found footage: Horror, thriller (Blair Witch style)
- POV shots: Character's perspective, first-person
- Intimate moments: Close, personal feeling
When NOT to use handheld:
- Product visualization (too unprofessional)
- Architectural showcases (need stability)
- Beauty/glamour shots (need perfection)
- Establishing/landscape shots (usually stable)
- When you want polish and control
The spectrum of shake:
- Subtle stabilized: Slight imperfection, barely noticeable (professional handheld)
- Moderate handheld: Visible shake, documentary style
- Heavy shake: Action, chaos, panic (Bourne style)
- Extreme shake: Found footage horror, nausea-inducing
Creating Handheld Camera in Blender
🛠️ Multiple Methods
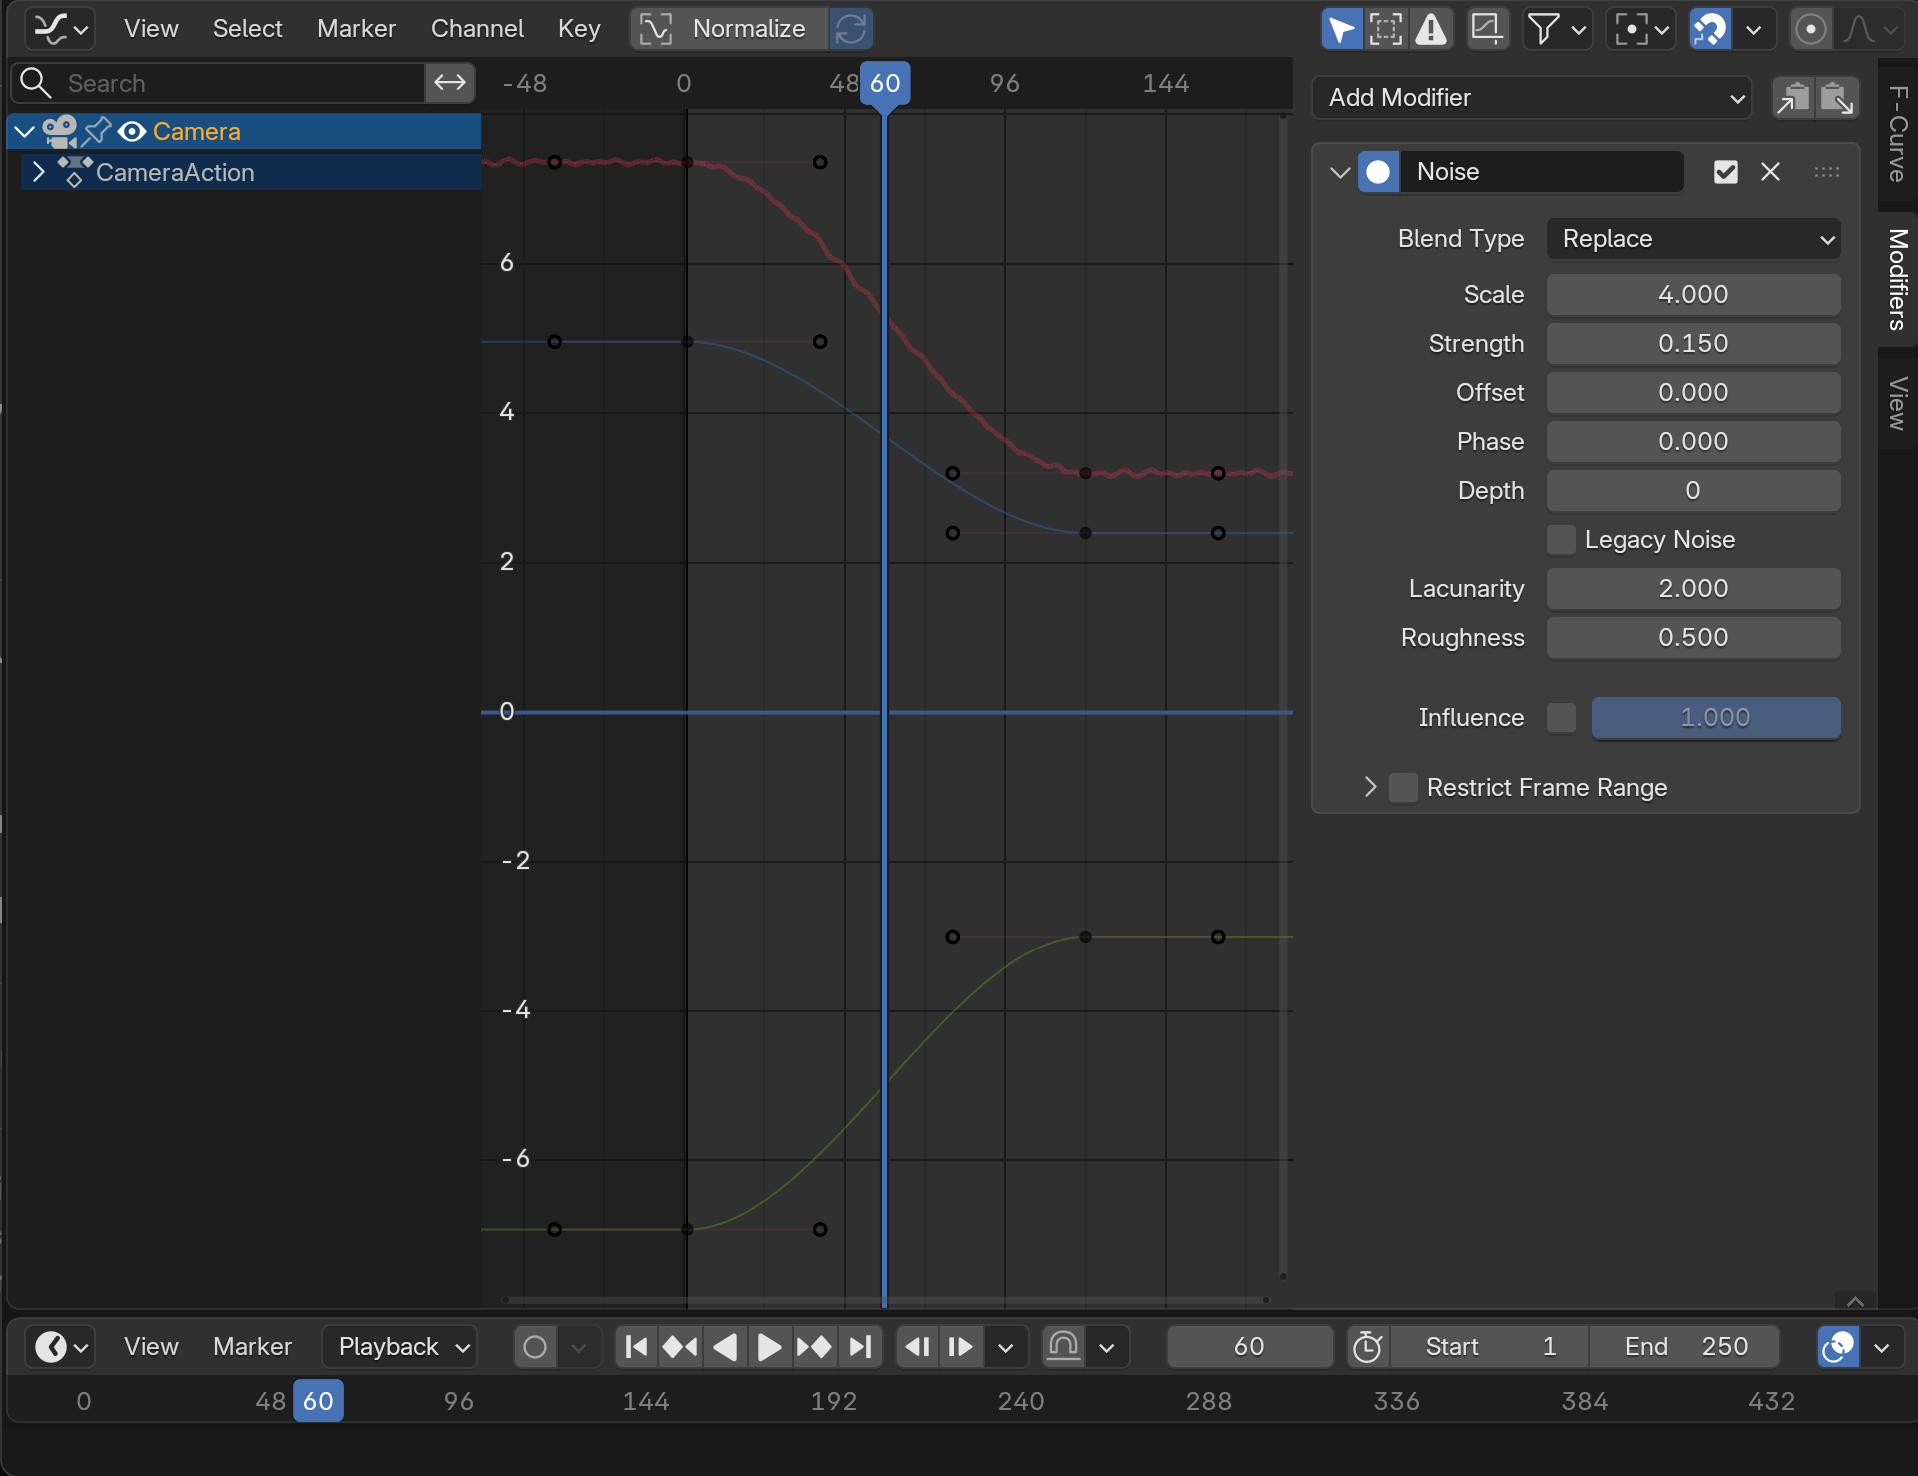
Method 1: Noise Modifier (Easiest)
- Select camera
- Open Graph Editor
- Select Location and Rotation channels
- Modifiers menu → Add Modifier → Noise
- Adjust parameters:
- Scale: How often shake occurs (frequency)
- Strength: How intense the shake is (amplitude)
- Phase: Randomize the pattern
- Preview: Instant handheld shake!
Noise modifier settings for different styles:
- Subtle professional handheld:
- Scale: 2-3
- Strength: 0.05-0.1 (location), 0.5-1.0 (rotation)
- Barely perceptible but adds realism
- Documentary handheld:
- Scale: 3-5
- Strength: 0.1-0.2 (location), 1.0-2.0 (rotation)
- Visible but not distracting
- Action/chaos handheld:
- Scale: 5-10
- Strength: 0.3-0.5 (location), 3.0-5.0 (rotation)
- Intense, energetic
- Found footage horror:
- Scale: 8-15
- Strength: 0.5-1.0 (location), 5.0-10.0 (rotation)
- Extreme, disorienting
Pro tip: Different noise for location vs rotation
- Add separate Noise modifiers for location and rotation
- Different Scale/Strength values
- More realistic (position shake ≠ rotation shake)
Method 2: Manual Keyframing (Advanced Control)
🎨 Hand-Crafted Shake
When to use manual keyframing:
- You want specific shake pattern (not random)
- Shake needs to match action (character running, explosion impact)
- Combining smooth camera move with shake
- More work but more control
Process:
- Create main camera movement (dolly, pan, etc.)
- Add keyframes every 3-5 frames for shake
- Each keyframe: slightly offset position/rotation
- Random small offsets create shake effect
- Varies from main movement path
Tips for manual shake:
- Don't make shake too regular (not mechanical)
- Vary the amplitude (some shakes bigger than others)
- Rotation shake more visible than position shake
- Use Graph Editor to ensure keyframes don't create smooth curves (keep it jittery)
Workflow efficiency:
- Create shake on one axis first (e.g., X rotation)
- Copy keyframes to other axes, offset timing
- Creates organic multi-axis shake quickly
Method 3: Empty with Noise + Parent Camera
🎯 Flexible Shake Setup
Why use Empty method:
- Shake separated from camera animation
- Easy to enable/disable (hide Empty)
- Can reuse same shake Empty for multiple cameras
- Can animate shake intensity by animating Empty influence
Setup:
- Create Empty at camera location:
Shift+A→ Empty → Plain Axes- Position at same location as camera
- Name it "Camera_Shake"
- Parent camera to Empty:
- Select camera, Shift-select Empty
Ctrl+P→ Object (Keep Transform)- Camera now child of Empty
- Animate camera normally:
- Keyframe camera as usual for main movement
- Dolly, pan, whatever you need
- Add Noise modifier to Empty:
- Select Empty → Graph Editor
- Add Noise modifier to Empty's location/rotation
- Configure shake parameters
- Result:
- Camera follows main animation (keyframes)
- Plus adds shake from Empty (noise)
- Best of both worlds: planned move + organic shake
Advantages of Empty method:
- Clean separation: main animation vs shake
- Easy to toggle: hide Empty = no shake
- Adjustable: change Empty noise = change shake without touching camera keyframes
- Reusable: multiple cameras can parent to same shake Empty
Realistic Handheld Characteristics
🎬 Authentic Shake Patterns
Real handheld traits to simulate:
- More rotation than position shake:
- Human operators struggle more with keeping camera aimed steady
- Position stays relatively stable, orientation wobbles
- Rotation shake should be 5-10x stronger than position shake
- Low-frequency sway:
- Slow, gradual drift (human shifting weight)
- Add low-frequency noise (scale 1-2) with medium strength
- Overlaid with higher-frequency micro-shakes
- Impact response:
- Sudden movements cause brief instability
- After camera whip-pan, add moment of shakier movement
- Operator "catching balance"
- Walking rhythm:
- If camera following walking character, add rhythmic bob
- Up-down motion synced to footsteps
- ~2 steps per second (scale 4-5 for walking shake)
Combine multiple noise frequencies:
- Layer 2-3 Noise modifiers with different scales
- Low frequency (1-2): Drift, sway
- Medium frequency (4-6): Main shake
- High frequency (10-15): Micro-jitter
- Result: Complex, realistic handheld feel
Stabilized vs Unstabilized Handheld
📹 Different Handheld Styles
Unstabilized handheld (raw):
- Full shake, no smoothing
- Documentary, found footage, raw reality
- High energy but can be tiring to watch
- Use sparingly—viewer fatigue
Stabilized handheld (professional):
- Subtle shake, smoothed motion
- Feels handheld but comfortable to watch
- Like using steadicam or gimbal
- Professional standard for drama/narrative
Simulating stabilized handheld in Blender:
- Use lower noise strength (0.05-0.15 for location)
- Lower frequency (scale 2-4)
- Smooth modifier after Noise in Graph Editor
- Or use Smooth constraint (advanced)
Context determines style:
- Narrative drama: Stabilized handheld
- Action sequences: Moderate unstabilized
- Horror/thriller: Heavy unstabilized
- Documentary: Light to moderate

Combining Handheld with Planned Moves
🎬 Hybrid Animation
Best of both worlds:
- Planned camera move (dolly, pan, tracking)
- Plus handheld shake for realism
- Controlled yet organic
- Professional cinematography standard
Workflow:
- Create main camera animation (keyframes or Follow Path)
- Test and refine until move is perfect
- Add shake last:
- Method A: Noise modifier to camera
- Method B: Parent to shake Empty
- Fine-tune shake intensity to match scene energy
Example scenarios:
- Dolly-in on character + subtle shake: Intimate but real
- Follow Path walkthrough + walking bob: Realistic POV
- Orbit product + micro-shake: Professional with human touch
- Action tracking shot + heavy shake: Chaotic energy
Motion Blur with Handheld
🌫️ Enhancing Realism
Why motion blur matters:
- Real cameras have motion blur (shutter can't freeze instant)
- Handheld shake without motion blur looks fake, strobing
- Motion blur smooths shake, makes it comfortable
- Essential for believable handheld
Enabling motion blur:
- Render Properties → Motion Blur (enable)
- Shutter: 0.5 (standard, 180° shutter angle equivalent)
- Works in both Cycles and Eevee
- Increases render time but worth it for handheld
Shutter values for different effects:
- 0.25: Minimal blur, crisp (90° shutter)
- 0.5: Standard film look (180° shutter) — use this default
- 0.75: More blur, dreamy (270° shutter)
- 1.0: Maximum blur (360° shutter, full frame exposure)
Handheld + motion blur = realism:
- Heavy shake needs higher motion blur to feel natural
- Subtle shake can use less blur
- Test render a few frames to verify blur amount
⚠️ Handheld Pitfalls
Don't overdo it:
- Too much shake = unwatchable, nauseating
- Viewer fatigue sets in quickly
- When in doubt, use less shake than you think
- You can always add more, hard to remove
Match shake to mood:
- Calm scene with heavy shake = confusing tone
- Action scene with no shake = feels flat, staged
- Shake intensity should match scene energy
Don't shake everything:
- Contrast is important
- If every shot is handheld, none feel special
- Mix stable shots with handheld for variety
- Use handheld strategically, not as default
Test on different viewers:
- Some people more sensitive to shake/motion
- What looks "energetic" to you might be nauseating to others
- Get feedback before finalizing
✅ Handheld Best Practices
- ✓ Start subtle: Easier to add shake than remove it
- ✓ Rotation > Position: Shake rotation 5-10x more than position
- ✓ Use Noise modifier: Easiest method for most cases
- ✓ Enable motion blur: Essential for realistic handheld
- ✓ Layer frequencies: Combine low/medium/high for complexity
- ✓ Match scene energy: Calm = less shake, action = more shake
- ✓ Test before committing: Preview shake, adjust before rendering
- ✓ Use strategically: Not every shot needs to be handheld
💡 Handheld: The Human Touch: Perfect camera moves are beautiful, but they're also obviously CG. A subtle handheld shake says "a human was here, operating this camera, experiencing this moment." It's the difference between watching a scene and feeling like you're in the scene. Documentary filmmakers understood this decades ago—perfect stability feels distant and observational, while handheld feels immediate and participatory. In 3D, we have the luxury of perfect control, which means we have to deliberately add imperfection back in. The trick is finding the sweet spot: enough shake to feel real, not so much that it distracts or nauseates. When you nail it, viewers won't consciously notice the shake—they'll just feel more connected to what they're watching.
🎯 Camera Movement + Focus Pulling
When you combine dynamic camera movement with rack focus (changing focus distance during animation), you create some of the most sophisticated cinematography possible. This is the stuff of feature films and high-end commercials.
Why Combine Movement and Focus
🎬 Layered Storytelling
Movement alone:
- Reveals space, guides attention through position
- Dynamic but still somewhat limited
Focus alone:
- Directs attention through sharpness/blur
- Powerful but static
Movement + Focus combined:
- Double-layer attention control
- Camera moves AND attention shifts
- Most sophisticated visual storytelling
- Professional cinema standard
What it communicates:
- Progression: "We're moving forward AND shifting focus"
- Discovery: "As we approach, we notice something else"
- Transition: "Leaving this subject, finding new one"
- Complexity: Multiple layers of information revealing
Common Movement + Focus Patterns
📖 Classic Combinations
Dolly-in with focus shift (foreground to background):
- Start: Focus on foreground object, camera distant
- Move: Camera dollies forward
- Focus: Shifts from foreground to background subject
- Effect: "Moving past foreground, discovering background"
- Use: Revealing antagonist behind protagonist, discovering clue
Dolly-out with focus shift (subject to context):
- Start: Close on subject, sharp focus
- Move: Camera pulls back
- Focus: Shifts to include background/context
- Effect: "Revealing where subject is, showing bigger picture"
- Use: Character isolation reveal, environmental context
Orbit with focus tracking:
- Move: Camera orbits around scene
- Focus: Continuously tracks moving subject
- Effect: Subject stays sharp while background rotates
- Use: Product showcase, hero moment, 360° reveal
Tracking shot with rack focus:
- Move: Camera tracks laterally with character
- Focus: Shifts from character to what they're looking at
- Effect: "Following character, then showing their POV"
- Use: Character realization, showing cause of reaction
Crane with descending focus:
- Move: Camera cranes down from high to low
- Focus: Starts on distant background, ends on foreground
- Effect: "From god's-eye overview to intimate closeup"
- Use: Opening shots, establishing to specific
Technical Setup: Movement + Focus
🔧 Coordinating Both Animations
Method 1: Focus Object with animation
- Set up camera movement:
- Animate camera position/rotation as usual
- Dolly, track, orbit, whatever you need
- Frame 1 to 120 or your duration
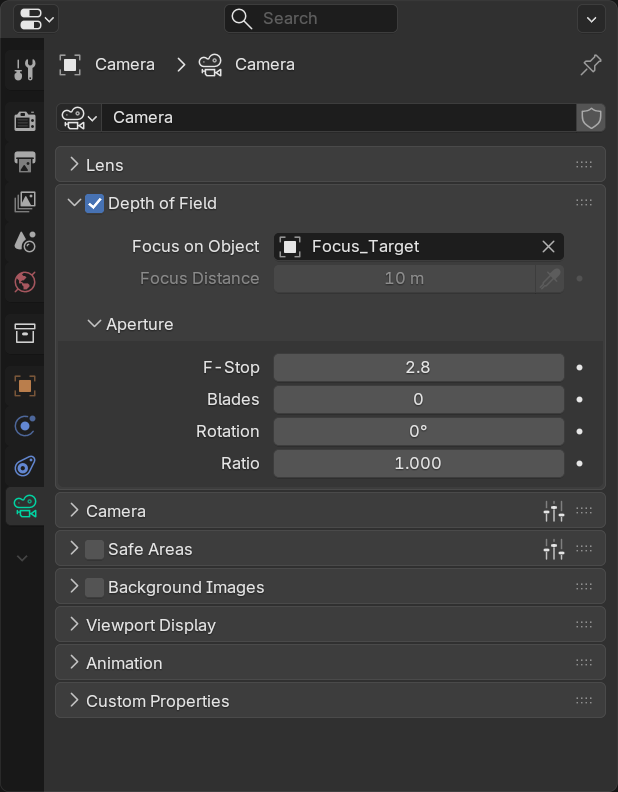
- Create focus Empty:
- Add Empty at first focus subject
- Camera → Depth of Field → Focus Object: Empty
- Animate Empty position:
- Frame 1: Empty at first subject, keyframe
- Frame 60-90: Animate Empty moving to second subject
- Frame 120: Empty at second subject, keyframe
- Focus smoothly transitions as camera moves
Method 2: Direct focus distance keyframes
- Animate camera movement first
- Then keyframe Focus Distance property directly
- Frame 1: Distance to subject A
- Frame 120: Distance to subject B
- Less intuitive but works if subjects don't move
Method 3: Multiple focus Empties with constraint
- Create Empty_FocusA at subject A
- Create Empty_FocusB at subject B
- Create Empty_ActiveFocus (master)
- Add Copy Location constraint to Empty_ActiveFocus
- Target: Empty_FocusA, Influence: 1.0 at frame 1
- Animate Influence: 1.0 → 0.0 (fading out A)
- Add second Copy Location constraint
- Target: Empty_FocusB, Influence: 0.0 at frame 1
- Animate Influence: 0.0 → 1.0 (fading in B)
- Camera Focus Object: Empty_ActiveFocus
- Complex but reusable, professional setup
Timing: Coordinating Movement and Focus
⏱️ Synchronization Strategies
Simultaneous (move and focus together):
- Camera movement and focus shift happen at same time
- Both start frame 1, both end frame 120
- Unified, flowing feel
- Most common approach
Sequential (move then focus, or focus then move):
- Frame 1-60: Camera moves, focus stays on A
- Frame 60-120: Camera stops, focus shifts to B
- Or reverse: Focus first, move second
- Distinct beats, clearer progression
Overlapping (offset timing):
- Frame 1-90: Camera moves
- Frame 30-120: Focus shifts (starts during move, continues after)
- Organic, complex feel
- Requires careful coordination
Speed matching:
- Fast camera move = fast focus shift
- Slow dolly = slow rack focus
- Match energy levels
- Contrasting speeds can work for emphasis (slow move, sudden focus snap)
Aperture Considerations
📐 DoF Depth for Moving Cameras
Shallow DoF (f/1.4-2.8) with movement:
- Focus shifts very noticeable
- Background completely blurred
- Dramatic, cinematic
- But: Small DoF margin—if movement too fast, subject goes out of focus
Moderate DoF (f/4-5.6) with movement:
- Focus shifts visible but not extreme
- More forgiving—subject stays reasonably sharp
- Professional standard for moving cameras
- Recommended for beginners
Deep DoF (f/8-16) with movement:
- Minimal focus shift visible
- Everything stays relatively sharp
- Less cinematic but practical
- Use when movement or subject unpredictable
Dynamic aperture (animating f-stop):
- Advanced: Change aperture during shot
- Start deep (f/11), close to shallow (f/2) as you dolly in
- Increases dramatic impact
- Keyframe F-Stop property in camera settings
- Rare but powerful effect
Practical Example: Complete Setup
🎬 Step-by-Step: Dolly + Rack Focus
Scenario: Character looking at photograph, camera reveals photo
Setup (2 minutes):
- Character (or stand-in cube) at position A
- Photograph object at position B, 5 units behind character
- Camera 10 units from character, aimed at character
Animation (5 minutes):
- Camera movement:
- Frame 1: Camera at starting position, keyframe Location
- Frame 120: Camera dollied past character toward photo, keyframe Location
- Add Track To constraint → Empty at photo (camera aims toward destination)
- Focus animation:
- Create Empty_Focus at character face (frame 1)
- Camera → DoF → Focus Object: Empty_Focus
- Frame 1: Keyframe Empty_Focus location (at character)
- Frame 60: Move Empty_Focus to photo, keyframe
- Focus shifts during dolly
- Depth of field:
- Set aperture f/2.8 (moderate shallow)
- Frame 1: Character sharp, photo blurred
- Frame 120: Photo sharp, character blurred
- Timing refinement:
- Open Graph Editor
- Set Bezier/Sine interpolation for smooth motion
- Adjust Empty_Focus easing for natural rack focus
Result:
- Camera smoothly moves from character to photo
- Focus elegantly shifts from face to photograph
- Tells story: "This is what they're looking at"
- Professional cinema-quality shot
✅ Movement + Focus Best Practices
- ✓ Plan both together: Don't add focus as afterthought
- ✓ Use Focus Object method: Easier to visualize and adjust
- ✓ Moderate aperture first: f/4-5.6 more forgiving while learning
- ✓ Match timing: Coordinate movement and focus durations
- ✓ Test early: Preview animation at low samples before final render
- ✓ Add motion blur: Smooths both movement and focus transitions
- ✓ Layer complexity gradually: Start simple, add sophistication
💡 Movement + Focus: Cinema at Its Peak: When you watch a Spielberg film or a high-end commercial, pay attention to how often camera movement and focus shifts happen simultaneously. It's everywhere—and when it's done well, you don't consciously notice it. You just feel guided, your attention effortlessly directed exactly where the filmmaker wants it. The camera moves you through space while focus moves you through the visual hierarchy. It's 3D navigation and 2D attention control working in perfect harmony. This is advanced cinematography, the kind of technique that takes years for camera operators and focus pullers to master. In Blender? You can do it with keyframes and Empties. That's the power you now have.
🎯 Project: Cinematic Camera Sequence
Time to put everything together! You'll create a multi-shot camera sequence that demonstrates your mastery of camera animation. This project will showcase dolly moves, tracking, orbits, constraints, and focus pulling—everything a professional cinematographer needs.
Project Overview
🎬 Your Mission
Create a 20-30 second camera sequence with 4-5 distinct shots, each demonstrating different camera animation techniques:
- Establishing Shot: Slow dolly or crane revealing scene
- Orbit Shot: Circle around hero subject using constraint rig
- Tracking Shot: Follow moving subject with Track To constraint
- Rack Focus Shot: Dolly + focus shift revealing information
- Finale Shot: Complex move combining multiple techniques
Each shot should flow naturally into the next, telling a visual story through camera movement alone.
Scene Setup
🎨 Building Your Stage
Keep it simple:
- You don't need complex models—focus on camera work
- Simple primitives with good materials are sufficient
- 3-5 objects at different distances is plenty
- Good lighting matters more than complex geometry
Suggested minimal scene:
- Hero subject: Suzanne (monkey head) or simple character stand-in
- Add Subdivision Surface for smooth look
- Position at origin or slightly off-center
- Secondary object: Cube, sphere, or product stand-in
- Position 5-8 units from hero subject
- Different material/color for visual interest
- Background elements: 3-5 simple objects
- Scattered at varying distances (10-20 units back)
- Provide depth and parallax
- Ground plane: Simple plane with material
- Scaled large (20x20 units or more)
- Receives shadows, grounds the scene
- Background lights: 10-15 small point lights or emissive spheres
- Creates bokeh in shallow DoF shots
- Adds visual interest
Lighting setup:
- Three-point lighting on hero subject (from Lesson 16)
- Key light: Strong directional light
- Fill light: Softer, opposite side
- Rim/back light: Separates subject from background
- Optional: HDRI world lighting for reflections
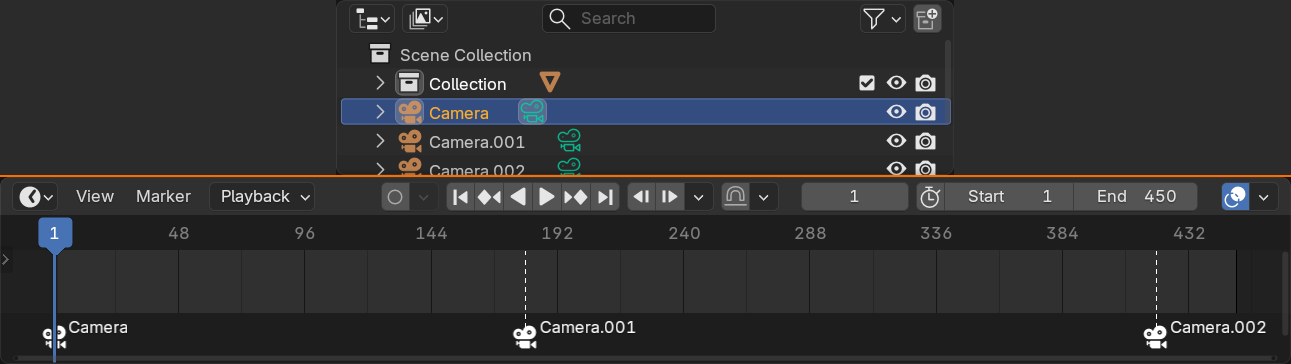
Shot 1: Establishing Dolly
🎬 Opening Shot
Goal: Slow, dramatic dolly-in establishing the scene and hero subject
Camera setup:
- Start position: 20-25 units from hero subject, elevated slightly
- End position: 8-10 units from subject (medium shot)
- Duration: 180 frames (6 seconds at 30fps)
- Focal length: 50mm
Animation:
- Frame 1: Camera at start position, keyframe Location & Rotation
- Frame 180: Camera at end position (closer), keyframe
- Add Track To constraint → Empty at hero subject (keeps subject centered)
- Graph Editor: Apply Sine or ease in/out interpolation
Depth of field:
- F-Stop: f/5.6 (moderate DoF)
- Focus Object: Empty at hero subject
- Subject sharp, background softly blurred
What it communicates:
- "Here's our scene, here's our hero"
- Draws viewer in, creates anticipation
- Classic establishing shot
Shot 2: Orbit Showcase
🔄 360° Reveal
Goal: Orbit around hero subject showing all angles
Setup using Empty parent method:
- Add Empty at hero subject location
- Position camera 6-8 units from Empty (orbit radius)
- Parent camera to Empty (Ctrl+P → Object Keep Transform)
- Add Track To constraint: Camera → Empty (aims at center)
Animation:
- Frame 180 (start of shot 2): Empty Z rotation 0°, keyframe
- Frame 420 (end): Empty Z rotation 360°, keyframe
- Duration: 240 frames (8 seconds) for full orbit
- Camera automatically orbits perfectly
Depth of field:
- F-Stop: f/2.8 (shallow DoF)
- Background bokeh visible throughout orbit
- Subject always sharp (Track To keeps it centered)
Optional enhancement:
- Slowly crane camera up during orbit (animate Empty Z location)
- Creates spiral orbit effect
- More dynamic than flat circle
Shot 3: Tracking Shot
🎯 Following Action
Goal: Camera tracks with animated object, maintaining framing
Setup:
- Animate hero subject moving (simple left-to-right or forward motion)
- Or animate a secondary object (cube rolling, sphere bouncing)
- Duration: 150 frames (5 seconds)
Camera animation method 1: Manual keyframing
- Position camera slightly to side of subject at frame 420
- Keyframe camera location
- Frame 570: Move camera to match subject's end position
- Keyframe location
- Add Track To constraint → subject (camera follows AND aims)
Camera animation method 2: Copy Location constraint
- Create Empty, parent to moving subject
- Position Empty offset from subject (side, behind, etc.)
- Camera with Copy Location constraint → Empty
- Camera automatically follows subject position
- Add Damped Track → subject for smooth aiming
Depth of field:
- F-Stop: f/4 (moderate)
- Focus Object: Moving subject (or Empty parented to it)
- Subject stays sharp despite movement
Optional: Add subtle handheld shake
- Noise modifier to camera or parent Empty
- Scale: 3-4, Strength: 0.1 (location), 1.0 (rotation)
- Adds energy to tracking shot
Shot 4: Rack Focus Reveal
🎭 Focus Shift Drama
Goal: Dolly past hero subject while shifting focus to secondary object
Setup:
- Hero subject at position A (foreground)
- Secondary object at position B (background, 6-10 units behind)
- Camera starts 8 units from A, will dolly to 4 units from B
Camera movement animation:
- Frame 570: Camera at start position, keyframe Location
- Frame 690: Camera past hero, closer to secondary object, keyframe
- Duration: 120 frames (4 seconds)
- Add Track To → Empty at secondary object (aims at destination)
Focus animation:
- Create Empty_Focus at hero subject (frame 570)
- Camera → Depth of Field → Focus Object: Empty_Focus
- Frame 570: Keyframe Empty_Focus location (at hero)
- Frame 630: Move Empty_Focus to secondary object, keyframe
- Focus smoothly shifts during dolly
- Graph Editor: Sine interpolation for smooth rack
Depth of field:
- F-Stop: f/2 (very shallow DoF)
- Frame 570: Hero sharp, secondary blurred
- Frame 690: Secondary sharp, hero blurred
- Dramatic focus transition visible
What it communicates:
- "We're leaving this subject, discovering that one"
- Attention shift + spatial progression
- Sophisticated cinematography
Shot 5: Finale Complex Move
🎆 Showpiece Shot
Goal: Combine multiple techniques for impressive finale
Suggested complex move options:
Option A: Spiral crane with focus pull
- Camera spirals up around scene (orbit + crane up)
- Focus shifts from ground subjects to sky/horizon
- Ends with wide establishing view
- Duration: 180 frames (6 seconds)
Option B: Follow Path with dynamic focus
- Create S-curve path weaving through scene
- Camera follows path (Follow Path constraint)
- Focus shifts between subjects as camera passes them
- Multiple focus keyframes (3-4 subjects)
- Duration: 240 frames (8 seconds)
Option C: Speed ramp reveal
- Start: Slow dolly approach to hero
- Middle: Suddenly speed up (fast dolly past hero)
- End: Slow down at final reveal object
- Graph Editor: Adjust keyframe spacing for speed variation
- Focus shifts match speed changes
Setup (using Option A as example):
- Empty at scene center
- Camera parented to Empty, 12 units away
- Frame 690: Empty at ground level, rotation 0°, keyframe
- Frame 870: Empty 15 units up (Z location), rotation 360°, keyframe
- Camera spirals up while orbiting
- Focus Empty: Frame 690 at hero, frame 870 at horizon/background
- F-Stop: f/4, gradually increase to f/8 (animate F-Stop property)
- Result: Dramatic rising finale shot
Transitions and Flow
🎬 Connecting the Shots
Making sequence feel cohesive:
- Shot duration consistency:
- Vary lengths but keep similar rhythm
- 4-8 seconds per shot typical
- Finale can be longer for impact
- Camera speed consistency:
- If Shot 1 is slow dolly, keep other moves moderate
- Avoid jarring speed changes between shots
- Unless intentional (speed ramp for effect)
- Visual continuity:
- End position of Shot 1 should relate to start of Shot 2
- Maintain spatial logic (don't teleport camera)
- Or use intentional jump cuts if appropriate
- Focus continuity:
- If Shot 1 ends focused on hero, Shot 2 can start there
- Smooth attention flow between cuts
Optional: Camera cuts vs blending
- Hard cuts: Jump from one camera to next (traditional)
- Marker-based timeline: Add markers for each shot start
- Camera switching: Create multiple cameras, switch active camera per shot
- Render as single continuous animation or separate shots
Rendering Your Sequence
🎨 Final Output
Render settings:
- Resolution: 1920x1080 (Full HD)
- Frame rate: 30 fps (or 24 fps for film look)
- Samples (Cycles): 256-512 for clean DoF and motion blur
- Motion Blur: Enable, Shutter 0.5
- Denoising: Enable for faster renders
Output format:
- For editing/review: MP4 or Image Sequence (PNG/JPEG)
- Frame range: 1 to 870 (or your total)
- Output Properties → Output → File Format
- MP4 with H.264 codec for easy sharing
Rendering tips:
- Test render first 30 frames at low samples (128) to verify animation
- Check for any jumps, glitches, or mistakes
- Then render full sequence at final quality
- Use Eevee for faster preview renders, Cycles for final
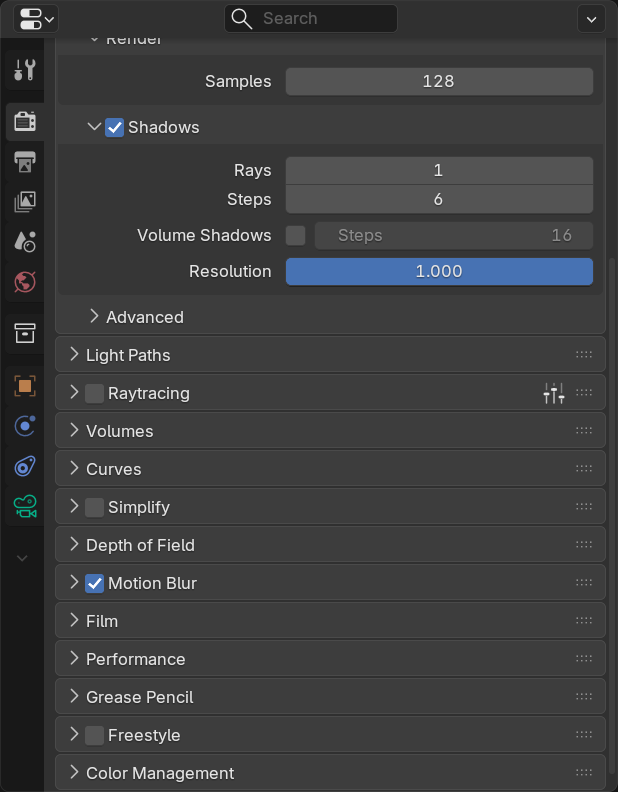
Success Checklist
✅ Project Completion Criteria
Technical requirements:
- ✓ 4-5 distinct camera shots, total 20-30 seconds
- ✓ At least one constrained move (Track To or Follow Path)
- ✓ At least one rack focus shot
- ✓ At least one orbit or circular movement
- ✓ Smooth easing on all camera movements
- ✓ Appropriate DoF settings (shallow where needed, deep where needed)
- ✓ Motion blur enabled
Quality verification:
- ✓ No sudden jumps or glitches in camera motion
- ✓ Focus stays on intended subjects (no out-of-focus mistakes)
- ✓ Adequate lighting (subjects visible and well-lit)
- ✓ Smooth transitions between techniques
- ✓ Bokeh visible in shallow DoF shots
- ✓ Camera speeds feel natural (not too fast or too slow)
Artistic success:
- ✓ Each shot has clear purpose (reveals, follows, emphasizes)
- ✓ Sequence tells visual story through movement alone
- ✓ Professional, cinematic feel
- ✓ You're proud to show it in your portfolio
Bonus Challenges
🌟 Go Further (Optional)
Challenge 1: Add character animation
- Rig simple armature to Suzanne or character
- Animate character movement (walk, reach, turn)
- Camera follows character animation
- Combines character animation + camera skills
Challenge 2: Handheld style variation
- One shot smooth/stable, next shot handheld
- Shows contrast between styles
- Add Noise modifier to one camera only
Challenge 3: Multi-camera editing
- Create 5 separate cameras, one per shot
- Use markers and camera binding to switch between them
- Or render each separately and edit together
- Professional multi-cam workflow
Challenge 4: Add music and sync
- Import audio track (Video Sequencer or external editor)
- Time camera moves to music beats
- Speed changes match tempo changes
- Creates music video feel
Challenge 5: Dolly zoom (Vertigo effect)
- Dolly camera forward while zooming out (or reverse)
- Keyframe both Location AND Focal Length
- Subject stays same size, background warps dramatically
- Advanced, iconic effect
💡 Your Cinematography Showreel: This project isn't just an exercise—it's the foundation of your camera animation portfolio piece. Every shot you create here demonstrates specific technical competence: "I can execute dolly moves with proper easing. I can set up constraint-based orbits. I understand rack focus timing. I combine multiple techniques seamlessly." When potential clients or employers see this, they're not just seeing pretty motion—they're seeing proof of skill. Take your time, make each shot intentional, refine until it feels professional. This sequence will open doors. Many students skip camera animation fundamentals and go straight to modeling or shading. By mastering camera work, you've learned something most 3D artists neglect—and that makes you valuable.
📝 Lesson Summary
Congratulations! You've mastered camera animation—one of the most powerful tools in visual storytelling. You can now create dynamic, professional camera movements that rival Hollywood productions.
🎯 Key Takeaways
- Camera movement guides attention through time: Static cameras show, moving cameras reveal
- Classic moves are your vocabulary: Dolly, track, crane, pan, tilt, orbit—master these first
- Keyframes + easing = natural motion: Always use smooth interpolation (Bezier/Sine), never linear
- Constraints automate complex behavior: Track To, Follow Path, Copy Location save massive time
- Handheld adds realism: Noise modifiers create organic camera shake for energy
- Movement + focus = cinema: Combining camera animation with rack focus = professional storytelling
What We Covered
📚 Complete Camera Animation Knowledge
Fundamentals:
- Why camera movement matters for storytelling
- When to move camera vs keep it static
- Keyframe animation workflow and timeline basics
- Lock Camera to View for intuitive positioning
Classic camera movements:
- Dolly (forward/backward), tracking (left/right), crane (up/down)
- Pan (horizontal rotation), tilt (vertical rotation), roll (axis rotation)
- Orbit movements and 360° reveals
- Zoom vs dolly (and why dolly is almost always better)
Timing and easing:
- Interpolation types (linear, Bezier, Sine)
- Ease in, ease out, ease in/out patterns
- Speed ramping for dramatic effect
- Timing guidelines (quick, standard, slow moves)
Constraints and automation:
- Track To and Damped Track for automatic aiming
- Follow Path for complex curved camera paths
- Copy Location for following subjects
- Orbit rigs using Empty parents
Advanced techniques:
- Handheld camera shake with Noise modifiers
- Combining movement with rack focus
- Multi-layered animations (position + rotation + focus)
- Motion blur for realistic camera movement
Skills You've Gained
✅ Professional Capabilities
You can now:
- ✓ Create smooth, professional camera movements using keyframes and easing
- ✓ Execute all classic camera moves (dolly, track, crane, pan, tilt, orbit)
- ✓ Set up constraint-based camera rigs for automated behavior
- ✓ Animate cameras along complex paths using Follow Path
- ✓ Add realistic handheld shake for documentary/action feel
- ✓ Combine camera movement with rack focus for sophisticated storytelling
- ✓ Time camera movements appropriately for different emotional effects
- ✓ Build multi-shot camera sequences with smooth transitions
- ✓ Render animated camera sequences with motion blur and DoF
- ✓ Create portfolio-quality cinematography demonstrating camera mastery
The Complete Camera Mastery Journey
🎓 Module 5 Complete!
Camera Basics] --> B[Lesson 21:
Composition] B --> C[Lesson 22:
Depth of Field] C --> D[Lesson 23:
Camera Animation] style A fill:#4CAF50,stroke:#333,stroke-width:2px,color:#fff style B fill:#4CAF50,stroke:#333,stroke-width:2px,color:#fff style C fill:#4CAF50,stroke:#333,stroke-width:2px,color:#fff style D fill:#4CAF50,stroke:#333,stroke-width:3px,color:#fff
Your complete camera toolkit:
- Lesson 20: Technical camera fundamentals (focal length, sensor, clipping)
- Lesson 21: Composition and framing (rule of thirds, leading lines, balance)
- Lesson 22: Depth of field and focus control (aperture, bokeh, rack focus)
- Lesson 23: Camera animation and movement (dolly, constraints, handheld) ✅
You now have complete cinematography mastery:
- Technical control (camera settings and properties)
- Visual composition (framing and aesthetics)
- Focus control (DoF and attention direction)
- Dynamic movement (animation and timing)
This is professional-level camera work. You're not just a 3D artist—you're a cinematographer.
Common Mistakes to Avoid Long-Term
⚠️ Habits to Break
Don't develop these patterns:
- ❌ Moving camera "because you can": Every move needs purpose—unmotivated movement distracts
- ❌ Linear interpolation everywhere: Robotic motion ruins otherwise good animation—always ease
- ❌ Ignoring constraints: Manually keyframing what constraints could automate—work smarter, not harder
- ❌ Forgetting motion blur: Animated cameras without motion blur look fake—always enable for final renders
- ❌ Too much handheld: Constant shake fatigues viewers—use strategically, not as default
- ❌ One-speed-fits-all: Varying timing creates rhythm—fast and slow moves should coexist
- ❌ Never combining techniques: Movement + focus = impact—don't limit yourself to one thing at a time
Instead, cultivate these habits:
- ✓ Ask "why is camera moving?" before animating—intentional choices first
- ✓ Default to Bezier/Sine easing—organic motion unless you specifically want mechanical
- ✓ Use constraints liberally—Track To, Follow Path, Copy Location save enormous time
- ✓ Preview early and often—catch mistakes before spending hours on refinement
- ✓ Study professional cinematography—watch films/commercials, analyze camera choices
- ✓ Build camera movement library—save favorite setups as presets for future use
💡 Camera Animation: The Invisible Storyteller: Great camera movement doesn't call attention to itself—it guides attention without the viewer realizing they're being guided. When you watch a Spielberg film, you don't think "wow, cool dolly shot"—you're immersed in the story, naturally looking where the filmmaker wants you to look. That's the goal. Your camera should feel like an intelligent, invisible observer that's always in the perfect position at the perfect time. It moves with purpose, reveals with intention, and guides with subtlety. Master that and you're not just animating cameras—you're directing viewer experience. That's the power you now have.
🔮 What's Next?
You've completed Module 5: Camera and Composition! You now control every aspect of how viewers see your scenes. Next up: bringing those scenes to life with animation!
🎬 Coming Up: Module 6 - Introduction to Animation
The next module dives into keyframe animation beyond cameras—animating objects, characters, and properties:
- Lesson 24: Animation Fundamentals: Principles of animation, timing, spacing
- Lesson 25: Timeline and Keyframes: Deep dive into animation workflow
- Lesson 26: Graph Editor Essentials: Mastering F-curves for professional motion
- Lesson 27: Basic Character Animation: Bringing characters to life
Why it matters: You can animate cameras—now it's time to animate everything else. Objects, lights, materials, characters. Animation brings static 3D to life, and you already understand the fundamentals from camera work.
Continuing Your Camera Journey
📚 Keep Learning
Practice exercises:
- Daily camera challenge: One new camera move per day for 30 days
- Film analysis: Watch a scene, pause, try to recreate the camera work
- Constraint mastery: Rebuild professional camera rigs from tutorials
- Music video project: Time camera movements to music beats
Study professional work:
- Watch "Every Frame a Painting" YouTube channel (cinematography analysis)
- Study Roger Deakins cinematography (master of camera movement)
- Analyze commercial/music video camera work (often more experimental)
- Read "Cinematography: Theory and Practice" for deeper understanding
Build your demo reel:
- Take your Lesson 23 project, polish it to perfection
- Add 2-3 more camera sequences showcasing different styles
- Create 60-90 second cinematography demo reel
- This proves your camera skills to clients/employers
🎓 You're a Cinematographer
Four lessons ago, you learned what a camera was. Now? You can execute professional dolly moves, create perfect orbits with constraints, add realistic handheld shake, and combine movement with rack focus for sophisticated storytelling. That's not incremental progress—that's transformation.
Most 3D artists can model and shade but have no idea how to frame or move a camera. They create beautiful assets, then ruin them with bad camera work. You're different. You understand focal length, composition, depth of field, AND dynamic movement. That complete toolkit makes you incredibly valuable.
Camera work is often the difference between amateur and professional work. Not modeling quality, not shader complexity—camera work. How the scene is framed, how attention is guided, how movement reveals information. You've mastered this invisible art. Own that skill. Put it on your resume. Showcase it in your portfolio. It's a differentiator that opens doors.
Next stop: Animation! Let's bring everything to life! 🎬