📸 Lesson 22: Depth of Field and Focus
Welcome to one of the most powerful cinematic techniques available to 3D artists! Depth of field (DoF) is that beautiful blur you see in professional photography and film where the subject is sharp while foreground and background fade into soft bokeh. It's not just a pretty effect—it's a fundamental tool for directing attention, creating depth, and making 3D renders feel photorealistic. Real cameras can't keep everything in focus simultaneously; they must choose what matters. This limitation became an artistic strength that cinematographers exploit masterfully. In 3D, everything is infinitely sharp by default—technically perfect but visually unnatural. Adding depth of field transforms your renders from "obviously CG" to "could this be real?" It separates subjects from backgrounds, guides viewer attention, and adds that professional polish that distinguishes amateur work from pro. In this lesson, you'll learn the physics behind focus, how to control it in Blender, and most importantly, when and how to use depth of field for maximum artistic impact.
🎯 What You'll Learn
- Understanding depth of field fundamentals and optics
- How aperture (f-stop) controls blur amount
- Focus distance and focal plane
- Bokeh shapes and quality
- Enabling and configuring DoF in Blender
- Using focus objects and Empty targets
- Viewport vs render DoF differences
- Shallow vs deep depth of field choices
- DoF for composition and storytelling
- Common DoF mistakes and solutions
- Rack focus techniques
- Hands-on DoF project
⏱️ Estimated Time: 50-65 minutes
🎯 Project: Create multiple DoF studies
In This Lesson
📸 Depth of Field Fundamentals
Before diving into Blender's technical settings, let's understand what depth of field is, why it exists, and how it became one of cinematography's most powerful tools.
What is Depth of Field?
🔍 The Zone of Sharpness
Depth of field defined:
- The distance range within which objects appear acceptably sharp
- Everything in this zone is in focus
- Everything outside this zone is blurred
- A physical limitation of camera optics
Real-world analogy:
- Hold your finger 6 inches from your face
- Focus on your finger—background blurs
- Focus on the background—finger blurs
- You can't see both sharp simultaneously
- This is depth of field in action
The three zones:
- Foreground blur: Objects closer than focus distance
- Focal plane: The distance that's perfectly sharp
- Background blur: Objects farther than focus distance
Why DoF exists:
- Light passes through lens opening (aperture)
- Lens focuses light to a point (focal plane)
- Light from other distances doesn't focus to point—spreads out
- This spread creates blur (circles of confusion)
- Physics of optics, not a flaw—now used artistically
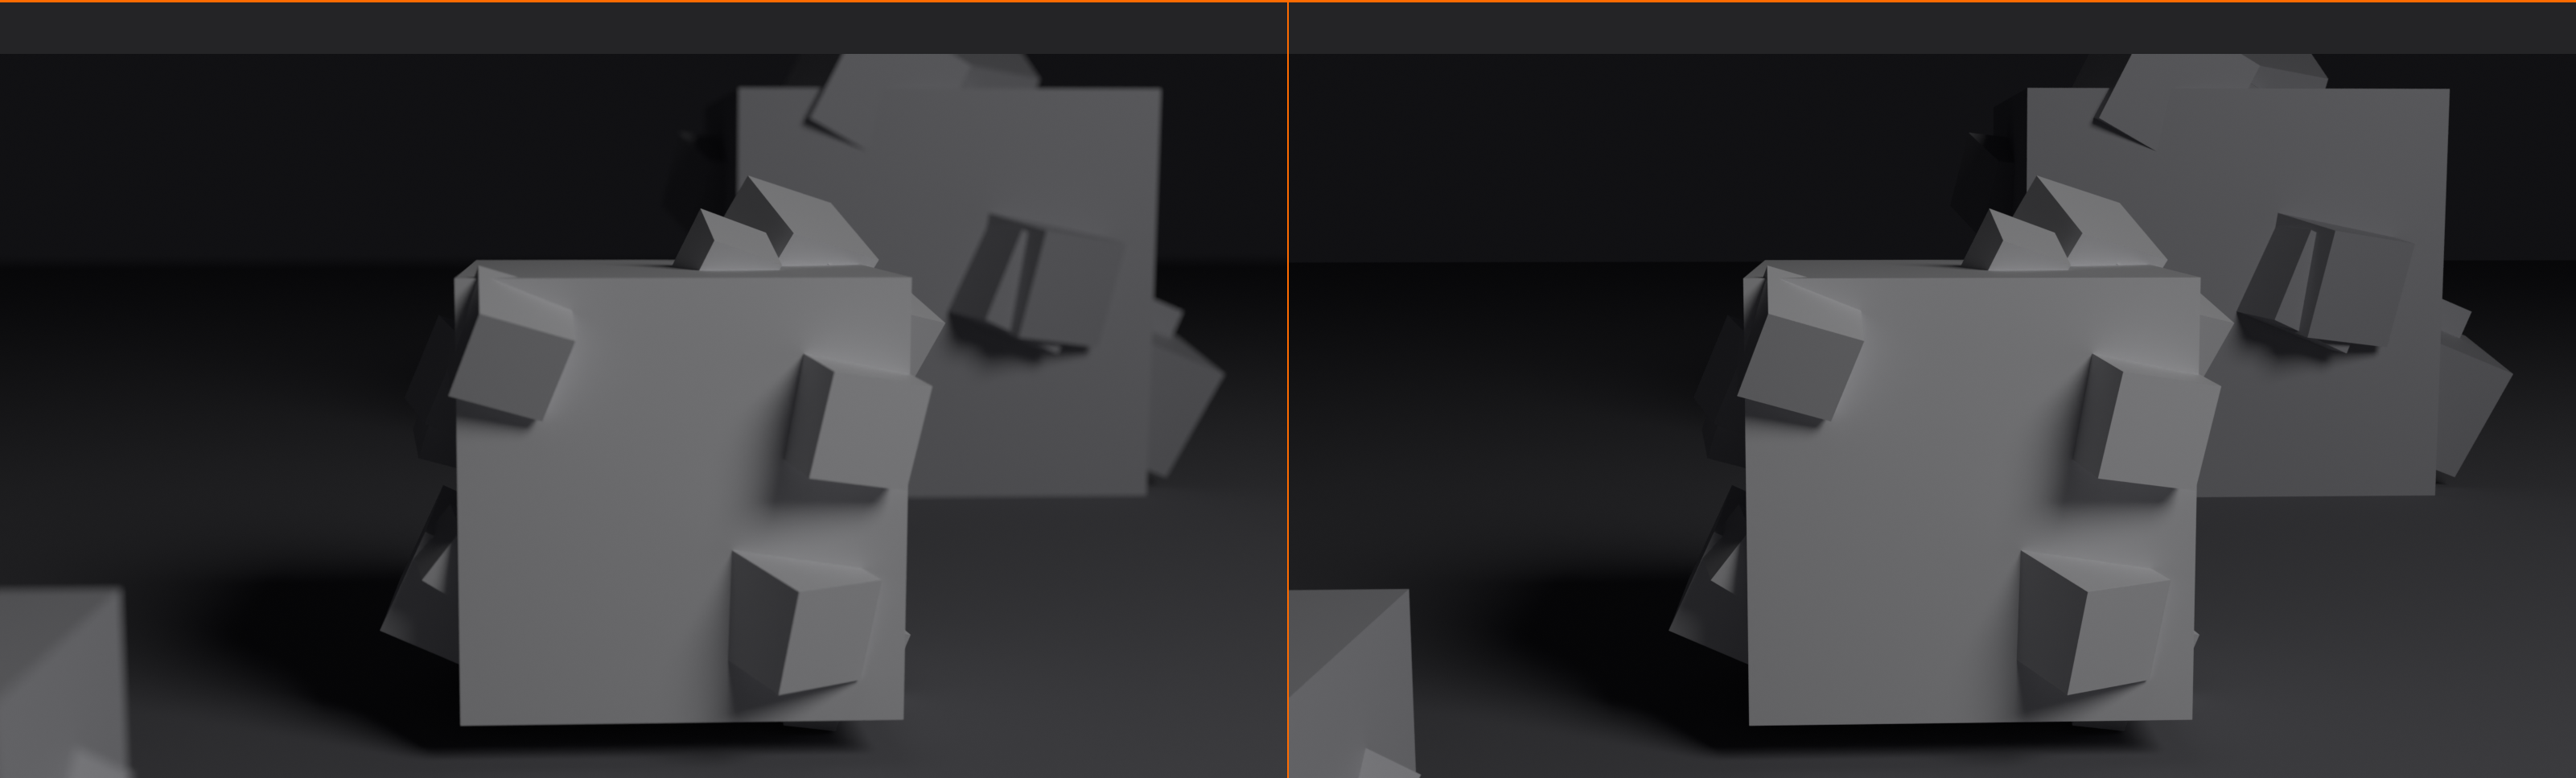
Shallow vs Deep Depth of Field
📏 The DoF Spectrum
Shallow depth of field (narrow zone):
- Small range of acceptable sharpness
- Subject sharp, everything else blurred
- Strong foreground and background blur
- Isolates subject dramatically
- Visual characteristics:
- Beautiful bokeh (out-of-focus blur)
- Strong subject separation
- Dreamy, romantic, cinematic quality
- Professional photography look
- Use for:
- Portraits (isolate person from background)
- Product shots (focus on product only)
- Close-ups (emphasize details)
- Romantic or intimate scenes
- Directing attention to specific element
Deep depth of field (wide zone):
- Large range of acceptable sharpness
- Foreground and background both sharp
- Minimal or no blur
- Everything visible and clear
- Visual characteristics:
- Documentary or journalistic feel
- Information-dense compositions
- Realistic, objective quality
- Maximum detail visible
- Use for:
- Landscapes (everything sharp horizon to foreground)
- Architecture (show full detail)
- Group shots (everyone in focus)
- Action scenes (see all movement)
- Technical/informational imagery
Medium depth of field:
- Moderate range of sharpness
- Subject sharp, gradual blur beyond
- Natural, balanced look
- Most common in general cinematography
Why Depth of Field Matters
🎨 Artistic and Technical Benefits
Directs attention:
- Blur removes distracting details
- Eye naturally drawn to sharp areas
- Creates clear focal point
- Guides viewer to what matters
Creates depth separation:
- Sharp subject vs blurred background = clear depth
- Enhances three-dimensionality
- Prevents subject merging with background
- Professional compositional technique
Adds realism:
- Real cameras have DoF—no DoF looks artificial
- Mimics how human vision works (selective focus)
- Bridges "uncanny valley" in 3D
- Makes CG indistinguishable from photography
Simplifies compositions:
- Blur hides imperfect background modeling
- Reduces visual clutter
- Focuses on hero assets
- Artistic way to handle complex scenes
Evokes emotion:
- Shallow DoF = intimate, romantic, delicate
- Deep DoF = objective, informational, epic
- Rack focus (changing focus) = narrative shift
- Emotional language of cinematography
DoF in 3D vs Real Cameras
🎬 The Fundamental Difference
Real cameras (physical limitation):
- DoF is unavoidable physical result of optics
- Cannot have infinite DoF (except with tricks)
- Always present to some degree
- Varies with aperture, focal length, distance
3D cameras (perfect by default):
- Everything infinitely sharp by default
- No physical optics—mathematical projection
- DoF is added effect, not inherent
- Must be enabled intentionally
The advantage:
- Complete control—enable or disable at will
- Adjust DoF in post without re-shooting
- No physics limitations
- Can have impossible combinations of settings
The challenge:
- Must understand real camera behavior
- Easy to overdo or misuse DoF
- Render time increases with DoF
- Need to match real camera for photorealism
💡 The Cinematographer's Secret Weapon: Depth of field is how cinematographers sculpt space and attention. Watch any professional film and notice how shallow DoF isolates actors during emotional moments, while deep DoF shows scope during epic scenes. It's invisible storytelling—viewers feel the effect without consciously noticing the technique. As a 3D artist, you have an advantage: you can dial in perfect DoF without the constraints of physical optics, test different settings instantly, and even change it after rendering. But with great power comes responsibility—you need to understand real camera behavior to make choices that feel natural. The goal isn't to show off DoF; it's to use it so skillfully that viewers never think about it, they just feel more immersed in your world.
🔘 Aperture and F-Stop
Aperture is the single most important control for depth of field. Understanding f-stops—the confusing numbers that control aperture—unlocks precise control over blur in your renders.
Understanding Aperture
⭕ The Lens Opening
What is aperture?
- The adjustable opening in a lens that controls light
- Like the pupil of an eye—expands and contracts
- Circular diaphragm with adjustable blades
- Measured in f-stops (f/1.4, f/2.8, f/5.6, etc.)
Aperture's dual role:
- Exposure control:
- Larger opening = more light enters
- Smaller opening = less light enters
- Affects brightness (handled automatically in 3D)
- Depth of field control:
- Larger opening = shallower DoF (more blur)
- Smaller opening = deeper DoF (less blur)
- Primary creative control for focus effects
Physical mechanism:
- Blades inside lens form adjustable circle
- Photographer adjusts aperture size
- Changes how light cone converges
- Directly affects circles of confusion (blur circles)
The F-Stop System
🔢 Decoding the Numbers
What is an f-stop?
- Ratio of focal length to aperture diameter
- Formula: f-stop = focal length ÷ aperture diameter
- Example: 50mm lens with 25mm opening = f/2
- Written as f/2, f/2.8, f/4, f/5.6, etc.
The confusing inverse relationship:
- Lower f-number = LARGER aperture = MORE blur (shallow DoF)
- Higher f-number = SMALLER aperture = LESS blur (deep DoF)
- This backwards relationship confuses everyone at first
- Think: f/1.4 is a large opening (f divided by small number = large result)
- f/16 is a small opening (f divided by large number = small result)
Common f-stop values:
- f/1.4, f/1.8, f/2: Very wide aperture
- Maximum light gathering
- Extremely shallow DoF
- Beautiful subject isolation
- Professional portrait lenses
- f/2.8, f/4: Wide aperture
- Good light gathering
- Shallow DoF
- Common for general photography
- Good subject separation
- f/5.6, f/8: Medium aperture
- Moderate light
- Moderate DoF
- "Sweet spot" for sharpness
- Balanced look
- f/11, f/16: Narrow aperture
- Less light
- Deep DoF
- Landscape photography standard
- Everything sharp
- f/22, f/32+: Very narrow aperture
- Minimal light
- Maximum DoF
- Architectural and technical work
- Sharpness degradation (diffraction)
F-stop scale pattern:
- Standard stops: f/1.4, f/2, f/2.8, f/4, f/5.6, f/8, f/11, f/16, f/22
- Each stop is √2 (about 1.4) times the previous
- Each stop doubles or halves light
- You can use intermediate values (f/3.5, f/6.3, etc.)
Aperture and DoF Relationship
🎯 How Aperture Controls Blur
The physics:
- Light from out-of-focus points spreads into circles
- Circle size depends on aperture diameter
- Larger aperture = larger circles = more blur
- Smaller aperture = smaller circles = less blur
Practical DoF by f-stop:
- f/1.4 - f/2.0: Paper-thin DoF
- Only a few inches sharp
- Extreme background blur
- Difficult to keep subject in focus
- Dramatic, dreamy effect
- Use for: Artistic portraits, macro, product hero shots
- f/2.8 - f/4: Shallow DoF
- Subject sharp, background softly blurred
- Still good separation
- More practical than f/1.4
- Professional portrait standard
- Use for: Portraits, character close-ups, products
- f/5.6 - f/8: Moderate DoF
- Subject and near surroundings sharp
- Distant background gently blurred
- Natural, balanced look
- Most versatile range
- Use for: General scenes, environmental portraits, medium shots
- f/11 - f/16: Deep DoF
- Foreground through background sharp
- Minimal blur
- Maximum detail visible
- Documentary feel
- Use for: Landscapes, architecture, groups, wide shots
- f/22+: Maximum DoF
- Everything sharp (nearly infinite DoF)
- No visible blur
- Technical/scientific
- Use for: Maximum sharpness needs (rare in cinematography)
Choosing the Right F-Stop
🤔 Creative Decision Making
Ask yourself:
- What's the subject?
- Person/character → f/1.4 - f/4 (shallow)
- Product → f/2.8 - f/8 (moderate to shallow)
- Architecture → f/8 - f/16 (deep)
- Landscape → f/11 - f/16 (deep)
- How much separation needed?
- Isolate from background → Lower f-stop
- Show context → Higher f-stop
- Balance both → Middle f-stops
- What's the mood?
- Intimate, romantic → Shallow DoF (f/1.4-2.8)
- Epic, grand → Deep DoF (f/11-16)
- Natural, documentary → Moderate DoF (f/5.6-8)
- Is background important?
- Irrelevant/distracting → Blur it (low f-stop)
- Important context → Keep sharp (high f-stop)
Starting recommendations:
- Portraits: Start at f/2.8, adjust if needed
- Products: Start at f/4, adjust for detail vs separation
- Interiors: Start at f/5.6, adjust for desired sharpness
- Exteriors: Start at f/8, adjust for depth needs
- When in doubt: f/5.6 is safe middle ground
Common F-Stop Mistakes
⚠️ Aperture Pitfalls
Mistake 1: Always using extreme shallow DoF
- Problem: f/1.4 for everything—looks overdone
- Fix: Match f-stop to content—not everything needs f/1.4
- Shallow DoF is tool, not universal requirement
Mistake 2: Subject not fully in focus
- Problem: DoF so shallow subject's face partially blurred
- Fix: Increase f-stop or adjust focus distance
- Eyes should always be sharp in portraits
Mistake 3: No DoF at all
- Problem: Everything infinitely sharp—looks CG
- Fix: Add at least subtle DoF for realism
- Even f/8-11 adds photorealistic quality
Mistake 4: Wrong f-stop for focal length
- Problem: f/1.4 with wide-angle = too much in focus
- Fix: Consider focal length affects DoF (more on this later)
- Telephoto needs higher f-stops, wide-angle can use lower
Mistake 5: Inconsistent f-stops in sequence
- Problem: Shot 1 at f/2.8, shot 2 at f/11—jarring
- Fix: Maintain consistent DoF within scene/sequence
- Changes should be motivated by story, not random
✅ F-Stop Quick Reference
Remember the inverse relationship:
- 💡 Lower number = MORE blur (f/1.4, f/2)
- 💡 Higher number = LESS blur (f/11, f/16)
Common uses:
- f/1.4-2: Extreme isolation, artistic portraits
- f/2.8: Portrait standard, shallow DoF
- f/4: Product shots, moderate separation
- f/5.6: Safe all-purpose, balanced
- f/8: Landscape standard, good sharpness
- f/11-16: Maximum sharpness, architecture
💡 The F-Stop Confusion: Every photographer remembers the moment they understood f-stops—it's confusing because it's counterintuitive. Lower numbers = more blur? How does that make sense? Think of it as fractions: f/2 is actually "focal length divided by 2" which is a larger opening than "focal length divided by 16" (f/16). Or memorize this: "Lower f-stop number, lower depth of field." Once it clicks, you'll never forget. And here's the best part—in Blender, you can preview DoF in real-time and adjust the f-stop slider while watching the effect. Unlike real photographers who must memorize DoF for every lens, you can experiment instantly. Use this advantage to build intuition about which f-stops create which effects.
🎯 Focus Distance and Focal Plane
Aperture controls how much blur you get, but focus distance determines where that sharpness is. Understanding the focal plane is crucial for directing attention exactly where you want it.
Understanding Focus Distance
📏 Where Sharpness Lives
What is focus distance?
- The distance from camera to the plane of perfect sharpness
- Measured in Blender units (or meters/feet in real cameras)
- Everything at this exact distance is maximally sharp
- Objects closer or farther gradually blur
The focal plane:
- Imaginary plane perpendicular to camera direction
- At the focus distance from camera
- Everything on this plane is in focus
- Parallel to the camera sensor/film plane
How focus works:
- Lens adjusts to focus light from specific distance
- Light from that distance converges to sharp point
- Light from other distances doesn't converge—creates blur
- Changing focus changes which distance is sharp
The acceptable sharpness zone:
- DoF extends in front of and behind focal plane
- Not perfectly sharp, but "acceptably sharp"
- Typically 1/3 in front, 2/3 behind focal plane
- This is your depth of field range
Setting Focus Distance in Blender
🔧 Practical Focus Control
Method 1: Manual distance entry
- Select camera
- Camera Properties → Depth of Field → Focus Distance
- Enter distance value directly
- Precise but requires knowing exact distance
Method 2: Focus Object (recommended)
- Create Empty at subject location (
Shift+A→ Empty) - Camera Properties → Depth of Field → Focus Object
- Select the Empty (or your subject object)
- Camera automatically focuses on that object
- Benefits:
- Move object = focus follows automatically
- No manual distance calculation needed
- Can animate Empty for rack focus
- Most intuitive method
Method 3: Eyedropper tool (quick)
- In viewport, press
Shift+Right-Clickon subject - Focus distance automatically set to that point
- Quick but not animated
- Good for still renders
Viewing focus in viewport:
- Enable Camera Properties → Viewport Display → Limits
- Yellow cross appears showing focus plane location
- Helps visualize where focus is
- Adjust until cross aligns with subject


Focus and Subject Placement
🎯 Strategic Focus Decisions
What to focus on:
- Portraits/characters:
- Always focus on eyes (closest eye if angled)
- Eyes are primary point of connection
- If eyes aren't sharp, portrait fails
- Can have tip of nose slightly soft if needed
- Products:
- Focus on brand name or key feature
- Whatever viewer should notice first
- Usually front-most part of product
- Scenes with multiple subjects:
- Focus on primary subject (main character, hero object)
- Let secondary elements blur appropriately
- Establishes clear hierarchy
- Landscapes:
- Focus 1/3 into scene (hyperfocal distance)
- Maximizes sharpness throughout
- Or focus on specific landmark
Creative focus choices:
- Focus on foreground:
- Subject blurred, foreground sharp
- Creates mystery, anticipation
- Viewer wants to see what's blurred
- Focus on background:
- Subject blurred, background sharp
- Emphasizes context over subject
- Can show character's perspective (looking at background)
- Soft focus throughout:
- Nothing perfectly sharp
- Dreamy, ethereal quality
- Nostalgic or romantic mood
Multiple Focal Planes and DoF Depth
📐 Understanding the Sharp Zone
The DoF distribution:
- Depth of field extends in front and behind focal plane
- NOT equally distributed:
- Approximately 1/3 of DoF in front of focal plane
- Approximately 2/3 of DoF behind focal plane
- This is why "focus 1/3 into scene" works for landscapes
Calculating acceptable sharpness:
- Depends on:
- Aperture (f-stop) - smaller aperture = larger DoF
- Focus distance - closer focus = shallower DoF
- Focal length - longer lens = shallower DoF
- Sensor size - larger sensor = shallower DoF
- Blender calculates this automatically
Hyperfocal distance:
- Special focus distance where DoF extends to infinity
- Everything from half hyperfocal distance to infinity is sharp
- Maximizes depth of field
- Used in landscape photography
- Calculation: Hyperfocal = (Focal Length²) / (Aperture × CoC)
- (Advanced topic—Blender doesn't calculate automatically)
Focus Distance and Camera Movement
🎬 Maintaining Focus
Static camera:
- Set focus once, leave it
- Simple and straightforward
- Most common scenario
Moving camera (camera moves toward/away from subject):
- If using Focus Object:
- Focus automatically maintained on object
- Camera follows subject perfectly
- Works for dolly, crane, orbit moves
- If using manual focus distance:
- Must keyframe focus distance changes
- Distance to subject changes as camera moves
- More work but allows creative focus shifts
Moving subject (subject moves toward/away from camera):
- If using Focus Object:
- Focus tracks subject automatically
- Like camera auto-focus
- Ideal for character animation
- Creative choice—maintain focus or let it drift:
- Keep focus on moving subject (track)
- Or keep focus on original plane (subject goes out of focus)
- Depends on narrative intent
💡 Focus: The Art of Selective Sharpness: Where you place focus is one of the most powerful storytelling tools available. In every shot, you're making a decision: "This is what matters right now." Focus on the character's face, and you're emphasizing their emotion. Focus on the gun in their hand, and you're building tension. Focus on the wedding ring, and you're telling a story about relationships. Professional cinematographers obsess over focus because it's literally guiding the viewer's attention—it's a spotlight for the eye. In 3D, you have perfect control over focus without the mechanical limitations of real cameras. Use the Focus Object method and you can choreograph attention with precision that would make cinema focus pullers jealous.
✨ Bokeh and Blur Quality
Bokeh—the aesthetic quality of out-of-focus blur—is what separates beautiful DoF from merely acceptable blur. Understanding bokeh lets you create that premium, cinematic look.
Understanding Bokeh
💫 The Art of Beautiful Blur
What is bokeh?
- Japanese word meaning "blur" or "haze"
- The aesthetic quality of out-of-focus areas
- How highlights and textures render when blurred
- Subjective—"good" vs "bad" bokeh
What creates bokeh:
- Out-of-focus point lights become circles
- Circle shape determined by aperture blade shape
- Specular highlights (shiny surfaces, lights) most visible
- Can be circular, hexagonal, octagonal, etc.
Good vs bad bokeh:
- "Good" bokeh (smooth, creamy):
- Soft, circular blur circles
- Gentle gradients, no harsh edges
- Pleasant, non-distracting background
- Expensive lenses aim for this
- "Bad" bokeh (harsh, busy):
- Harsh-edged polygonal shapes
- Double-line circles (cat's eye)
- Distracting or unpleasant background
- Cheap lenses often have this
- Note: "Bad" bokeh can be stylistic choice
Bokeh Shape (Aperture Blades)
⭕ Blade Count and Shape
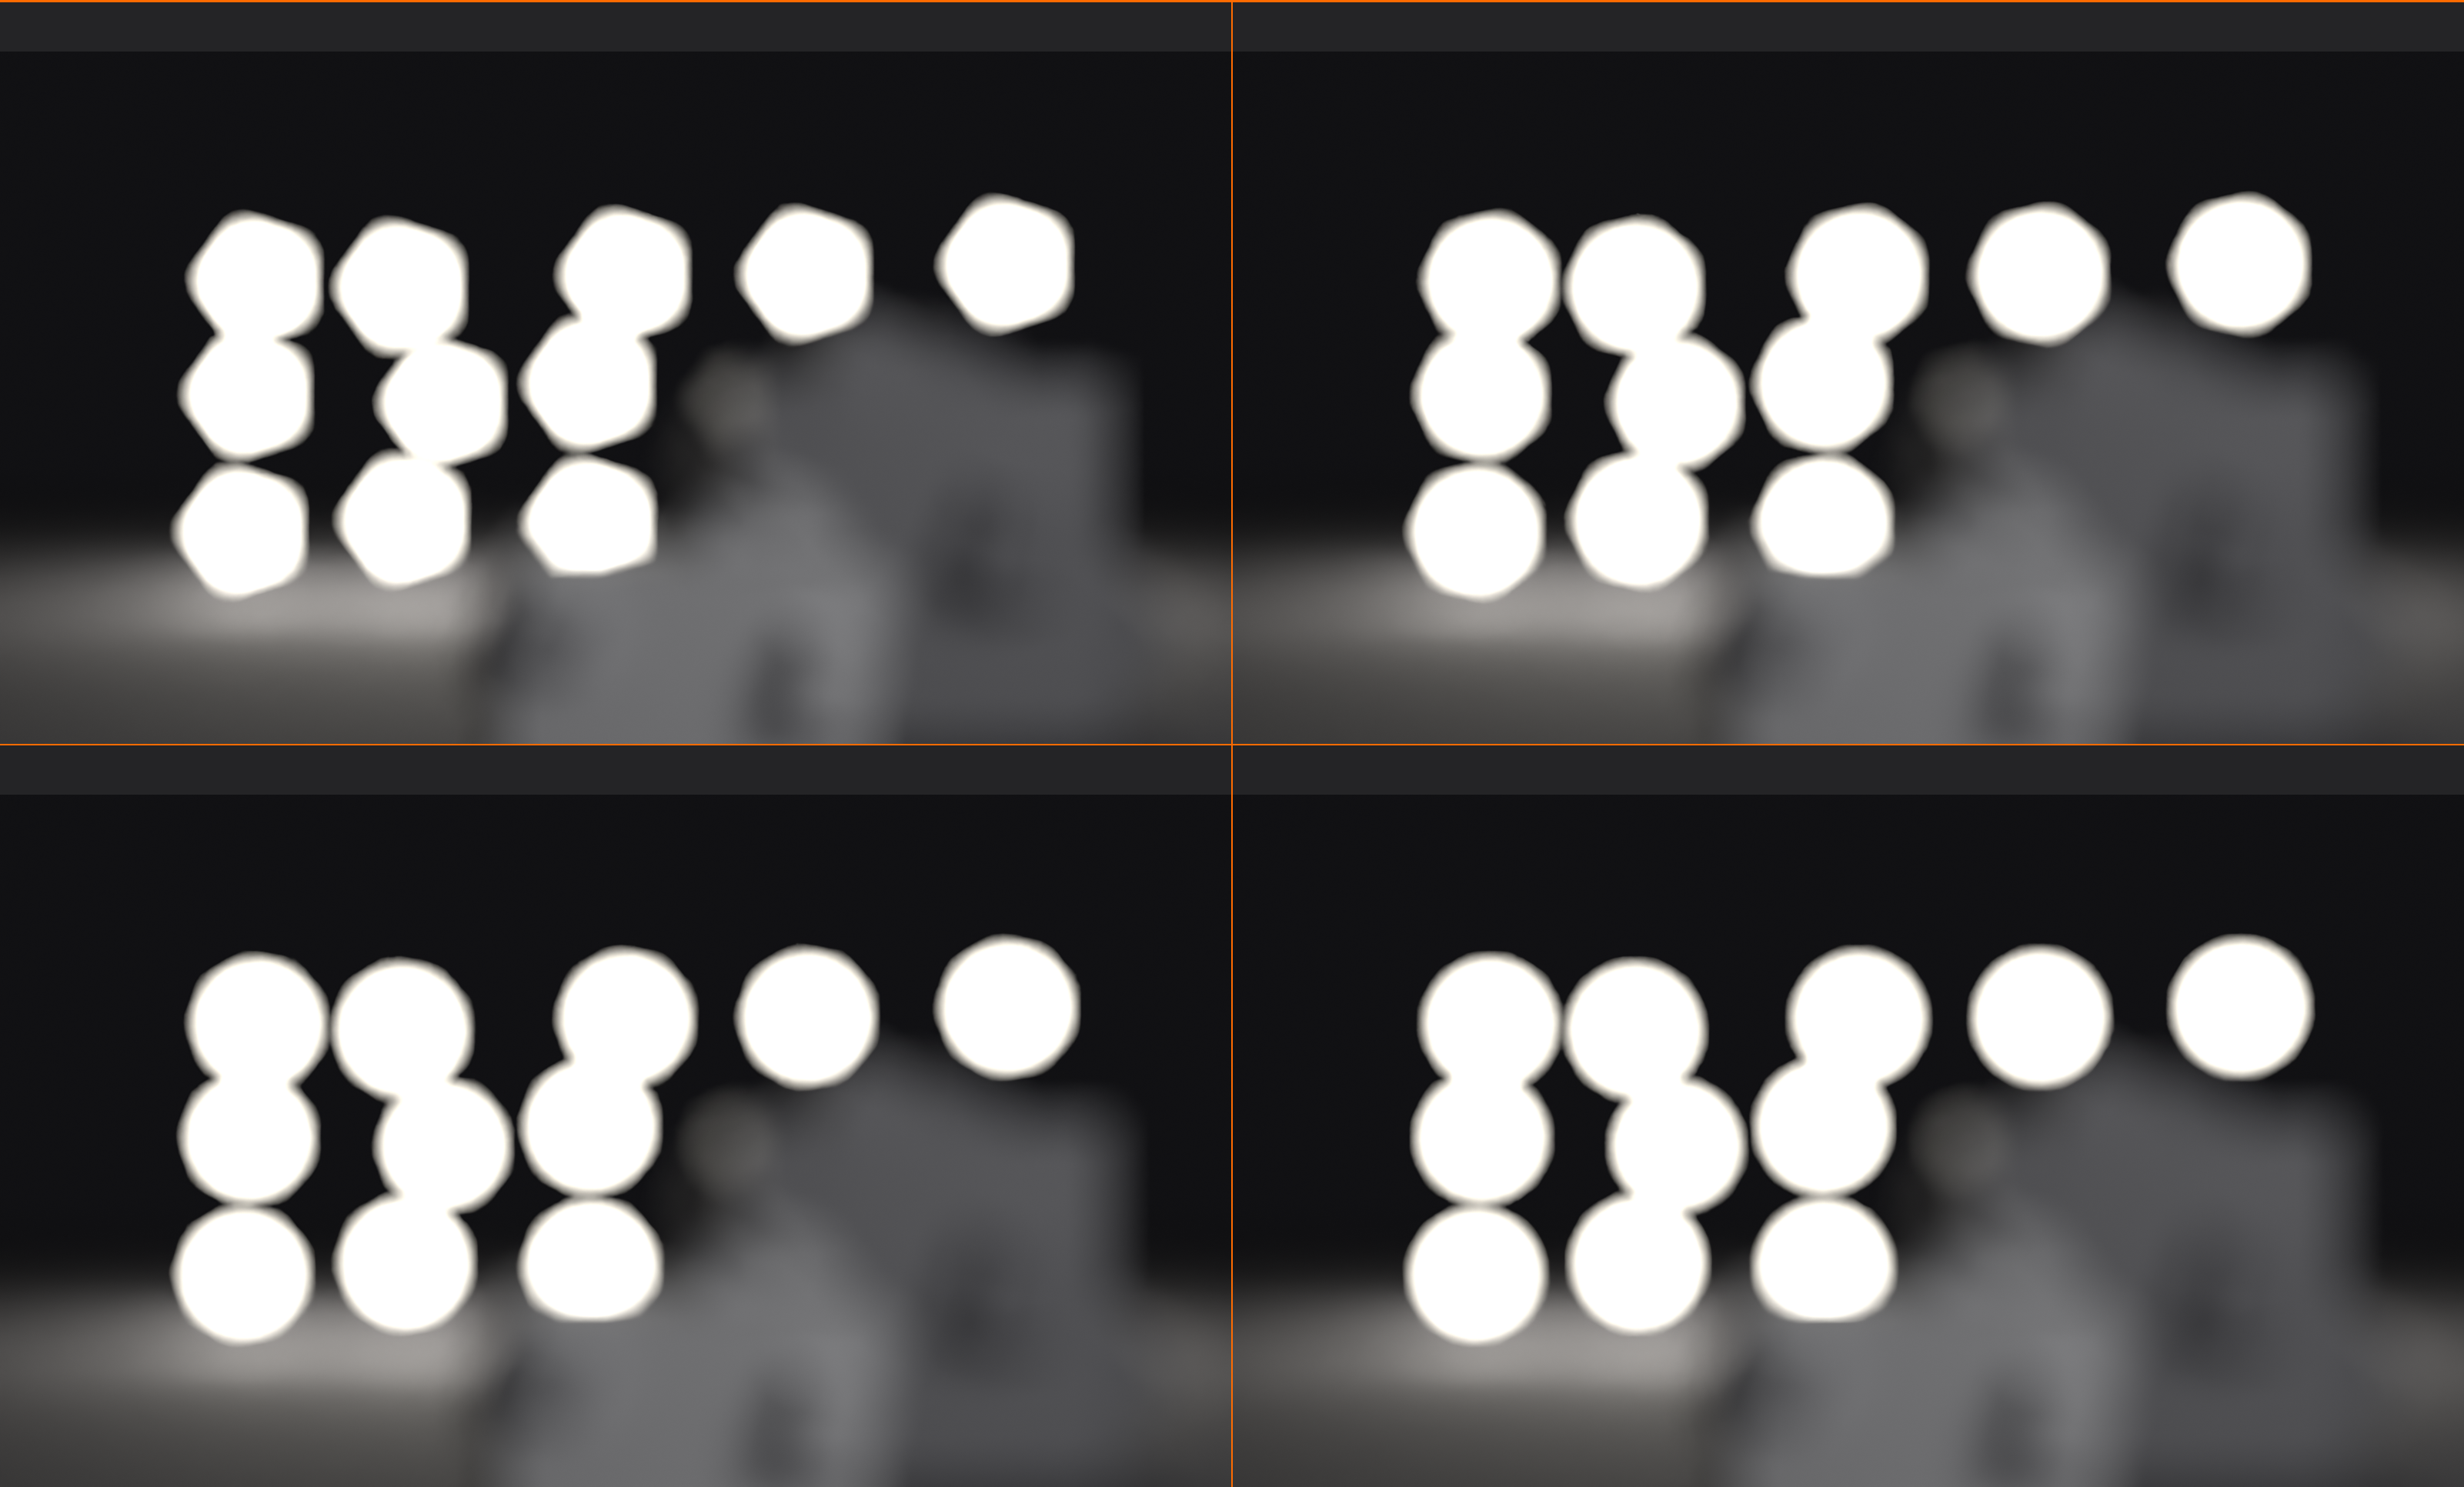
How aperture blades affect bokeh:
- Aperture iris made of overlapping blades
- Blades form polygon when closed (not perfect circle)
- Number of blades = number of sides on bokeh polygon
Common blade counts:
- 5-6 blades:
- Budget lenses
- Pentagonal or hexagonal bokeh
- Visible polygon shape
- Can be distracting
- 7-8 blades:
- Mid-range lenses
- Heptagonal or octagonal bokeh
- Approaching circular
- Generally pleasant
- 9+ blades:
- Professional lenses
- Nearly circular bokeh
- Smooth, creamy
- "Premium" look
- Perfect circle:
- Wide-open aperture (f/1.4, f/2)
- Blades fully retracted
- Natural circular opening
- Best bokeh quality
Rounded vs straight blades:
- Rounded blades create rounder bokeh even when closed
- Straight blades create more polygonal bokeh
- Premium lenses use rounded blades
Bokeh in Blender
🔧 Controlling Blur Aesthetics
Camera Properties → Depth of Field:
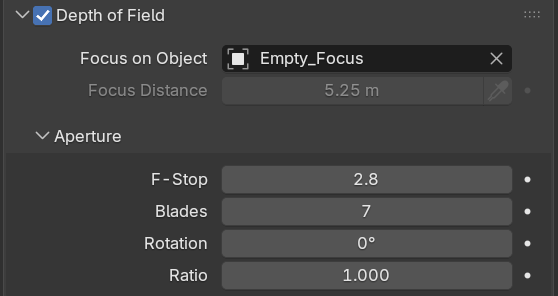
- Aperture:
- Blades count (3-16 typically)
- More blades = rounder bokeh
- Default: usually 6 or 8
- Rotation:
- Rotates the bokeh polygon
- Aesthetic choice
- 0° vs 45° creates different feel
- Ratio:
- Aspect ratio of bokeh shape
- 1.0 = circular
- <1.0 = horizontally stretched (anamorphic look)
- >1.0 = vertically stretched (rare)
Achieving "premium" bokeh:
- Use 9-12 blades for nearly circular bokeh
- Or use very wide aperture (f/1.4-2) for perfect circles
- Add specular highlights in scene (small bright lights)
- These become visible bokeh balls
Cycles vs Eevee bokeh:
- Cycles:
- Physically accurate bokeh
- Respects blade count and shape
- Slower but realistic
- Eevee:
- Approximated bokeh
- Faster but less accurate
- May not show polygon shapes as clearly
Creating Bokeh Highlights
💡 Making Bokeh Visible
Bokeh is most visible with:
- Point light sources (small, bright)
- Specular highlights on objects
- Backlit particles or foliage
- City lights at night
- Christmas lights, fairy lights
Creating beautiful bokeh scenes:
- Add small bright lights in background:
- Array of point lights
- Emissive spheres
- Glowing particles
- Use glossy materials:
- Shiny surfaces create specular highlights
- When blurred, these become bokeh
- Water droplets, metal, glass
- Backlight translucent objects:
- Leaves with sun behind
- Fabric with light shining through
- Creates glowing bokeh
Classic bokeh setups:
- Portrait with Christmas lights: Subject sharp, twinkling lights bokeh background
- Product with rain: Glossy product sharp, rain drops on window blurred bokeh
- Night city: Subject sharp, city lights create bokeh carpet
- Forest bokeh: Subject sharp, sun through leaves creates golden bokeh
Special Bokeh Effects
🎨 Creative Bokeh Techniques
Anamorphic bokeh (oval/stretched):
- Horizontally stretched bokeh ovals
- Cinematic "film" look
- Set Ratio < 1.0 (e.g., 0.5 for 2:1 stretch)
- Combined with anamorphic aspect ratio
- Premium cinema aesthetic
Shaped bokeh (creative filters):
- In real photography: shaped aperture filters
- Hearts, stars, custom shapes
- In Blender: requires post-processing or custom shader work
- Novelty effect, use sparingly
Swirly bokeh:
- Bokeh with curved, swirling quality
- Vintage lens characteristic
- Artistic but can be distracting
- Advanced: requires lens distortion simulation
Cat's eye bokeh:
- Bokeh circles with dark centers
- Or bokeh that's round in center, oval at edges
- Lens vignetting effect
- Can be artifact or aesthetic choice
✅ Bokeh Best Practices
For premium cinematic look:
- ✓ Use 9-12 aperture blades for smooth bokeh
- ✓ Add small bright lights in background for visible bokeh
- ✓ Wide aperture (f/1.4-2.8) creates rounder bokeh
- ✓ Consider anamorphic ratio (0.5) for film look
- ✓ Test with Cycles for accurate bokeh rendering
- ✓ Use glossy materials to create specular bokeh
When bokeh doesn't matter:
- Deep DoF (f/11+) - minimal blur anyway
- No bright background elements
- Matte/diffuse backgrounds
- Can use default settings
💡 Bokeh: The Signature of Quality: Photography enthusiasts can identify expensive lenses by their bokeh alone. Smooth, creamy, circular bokeh with gentle falloff screams "professional glass." Harsh, polygonal bokeh with hard edges says "kit lens." As a 3D artist, you get to choose which signature you want—free of charge. That $5000 lens look? Just set your blade count to 12. Want the vintage film aesthetic? Use anamorphic bokeh. The beautiful part is that good bokeh isn't just pretty—it's functional. Smooth bokeh doesn't distract from your subject. It melts away backgrounds while maintaining visual interest. It's the difference between blur that looks like a mistake and blur that looks intentional, controlled, and cinematic.
🎬 Rack Focus and Focus Pulling
Rack focus—also called "pulling focus"—is one of the most powerful cinematic techniques for directing attention and revealing information. It's the art of smoothly shifting focus from one subject to another during a shot.
Understanding Rack Focus
🎯 The Focus Transition
What is rack focus?
- Changing focus distance during a shot
- One subject starts sharp, another ends sharp
- Smooth transition between the two
- Guides viewer's attention deliberately
Why rack focus is powerful:
- Reveals information progressively: Start on character's face, rack to what they're looking at
- Shifts attention: From background to foreground or vice versa
- Creates suspense: "What are they looking at?" (rack to reveal it)
- Shows relationships: Between characters or between character and object
- Adds dynamism: Static shot becomes dynamic with focus shift
Real-world context:
- In cinema, focus pullers manually adjust lens during take
- Requires precise timing and rehearsal
- Mark positions on lens with tape
- One of the most skilled jobs in camera department
- In 3D: we get perfect control with keyframes!
Classic Rack Focus Scenarios
📽️ Common Focus Transitions
Foreground to background:
- Setup: Character in foreground, subject of interest in background
- Start: Focus on character's face (background blurred)
- Rack: Pull focus to background subject
- Effect: Reveals what character sees or is thinking about
- Example: Detective sharp, rack to crime scene evidence behind them
Background to foreground:
- Setup: Blurred figure in foreground, clear background
- Start: Focus on background (establishing environment)
- Rack: Pull focus to foreground character
- Effect: Dramatic reveal of who's in scene
- Example: Museum display sharp, rack to reveal thief in foreground
Character to character:
- Setup: Two characters at different distances
- Start: Focus on character speaking
- Rack: Pull focus to other character for their reaction
- Effect: Shows conversation dynamics, reaction shots
- Example: Focus on person delivering news, rack to recipient's shock
Object to character:
- Setup: Important object in foreground, character behind
- Start: Focus on object (gun, letter, ring)
- Rack: Pull to character's reaction
- Effect: Establishes object importance, then emotional impact
- Example: Focus on pregnancy test, rack to woman's face
Discovery rack focus:
- Setup: Character searching, discovery in background
- Start: Focus on character (searching, confused)
- Rack: Pull to what they discover
- Effect: "Aha!" moment visualization
- Example: Character confused, rack to clue they suddenly notice
Setting Up Rack Focus in Blender
🔧 Technical Implementation
Method 1: Animating Focus Distance (manual)
- Step 1: Select camera
- Step 2: Go to frame where focus should start
- Step 3: Set Focus Distance to first subject distance
- Step 4: Hover over Focus Distance value, press
Ito keyframe - Step 5: Move timeline to frame where focus should end
- Step 6: Set Focus Distance to second subject distance
- Step 7: Press
Iagain to keyframe - Step 8: Blender interpolates smoothly between keyframes
Method 2: Animating Focus Object (recommended)
- Setup:
- Create Empty at first subject location
- Camera Properties → Focus Object → Select Empty
- Camera now focuses on Empty position
- Animate the Empty:
- Frame 1: Position Empty at subject A, keyframe location (
I→ Location) - Frame 60: Move Empty to subject B, keyframe location
- Empty travels between subjects, focus follows
- Frame 1: Position Empty at subject A, keyframe location (
- Benefits:
- Visual feedback—see Empty move in viewport
- Easy to adjust timing by moving keyframes
- Can add easing for organic feel
- More intuitive than numeric distance
Method 3: Multiple Empties with constraints (advanced)
- Create Empty for each subject (Empty_FocusA, Empty_FocusB)
- Create master Focus Empty with Copy Location constraint
- Animate constraint influence (0 = A, 1 = B)
- Allows precise control and reusability
Timing and Pacing Rack Focus
⏱️ The Rhythm of Focus Change
Speed considerations:
- Fast rack (0.5-1 second):
- Sudden realization or surprise
- Action sequences
- Snappy, energetic feel
- Example: Character notices danger
- Medium rack (1-2 seconds):
- Normal paced transition
- Most common speed
- Natural, not drawing attention to itself
- Example: Conversation between characters
- Slow rack (2-4 seconds):
- Deliberate, thoughtful
- Building suspense
- Artistic, draws attention
- Example: Slowly revealing who's at the door
- Very slow rack (4+ seconds):
- Extremely stylized
- Dreamlike or contemplative
- Use sparingly
- Can feel pretentious if overused
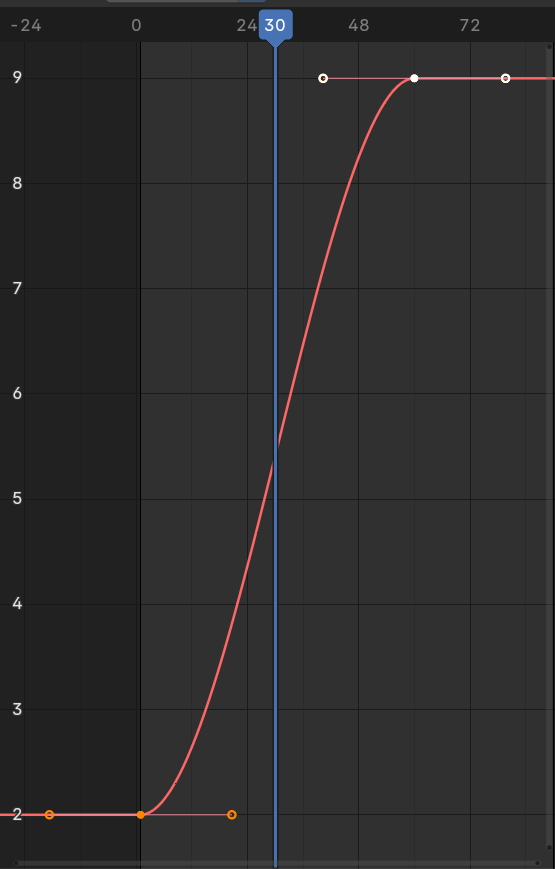
Easing and interpolation:
- Linear:
- Constant speed throughout
- Mechanical feeling
- Rarely used in practice
- Ease In/Out (recommended):
- Starts slow, speeds up, slows down
- Most natural, organic feel
- Mimics human focus pulling
- Default choice for most rack focus
- Ease In:
- Starts slow, ends fast
- Abrupt arrival at destination
- Surprise reveal
- Ease Out:
- Starts fast, ends slow
- Gentle arrival
- Settling on subject
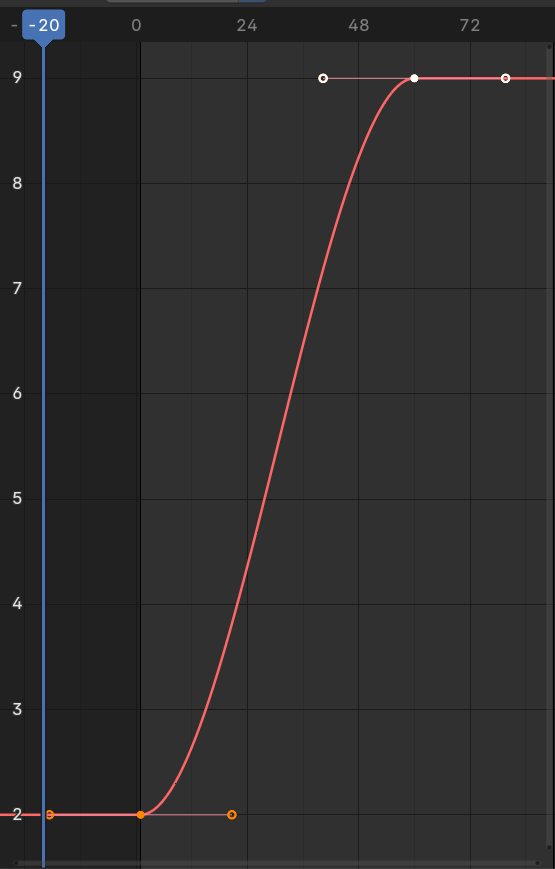
Setting easing in Blender:
- Open Graph Editor (change editor type)
- Select keyframes for Focus Distance or Empty location
- Press
T→ Set Keyframe Interpolation - Choose Bezier, then adjust handles for custom easing
- Or press
T→ Choose preset (Sinusoidal for smooth ease)
Rack Focus and Story
📖 Narrative Applications
Revealing information:
- Start on character's confused expression
- Rack to what they're looking at (the answer)
- Viewer discovers along with character
- Creates shared experience
Building suspense:
- Focus on character approaching door
- Slow rack to ominous shadow behind door
- Focus shift itself creates tension
- Anticipation builds during transition
Showing cause and effect:
- Focus on character's action (pressing button)
- Rack to result (machine activating)
- Visual connection between action and consequence
Emotional reactions:
- Focus on speaker delivering news
- Rack to listener's reaction
- Emphasizes emotional impact
- Show both sides of conversation moment
Point of view shifts:
- Start focused on what character sees
- Rack to character's face (their perspective to them)
- Or reverse: character to their POV
- Establishes whose perspective we're sharing
Visual metaphor:
- Focus on wedding ring (symbol of marriage)
- Rack to divorce papers (conflict)
- Juxtaposition tells story without dialogue
Advanced Rack Focus Techniques
🎨 Professional Polish
Multiple focus points (chain rack):
- Rack through several subjects in sequence
- A → B → C progression
- Creates journey through scene
- Example: Focus on phone, rack to photo, rack to door
- Implementation: Add keyframes at each subject
Partial rack (subtle focus shift):
- Don't fully reach second subject
- Both subjects remain somewhat soft
- Suggests attention but maintains mystery
- More ambiguous, artistic
Rack focus with camera move:
- Combine rack focus with dolly or crane move
- Camera moves while focus shifts
- Highly dynamic, complex shot
- Requires careful coordination of both animations
- Example: Dolly forward while racking from background to foreground
Motivated rack focus:
- Focus change triggered by action in scene
- Character looks at something → rack to what they see
- Sound off-screen → rack to source of sound
- Feels motivated by story, not arbitrary
Whip rack:
- Extremely fast rack focus (under 0.5 seconds)
- Brief moment of complete blur between subjects
- Energetic, almost like a whip pan
- Use for shock or rapid attention shifts
Breathing rack (subtle drift):
- Very slow, barely noticeable focus shift
- Organic, living quality
- Mimics imperfect human focus pulling
- Adds realism to handheld-style shots
Common Rack Focus Mistakes
⚠️ Pitfalls to Avoid
Overusing rack focus:
- Don't rack focus in every shot
- Becomes gimmicky and distracting
- Save for moments that matter
- Static focus is often better
Racking to nothing important:
- Every rack focus should have purpose
- Don't shift focus just because you can
- If second subject isn't important, don't rack to it
- Viewers expect payoff after focus shift
Wrong timing:
- Too fast: feels jarring, viewer can't register change
- Too slow: boring, draws too much attention to technique
- Match speed to emotional tone of scene
Insufficient depth of field:
- If DoF too deep (small aperture), rack focus invisible
- Both subjects stay sharp—no transition visible
- Need shallow DoF (wide aperture) for rack focus to work
- Typically f/2.8 or wider
Subjects too close together:
- If both subjects nearly same distance, rack barely visible
- Need significant distance separation
- Works best with foreground/background composition
Unmotivated rack:
- Focus shift happens for no story reason
- Viewers confused: "Why did focus change?"
- Should feel like natural progression or revelation
- Tie to character gaze, sound, or story beat
Linear interpolation:
- Constant-speed rack feels robotic
- Real focus pullers ease in and out
- Always use easing for organic feel
✅ Rack Focus Checklist
Before creating rack focus shot:
- ✓ Purpose: Why does focus need to shift? What's revealed?
- ✓ Distance: Subjects far enough apart for visible transition?
- ✓ Aperture: Wide enough (f/2.8 or lower) for shallow DoF?
- ✓ Timing: Speed matches emotional tone of moment?
- ✓ Easing: Smooth acceleration/deceleration, not linear?
- ✓ Motivation: Does focus shift feel natural, not arbitrary?
- ✓ Importance: Is second subject worth shifting attention to?
- ✓ Alternatives: Would cutting between shots work better?
💡 Rack Focus: The Invisible Guide: When done well, rack focus feels completely natural—the viewer's attention shifts without them realizing you're controlling it. It's like a gentle hand on their shoulder saying "Look here now." The key is motivation: rack focus works when it answers the question "What happens next?" or "What are they looking at?" Real focus pullers in cinema spend years mastering the timing—when to rack, how fast, and with what easing. They're reading the scene, feeling the rhythm, anticipating the actor's movements. In Blender, you have the luxury of perfect timing every time. Use that power wisely. The best rack focus is the one the viewer doesn't consciously notice—they just naturally look where you want them to, at exactly the right moment, as if by their own choice.
🎬 Practical DoF Scenarios
Theory is one thing, but how do you actually use depth of field in real projects? Let's walk through common scenarios you'll encounter and exactly how to set up DoF for each.
Portrait Photography (Character Closeup)
👤 Classic Portrait Setup
Goal: Isolate subject from background, emphasize character
Camera setup:
- Focal length: 85mm-135mm (portrait range)
- Aperture: f/1.8-f/2.8 (very shallow DoF)
- Distance: 2-3 meters from subject
- Focus target: Character's closest eye
Why these settings:
- 85mm+ compresses perspective, flattering for faces
- Wide aperture completely blurs background
- Subject "pops" from environment
- Viewer's eye drawn immediately to face
Focus object setup:
- Create Empty, position at character's eye level
- Parent Empty to character's head bone (if rigged)
- Camera Properties → Focus Object → Select Empty
- Focus automatically tracks character's face as they move
Bokeh considerations:
- Add small lights in background for visible bokeh
- Use 9-12 aperture blades for smooth, circular bokeh
- Background should be 5-10 meters behind subject
Common mistakes:
- ❌ Focusing on nose instead of eyes
- ❌ DoF so shallow that one eye sharp, other eye soft
- ❌ Background too close—doesn't blur enough
- ✓ Solution: Focus on closest eye, increase subject-background distance
Product Visualization
📦 Commercial Product Shots
Goal: Show product clearly while suggesting depth, context
Camera setup (hero shot):
- Focal length: 50mm-85mm
- Aperture: f/4-f/5.6 (moderate DoF)
- Distance: Depends on product size
- Focus target: Product brand/logo or key feature
Why these settings:
- Need product mostly sharp (client requirement)
- But want some background blur for depth
- f/4-5.6 is sweet spot for product work
- Logo/branding must be perfectly sharp
Lifestyle product shots (more DoF):
- Product in context (on desk, in kitchen, etc.)
- Aperture: f/2.8-f/4 (shallower DoF)
- Focus on product, blur environment
- Emphasizes product as subject, not just catalog photo
Technical product shots (less DoF):
- Show all details, specifications
- Aperture: f/8-f/11 (deep DoF)
- Everything sharp edge to edge
- Common for technical documentation, manuals
Setup tips:
- Place focus Empty at product's most important feature
- For bottles/cans: focus on label
- For electronics: focus on screen or logo
- For jewelry: focus on gemstone or central element
- Test render to verify key features are sharp
Architectural Visualization
🏛️ Interior and Exterior Shots
Goal: Show space, details, while maintaining depth
Interior camera setup:
- Focal length: 24mm-35mm (wide angle for space)
- Aperture: f/8-f/11 (deep DoF)
- Distance: Varies by room size
- Focus target: 1/3 into the scene
Why these settings:
- Clients want to see entire space clearly
- Deep DoF keeps foreground and background sharp
- Wide angle captures room scope
- Everything from near to far should be readable
Exterior shots:
- Similar to interiors: f/8-f/11 for overall sharpness
- Wide to normal focal lengths (24mm-50mm)
- Focus approximately 1/3 into scene for maximum sharpness
Artistic architectural shots:
- Can use shallow DoF for mood/emphasis
- Focus on specific detail (doorway, chandelier, texture)
- Blur background to isolate architectural element
- Aperture: f/2.8-f/4
- More editorial than commercial
DoF exceptions in archviz:
- Detail shots: Close-up of materials, fixtures (use shallow DoF, f/2.8-4)
- Mood shots: Through window, looking into space (can use f/4-5.6)
- Hero object: Featured furniture piece (shallow DoF acceptable)
Environment/Landscape Renders
🌄 Natural and Fantasy Environments
Goal: Showcase vast environment, maintain sharpness throughout
Camera setup:
- Focal length: 24mm-50mm
- Aperture: f/11-f/16 (very deep DoF)
- Distance: Far from camera
- Focus target: Hyperfocal distance (approximately 1/3 into scene)
Why these settings:
- Landscapes demand front-to-back sharpness
- Viewer wants to examine entire scene
- Small aperture provides maximum DoF
- Focus 1/3 into scene maximizes sharpness from near to infinity
Exceptions for creative effect:
- Foreground subject in landscape:
- Character looking at vista
- Focus on character (f/4-5.6)
- Landscape slightly soft
- Emphasizes character over environment
- Selective focus on distant landmark:
- Focus on mountain peak or distant structure
- Foreground softly blurred
- Draws eye to specific feature
- Atmospheric depth:
- Moderate DoF (f/5.6-8)
- Slight blur in far distance
- Combined with atmospheric fog
- Reinforces sense of scale
Action/Dynamic Scenes
⚡ Fast Movement and Energy
Goal: Keep subject sharp during movement, blur background for speed sense
Camera setup:
- Focal length: 50mm-85mm
- Aperture: f/2.8-f/4 (shallow to moderate)
- Distance: Varies by subject
- Focus target: Moving subject (use Focus Object)
Why these settings:
- Shallow DoF isolates fast-moving subject
- Blurred background enhances sense of speed
- Focus Object tracks subject automatically
- Viewer's eye stays on action
Implementation:
- Create Empty, parent to animated subject
- Camera automatically maintains focus during movement
- Combined with motion blur for maximum dynamism
Multiple subjects (fighting, racing):
- Slightly deeper DoF (f/4-5.6)
- Keep both combatants/racers reasonably sharp
- Or use rack focus to shift attention between subjects
Cinematic Storytelling
🎭 Narrative-Driven Scenes
Dramatic closeups:
- Aperture: f/1.4-f/2.8 (extremely shallow)
- Focus on eyes
- Everything else blurred
- Intimate, emotional
Over-the-shoulder dialogue:
- Aperture: f/2.8-f/4
- Focus on speaker's face
- Foreground character (shoulder) softly blurred
- Establishes spatial relationship
Establishing shots:
- Aperture: f/8-f/11 (deep DoF)
- Show entire environment
- Orient viewer to space
- Wide angle (24mm-35mm)
Revelation moments:
- Start with shallow DoF (subject blurred)
- Rack focus to reveal identity or detail
- Or deepen DoF over time (aperture change)
- Gradual information reveal
Suspense/mystery:
- Shallow DoF with partial reveals
- Focus on clues, keep context blurred
- Viewer pieces together scene
- Withholding information builds tension
💡 Quick Reference: DoF by Scenario
| Scenario | Focal Length | Aperture | Focus On |
|---|---|---|---|
| Portrait | 85-135mm | f/1.8-2.8 | Closest eye |
| Product (hero) | 50-85mm | f/4-5.6 | Logo/key feature |
| Architecture | 24-35mm | f/8-11 | 1/3 into scene |
| Landscape | 24-50mm | f/11-16 | Hyperfocal (1/3 in) |
| Action | 50-85mm | f/2.8-4 | Moving subject |
| Cinematic closeup | 85-135mm | f/1.4-2 | Eyes |
| Establishing shot | 24-35mm | f/8-11 | Middle distance |
💡 DoF as Visual Language: Every f-stop tells a story. f/1.4 whispers "intimacy"—just you and the subject, nothing else matters. f/8 declares "context"—this is where we are, this is the world. f/16 shouts "epic"—behold this vast landscape in all its detail. Professional cinematographers choose aperture as carefully as they choose camera angle, because DoF isn't just a technical setting—it's part of the visual vocabulary. A portrait at f/11 feels documentary, observational. The same portrait at f/1.8 feels emotional, personal, like we're inside the character's head. When you set your aperture in Blender, you're not just controlling blur—you're making a statement about how the viewer should feel about what they're seeing.
🔧 Troubleshooting DoF Issues
Depth of field can be finicky. Sometimes it doesn't look right, doesn't render as expected, or creates unexpected artifacts. Let's solve the most common problems you'll encounter.
DoF Not Visible in Render
⚠️ Problem: Everything Sharp Despite Shallow Aperture
Symptoms:
- Set aperture to f/1.4 but render looks like f/16
- No blur visible in background or foreground
- Viewport shows DoF preview but render doesn't
Cause 1: DoF not enabled
- Solution:
- Select camera
- Camera Properties → Depth of Field section
- Check that there's an F-Stop value set (not blank)
- Or check that Focus Object is assigned
- If both are empty, DoF is disabled
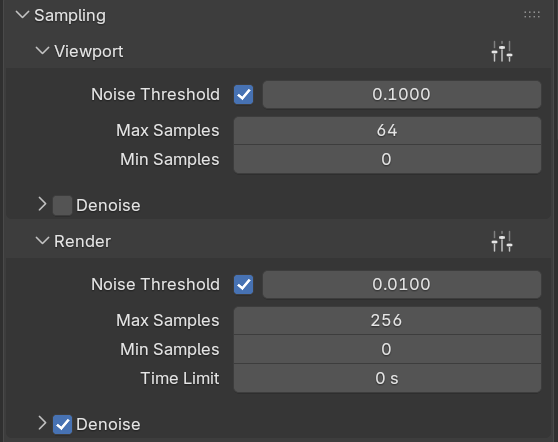
Cause 2: Render samples too low (Cycles)
- DoF requires many samples to render cleanly
- Low samples = noisy or absent DoF
- Solution:
- Render Properties → Sampling
- Increase Render samples to 128+ (256+ for clean DoF)
- Viewport samples can stay lower (32-64)
Cause 3: Eevee DoF not enabled
- In Eevee, DoF requires specific enabling
- Solution:
- Camera Properties → Depth of Field → Enable
- Render Properties → Bloom (if you want bokeh highlights)
- May need to increase Max Size for large blur
Cause 4: Insufficient subject-background separation
- If subject and background at similar distances, DoF minimal
- Solution:
- Move background farther from subject
- Or move subject farther from background
- Need at least 2-3x focus distance for visible blur
Cause 5: Aperture too small
- f/8 or higher creates deep DoF—blur barely visible
- Solution:
- Reduce f-stop to f/2.8 or lower
- Test with f/1.4 for obvious DoF effect
- Then adjust to taste
DoF Too Strong or Too Weak
⚠️ Problem: Can't Achieve Desired DoF Strength
DoF too strong (everything blurred):
- Cause: Aperture too wide, subject too close, or focal length too long
- Solutions:
- Increase f-stop (f/1.4 → f/2.8 → f/4)
- Move camera farther from subject
- Use shorter focal length (85mm → 50mm)
- Each adjustment deepens DoF slightly
DoF too weak (not enough blur):
- Cause: Aperture too narrow, subject too far, or focal length too short
- Solutions:
- Decrease f-stop (f/5.6 → f/2.8 → f/1.4)
- Use longer focal length (50mm → 85mm → 135mm)
- Move camera closer to subject (increases blur)
- Increase subject-background distance
Remember the DoF equation:
- Shallow DoF = Wide aperture + Long lens + Close subject + Far background
- Deep DoF = Narrow aperture + Short lens + Distant subject + Close background
Noisy or Grainy DoF (Cycles)
⚠️ Problem: DoF Looks Grainy/Noisy
Symptoms:
- Out-of-focus areas have visible grain/noise
- Bokeh circles not smooth
- Uneven blur quality
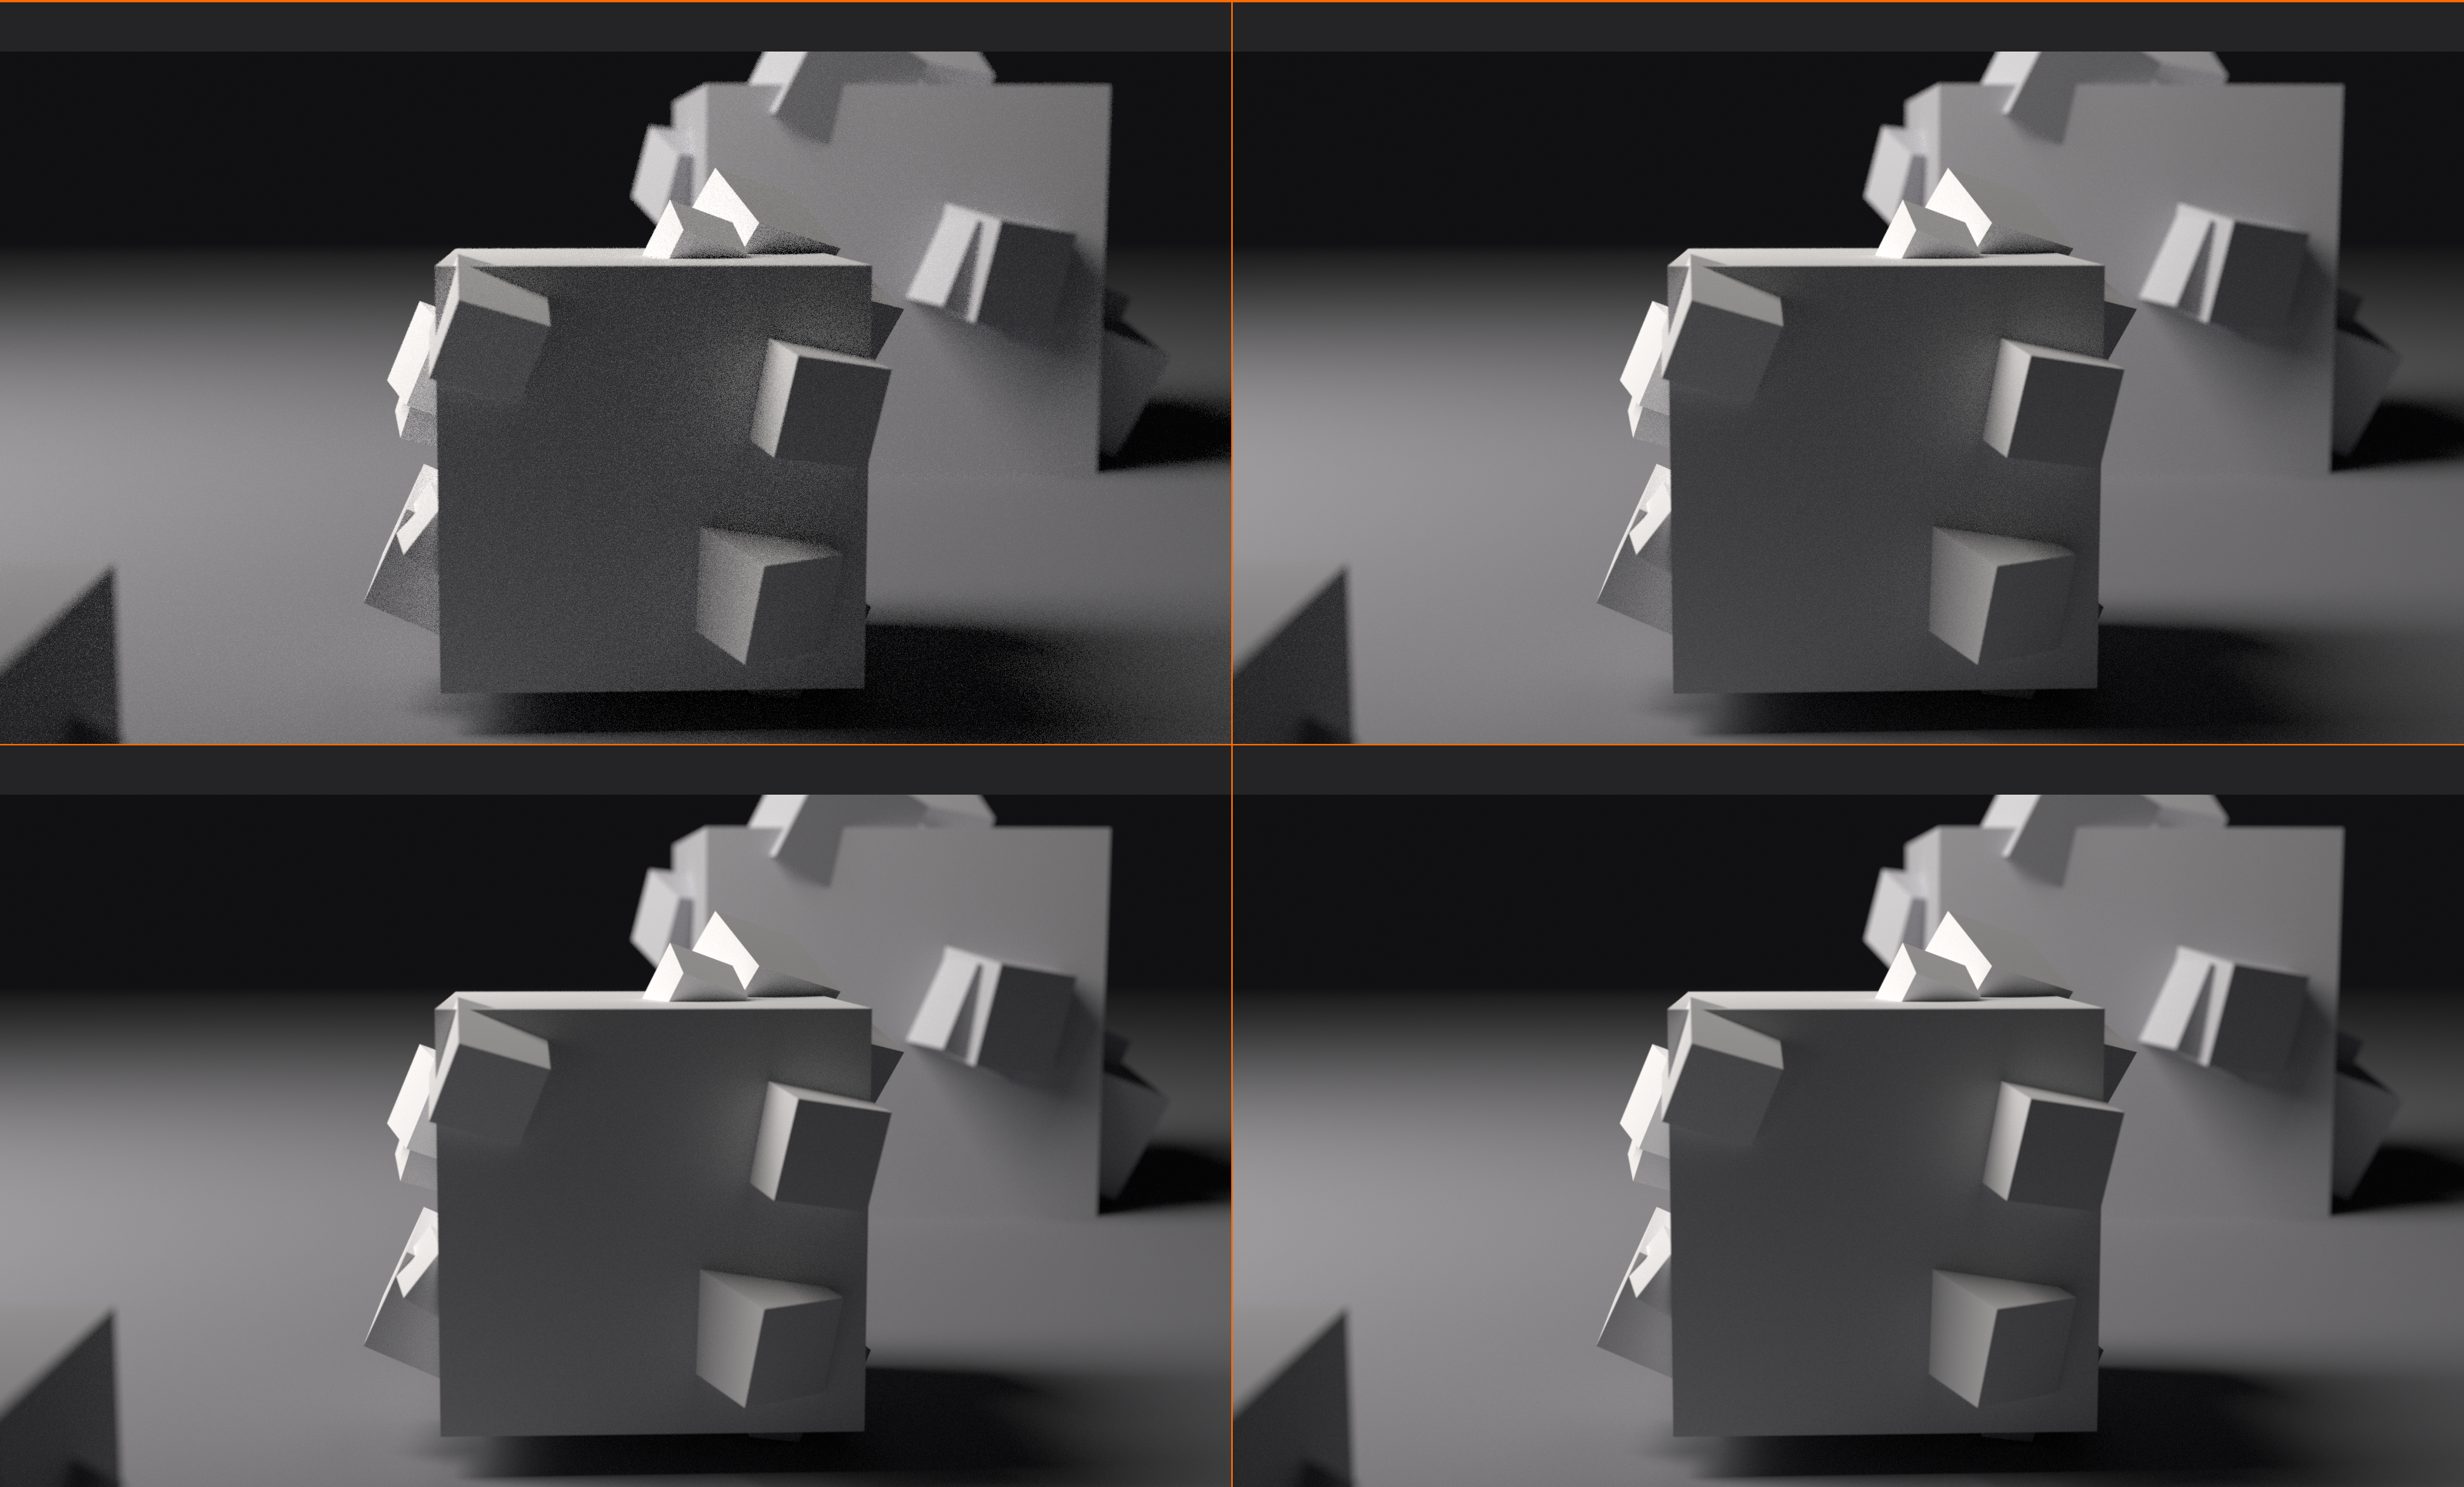
Cause: Insufficient render samples
- DoF is computationally expensive in Cycles
- Requires many samples for clean blur
- Solution:
- Render Properties → Sampling → Render: 256+ samples
- For very shallow DoF: 512-1024 samples
- Enable denoising to help (but samples still needed)
Denoising settings:
- Render Properties → Sampling → Denoise (enable)
- Use OptiX or OpenImageDenoise
- Helps reduce noise but can't fix extreme undersampling
- DoF requires samples—denoising is supplement, not replacement
Progressive refinement approach:
- Render with 128 samples for quick preview
- Verify DoF looks correct (focus, amount)
- Then render final at 256-512 samples
- Saves time—don't waste high sample count on wrong settings
Subject Out of Focus
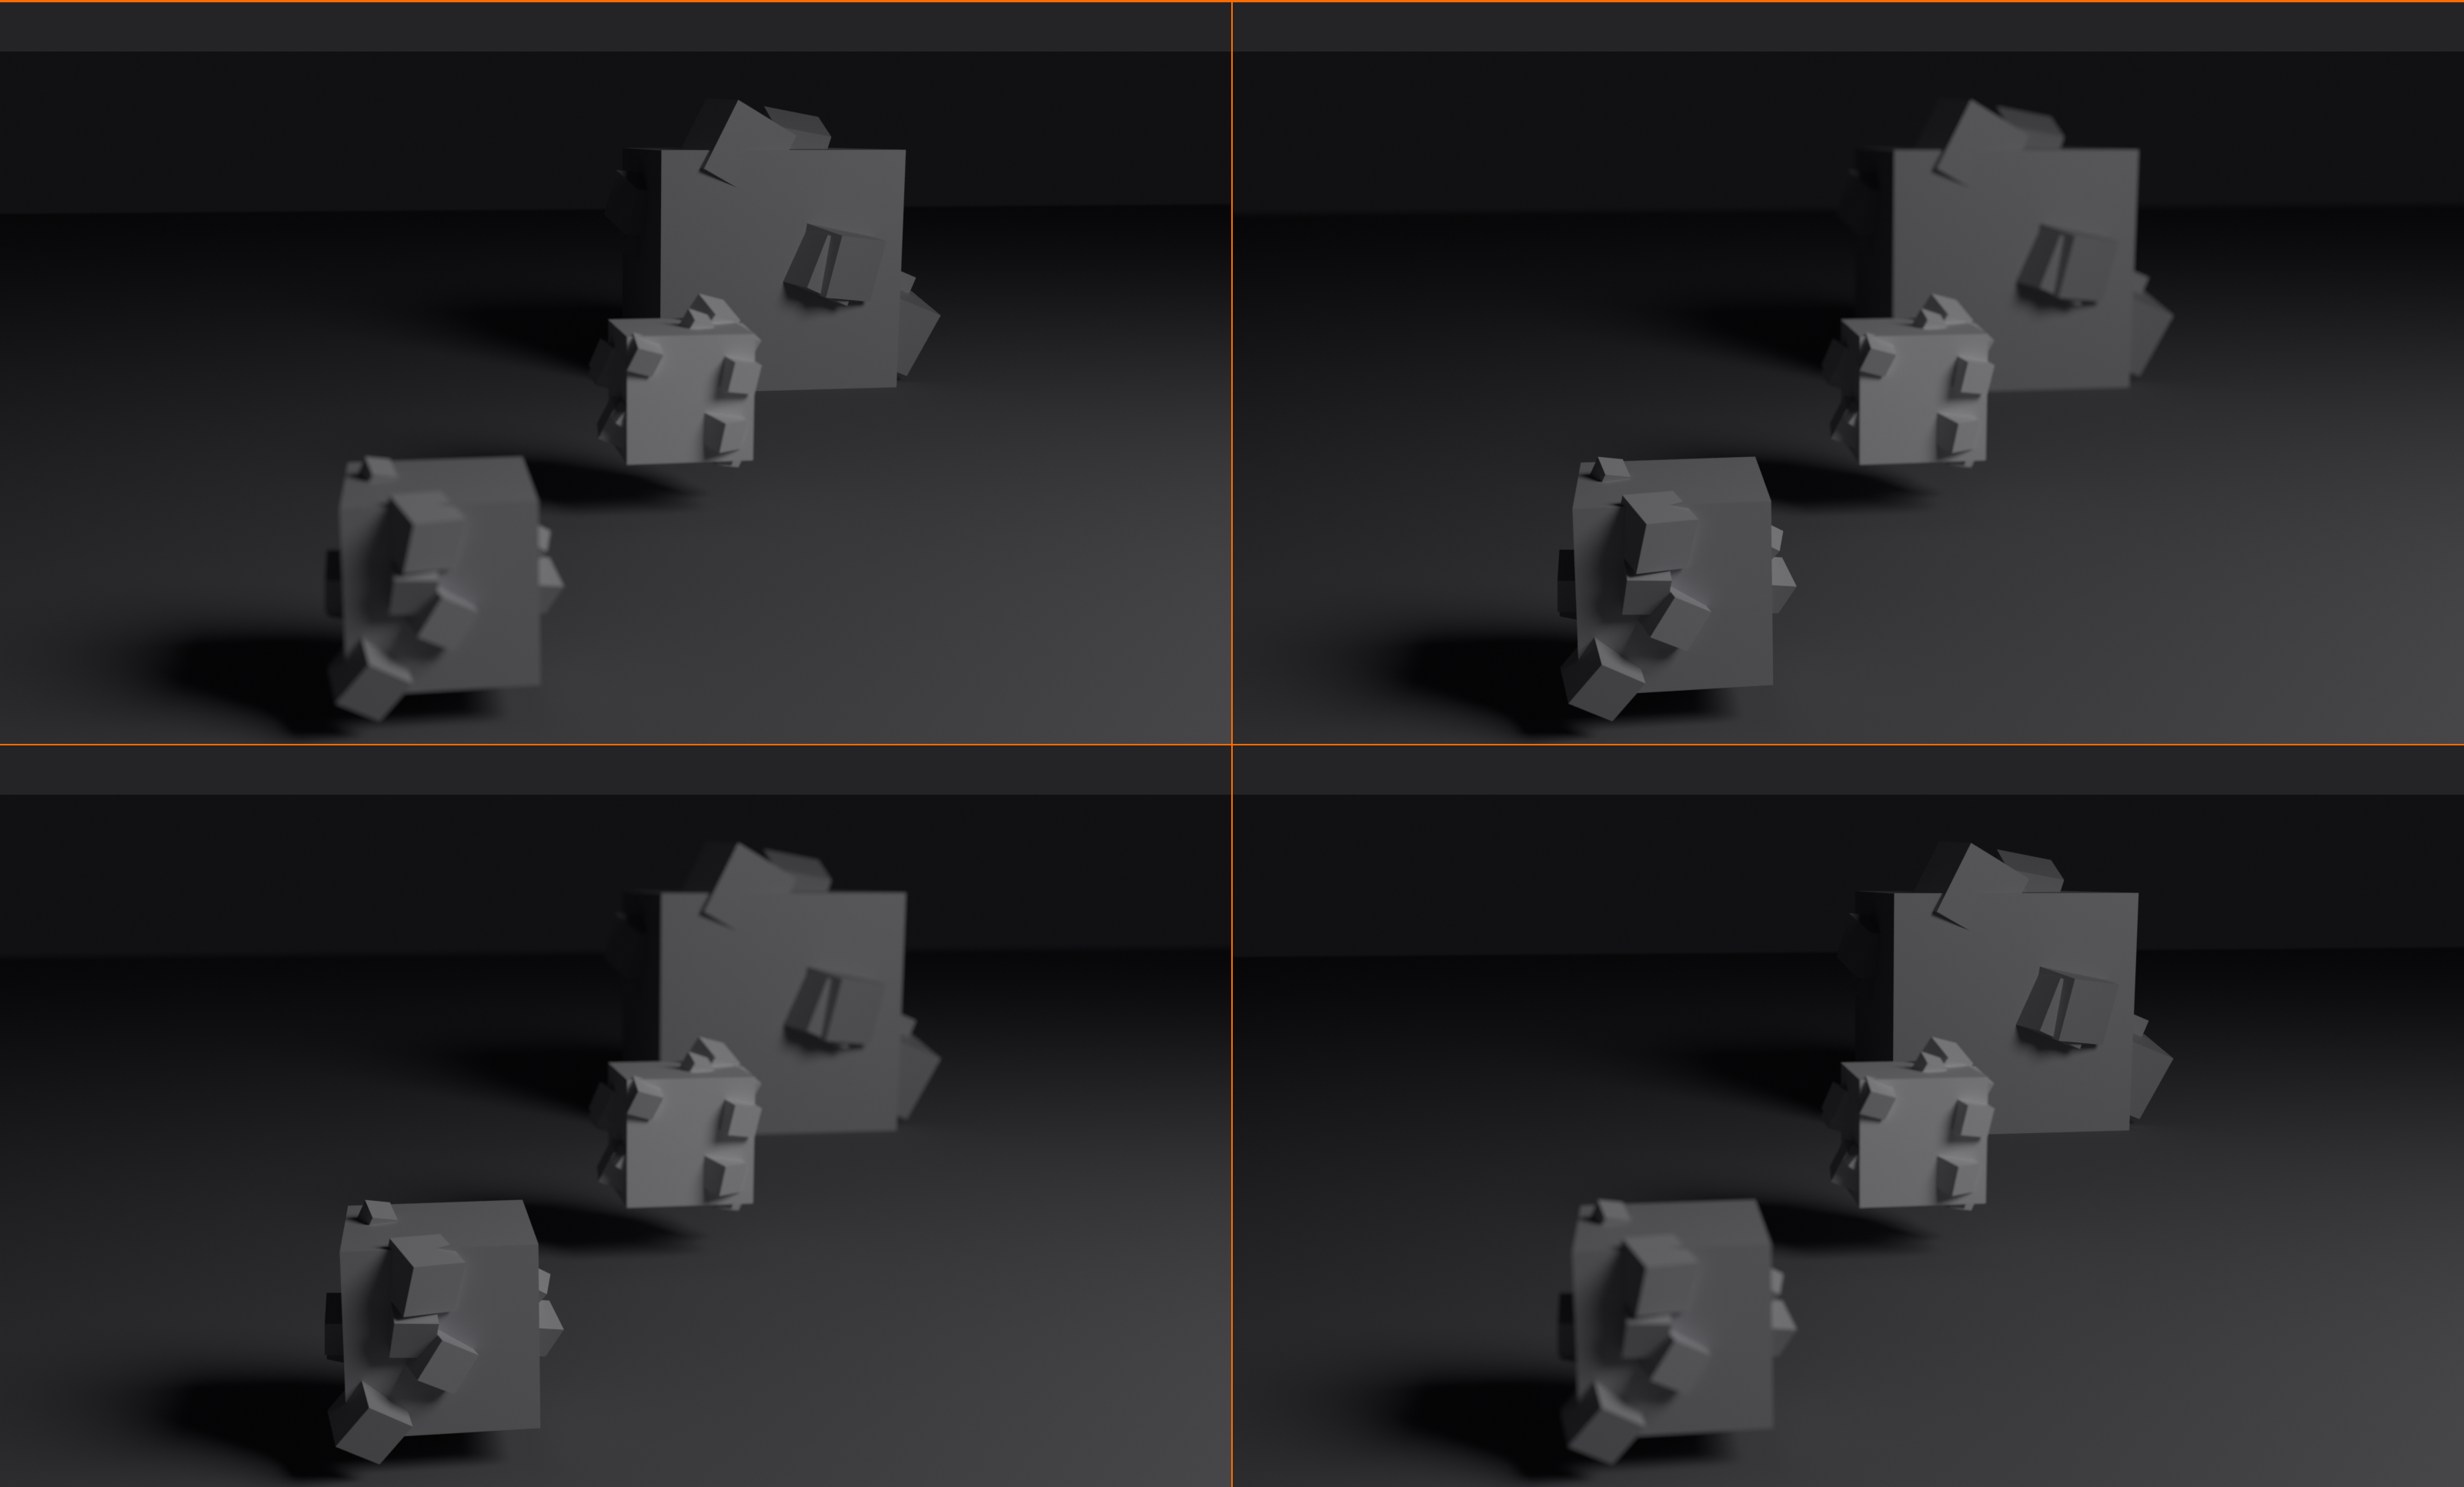
⚠️ Problem: Wrong Part of Scene is Sharp
Symptoms:
- Background sharp, subject blurred
- Or foreground sharp, subject blurred
- Focus seems to be in wrong location
Cause 1: Focus distance incorrect
- Solution:
- Enable Camera Properties → Viewport Display → Limits
- Yellow cross shows focus plane location in viewport
- Adjust Focus Distance until cross aligns with subject
- Or use Focus Object for automatic targeting
Cause 2: Focus Object set incorrectly
- Focus Object pointing to wrong object
- Or Empty in wrong location
- Solution:
- Check Camera Properties → Depth of Field → Focus Object
- Verify it's pointing to correct object/Empty
- In viewport, select camera, verify line connects to intended focus point
- Move Empty to correct location if needed
Cause 3: DoF too shallow
- Aperture so wide that DoF range tiny
- Focus technically correct but subject spans beyond DoF depth
- Solution:
- Slightly close aperture (f/1.4 → f/2 → f/2.8)
- Gives more "wiggle room" for subject
- Especially important for deep subjects (person facing camera)
Quick fix method:
- In viewport (camera view),
Shift+Right-Clickon subject - Focus distance automatically set to that point
- Quick way to get focus approximately right
- Then fine-tune with Focus Distance value or Empty
Bokeh Artifacts or Weird Shapes
⚠️ Problem: Bokeh Looks Wrong
Hexagonal bokeh when you want circular:
- Cause: Low blade count (default is often 6)
- Solution:
- Camera Properties → Depth of Field → Aperture
- Increase Blades to 9-12 for rounder bokeh
- Or set very wide aperture (f/1.4) for perfect circles
Bokeh not visible at all:
- Cause: No bright point sources in scene
- Solution:
- Add small bright lights in background
- Or add glossy spheres with specular highlights
- Bokeh only visible with bright, small light sources
- Large diffuse surfaces don't create visible bokeh
Bokeh too distracting:
- Cause: Background lights too bright or numerous
- Solution:
- Reduce background light intensity
- Remove some lights
- Slightly close aperture to reduce bokeh size
- Balance: visible but not overwhelming
Weird polygonal shapes (not bokeh circles):
- Cause: Object edges being blurred, not point lights
- This is normal—only point lights create circular bokeh
- Large object edges blur into irregular shapes
- Not a problem—this is accurate behavior
DoF Animation Issues
⚠️ Problem: Animated DoF Behaves Unexpectedly
Focus doesn't follow moving subject:
- Cause: Using manual Focus Distance instead of Focus Object
- Solution:
- Create Empty
- Parent Empty to subject (or subject's armature bone)
- Set Camera → Focus Object to Empty
- Focus now tracks subject automatically
Rack focus too fast or too slow:
- Cause: Keyframe timing incorrect
- Solution:
- Open Timeline or Graph Editor
- Move keyframes closer together (faster) or farther apart (slower)
- Typically 30-60 frames (1-2 seconds) for normal rack focus
Rack focus feels robotic:
- Cause: Linear interpolation
- Solution:
- Graph Editor → Select keyframes
- Press
T→ Set Interpolation → Bezier - Or choose Sinusoidal for smooth ease in/out
- Adjust handles for custom easing
Focus "hunting" (oscillating):
- Cause: Too many keyframes or conflicting keyframes
- Solution:
- Simplify keyframes—only key start and end points
- Remove intermediate keyframes unless intentional
- Check for accidental duplicate keyframes
Performance and Render Time Issues
⚠️ Problem: DoF Renders Too Slowly
Cycles DoF slow:
- Reality: DoF adds render time—this is normal
- Optimization strategies:
- Use Eevee for preview/test renders (much faster)
- Only render final shot in Cycles
- Reduce render samples to minimum acceptable (256 often sufficient)
- Enable adaptive sampling to save samples on converged areas
- Use denoising to allow lower sample counts
Eevee DoF slow:
- Cause: DoF Max Size set too high
- Solution:
- Camera Properties → Depth of Field → Max Size
- Lower value = faster but limited blur amount
- Try 64-128 for most cases
- Only increase if blur is getting cut off
Viewport preview slow:
- Solution:
- Disable viewport DoF until ready to test
- Camera icon in viewport header → uncheck Depth of Field
- Work without DoF, enable only for preview
- Or reduce viewport samples (Render Properties → Viewport Sampling)
Eevee vs Cycles DoF Differences
🎨 Render Engine Behavior
Cycles DoF characteristics:
- ✅ Physically accurate blur
- ✅ Proper bokeh shape (respects blade count)
- ✅ Accurate light gathering
- ❌ Slower render times
- ❌ Requires high sample counts
- Best for: Final renders, hero shots, extreme DoF effects
Eevee DoF characteristics:
- ✅ Very fast rendering
- ✅ Interactive viewport preview
- ✅ Good for quick iteration
- ❌ Approximated DoF (not physically accurate)
- ❌ Bokeh shape less accurate
- ❌ Limited blur amount (Max Size)
- Best for: Previews, animations, less critical shots
When Eevee is good enough:
- Moderate DoF (f/4-8 range)
- No extreme bokeh emphasis
- Fast turnaround needed
- Animation (render time critical)
When Cycles is necessary:
- Extreme shallow DoF (f/1.4-2)
- Bokeh is key visual element
- Final portfolio/client work
- Quality over speed priority
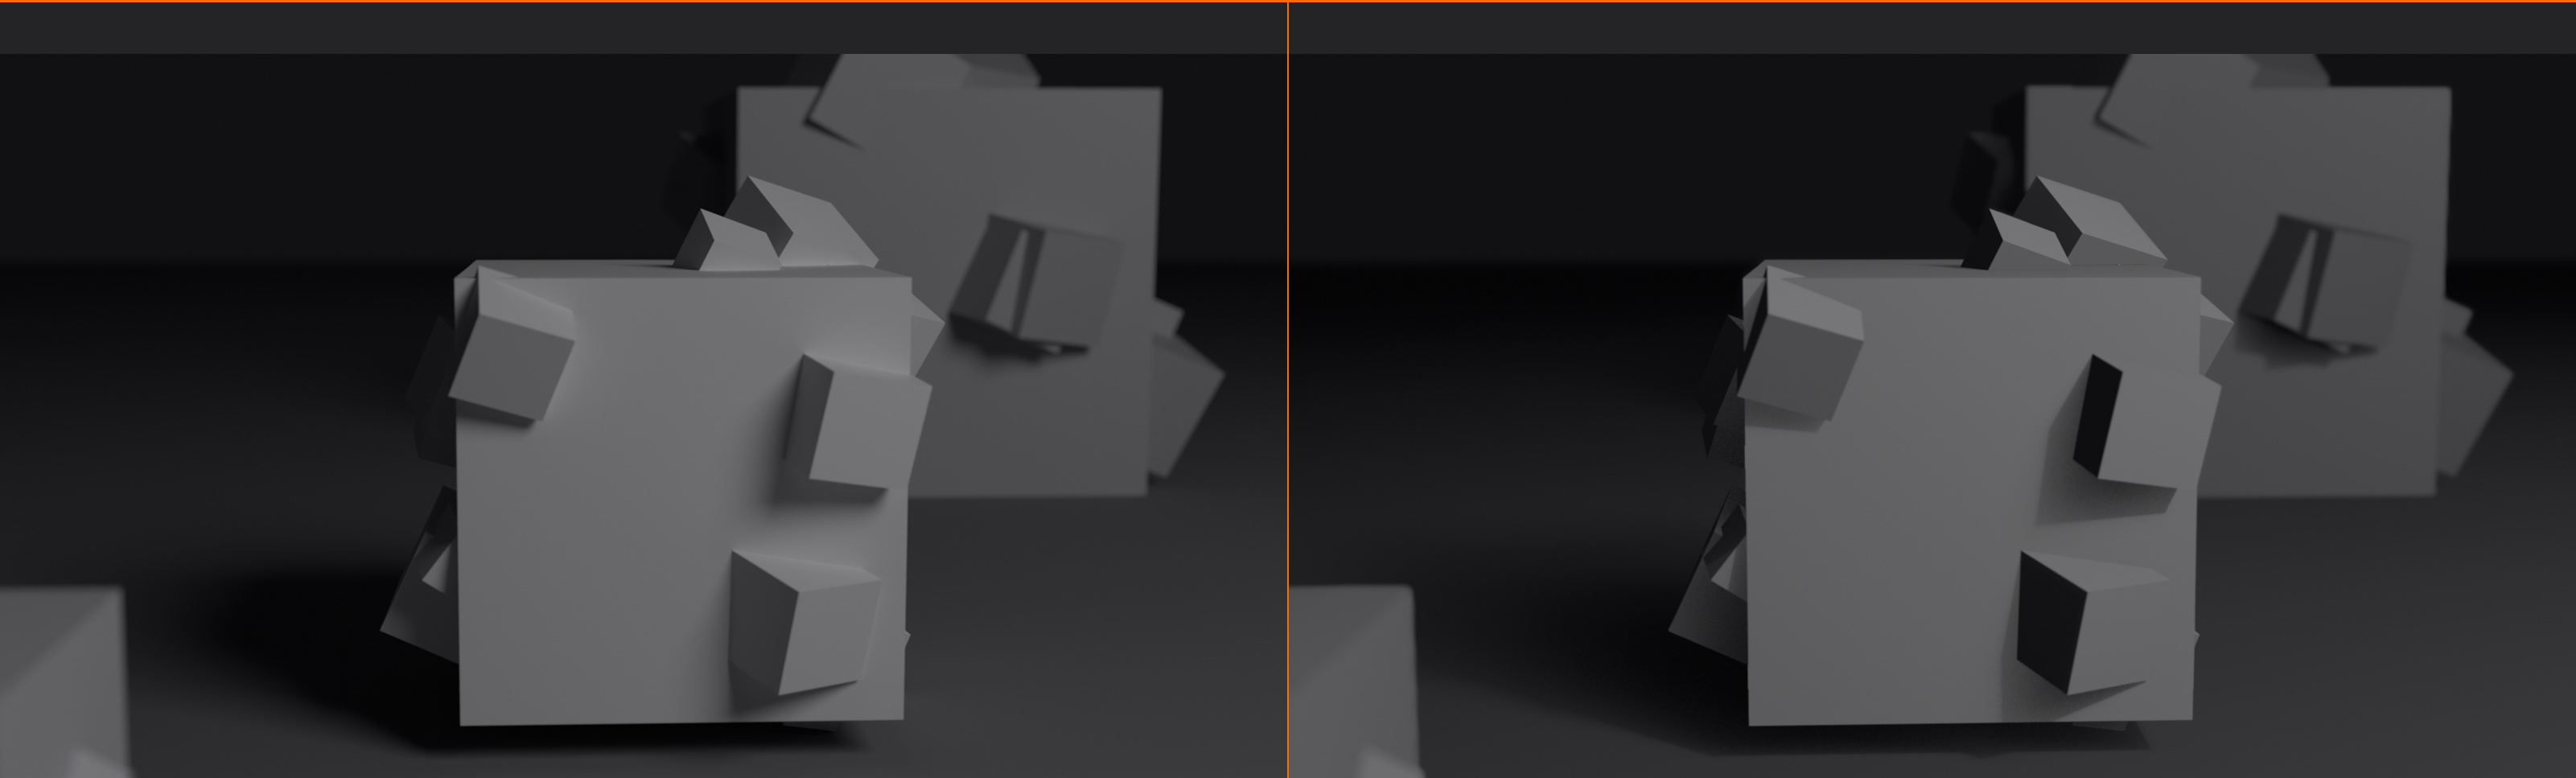
✅ DoF Troubleshooting Checklist
If DoF isn't working, check in this order:
- ✓ Is DoF enabled? (F-Stop value or Focus Object assigned)
- ✓ Is focus distance correct? (Use Limits display to verify)
- ✓ Is aperture appropriate? (f/2.8 or wider for visible DoF)
- ✓ Is subject-background distance sufficient? (Need separation)
- ✓ Are render samples high enough? (256+ for Cycles)
- ✓ Is Eevee DoF enabled in camera properties?
If DoF is working but looks wrong:
- ✓ Adjust aperture for stronger/weaker effect
- ✓ Increase render samples for cleaner blur
- ✓ Adjust blade count for better bokeh
- ✓ Check focus distance (Shift+Right-Click for quick fix)
- ✓ Verify interpolation (use easing for animated focus)
💡 DoF Troubleshooting Philosophy: When DoF isn't working, resist the urge to randomly adjust every setting. The systematic approach wins: verify it's enabled, check focus distance, confirm aperture setting, ensure adequate samples. Most DoF problems are one of these four issues. Once it's working but doesn't look right, then you optimize—adjust aperture for amount, increase samples for quality, tune bokeh for aesthetics. The best troubleshooters don't know more solutions—they just work methodically through the possibilities instead of guessing. Keep a render with DoF working correctly as reference, and when something goes wrong, compare settings side-by-side. Often the answer jumps out immediately.
🎯 Project: DoF Mastery Gallery
Time to put everything together! You'll create a gallery of four different DoF scenarios, each demonstrating your understanding of aperture, focus, and bokeh. This project will become portfolio-ready evidence of your camera mastery.
Project Overview
🎬 Your Mission
Create four distinct renders, each showcasing different depth of field techniques:
- Portrait Shot: Extreme shallow DoF with beautiful bokeh
- Product Display: Moderate DoF balancing sharpness and depth
- Environmental Story: Rack focus transition (animated)
- Landscape/Vista: Deep DoF showing front-to-back sharpness
Each render should demonstrate technical mastery and artistic intent.
Setup: Creating Your Scene Library
📦 Asset Preparation
You'll need simple subjects for each shot:
For Portrait:
- Suzanne (monkey head) with Subdivision Surface modifier
- Or simple character proxy (UV Sphere + cylinders for body)
- Position at origin for easy camera setup
For Product:
- Simple product shape (cylinder for can/bottle, cube for box)
- Add Bevel modifier for realistic edges
- Apply simple material (metallic or glossy)
For Environment:
- Foreground object (cube or sphere)
- Background object (different shape, 5-10 units away)
- Simple ground plane
For Landscape:
- Use Plane + Subdivision Surface + Displace modifier
- Or import simple terrain mesh
- Add several objects at different distances (trees, rocks)
- Can use primitive shapes—doesn't need to be photorealistic
Background elements for bokeh (all shots):
- Array of small Point lights (10-20) scattered in background
- Or small Emission spheres (0.1 unit radius)
- Position 5-15 units behind main subject
- Random heights for natural look
Shot 1: Portrait with Extreme DoF
👤 The Cinematic Closeup
Goal: Create dramatic portrait with subject sharp, everything else beautifully blurred
Camera setup:
- Add Camera (
Shift+A→ Camera) - Camera Properties → Lens:
- Focal Length: 85mm
- Sensor Size: 36mm (full frame)
- Camera Properties → Depth of Field:
- F-Stop: 1.8
- Blades: 12 (smooth bokeh)
- Focus Object: Create Empty at subject's "eye" location
- Position camera 3-4 units from subject
Lighting setup:
- Key light: Area light, above and 45° to side
- Fill light: Lower intensity, opposite side
- Rim light: Behind subject, highlighting edge
- Background lights: 15-20 small point lights scattered
Materials:
- Subject: Principled BSDF, adjust color/roughness
- Background elements: Emission shader (for bokeh)
Render settings (Cycles):
- Samples: 512 (for clean DoF)
- Resolution: 1920x1080
- Denoise: Enabled
Success criteria:
- ✓ Subject's face perfectly sharp
- ✓ Background completely blurred
- ✓ Visible circular bokeh from background lights
- ✓ Smooth, creamy blur quality
- ✓ Professional portrait aesthetic
Shot 2: Product Display
📦 Commercial Quality
Goal: Show product clearly while maintaining depth and context
Camera setup:
- Focal Length: 50mm
- F-Stop: 4.0
- Focus Object: Empty at product center or logo
- Position: Slight angle (not dead-on), 2-3 units away
Scene composition:
- Product: Center frame, elevated on surface
- Props: Complementary objects (books, plants, etc.)
- Background: 3-5 units behind product
- Surface: Simple plane with material
Lighting setup:
- Three-point lighting (from previous lessons)
- Soft key light (large area light)
- Fill to lift shadows
- Back/rim for separation
- Optional: HDRI for reflections
Materials focus:
- Product: Glossy/metallic material showing reflections
- Ensure reflections in focus (part of product sharpness)
- Props: Matte materials (don't compete with product)
Success criteria:
- ✓ Product entirely sharp (all details readable)
- ✓ Background softly blurred but recognizable
- ✓ Depth apparent (product separated from background)
- ✓ Professional, commercial look
- ✓ Balanced DoF—not too shallow, not too deep
Shot 3: Rack Focus Story (Animated)
🎬 Dynamic Focus Shift
Goal: Create animated shot where focus shifts from foreground to background
Scene setup:
- Foreground object: 2 units from camera
- Background object: 8-10 units from camera
- Clear visual connection (foreground character "looking at" background object)
Camera setup:
- Focal Length: 85mm (emphasizes DoF)
- F-Stop: 2.8 (shallow enough for clear transition)
- Static camera (no movement)
Animating the focus:
- Method: Animated Empty
- Create Empty_Focus
- Camera → Focus Object → Empty_Focus
- Frame 1:
- Position Empty at foreground object
- Hover over Empty location, press
I→ Location
- Frame 60:
- Move Empty to background object
- Press
I→ Location
- Easing:
- Open Graph Editor
- Select Empty's location keyframes
- Press
T→ Sinusoidal (smooth ease in/out)
Lighting:
- Light both foreground and background adequately
- Background should be visible (even if blurred at start)
- Foreground should be visible (even if blurred at end)
Render settings:
- Animation: 90 frames (3 seconds at 30fps)
- Frame 1-30: Focus on foreground (hold)
- Frame 30-60: Rack focus transition
- Frame 60-90: Focus on background (hold)
- Samples: 256 (acceptable for animation)
- Output as video file or image sequence
Success criteria:
- ✓ Smooth transition between focus points
- ✓ Both subjects clearly visible when in focus
- ✓ Natural easing (not linear)
- ✓ 1-2 second transition timing
- ✓ Storytelling: reveals information progressively
Shot 4: Landscape with Deep DoF
🌄 Front-to-Back Sharpness
Goal: Create expansive scene with everything sharp from near to far
Camera setup:
- Focal Length: 35mm (wide angle for landscape feel)
- F-Stop: 16 (very deep DoF)
- Focus Distance: 1/3 into scene (hyperfocal principle)
- Position: Ground level or slightly elevated
Scene composition:
- Foreground elements: 1-3 units from camera
- Midground: 5-10 units
- Background: 15-30+ units
- Vary heights for visual interest
- Leading lines directing eye through scene
Lighting setup:
- Sun light (Directional light, low angle for drama)
- Or HDRI world lighting (outdoor environment)
- Sky with atmospheric gradient
- Long shadows emphasizing depth
Focus technique:
- Create Empty at 1/3 distance into scene
- Or manually set Focus Distance to approximately 1/3 of far distance
- Enable Limits display to verify focus plane
- Adjust until foreground, middle, and background all acceptably sharp
Success criteria:
- ✓ Foreground elements sharp and detailed
- ✓ Midground elements sharp
- ✓ Background/horizon sharp
- ✓ No obvious blur anywhere in frame
- ✓ Epic, expansive feeling
- ✓ Demonstrates control over deep DoF
Bonus Challenges
🌟 Go Further (Optional)
Challenge 1: Anamorphic bokeh
- Recreate Portrait shot with anamorphic bokeh (oval shapes)
- Set Aperture Ratio to 0.5
- Add horizontal lens flare in post (optional)
- Render at 2.39:1 aspect ratio (cinemascope)
Challenge 2: Focus breathing
- Create animated shot with subtle focus drift
- Animate focus distance slightly (0.1-0.2 units oscillation)
- Slow, organic movement (2-3 second cycles)
- Simulates manual focus pulling or handheld feel
Challenge 3: Multi-subject rack focus
- Scene with 3+ subjects at different distances
- Rack focus through all subjects sequentially
- A → B → C → D progression
- Tells story through focus sequence
Challenge 4: DoF comparison sheet
- Same scene, 6 renders with different f-stops
- f/1.4, f/2.8, f/4, f/5.6, f/8, f/16
- Arrange in grid to show DoF progression
- Educational reference showing aperture impact
Submission and Review
✅ Project Completion Checklist
Required deliverables:
- ✓ Portrait render (1920x1080, PNG or JPG)
- ✓ Product render (1920x1080, PNG or JPG)
- ✓ Rack focus animation (MP4 or image sequence)
- ✓ Landscape render (1920x1080, PNG or JPG)
Quality verification:
- ✓ Each render demonstrates appropriate DoF for scenario
- ✓ Focus is accurate (sharp where intended)
- ✓ Bokeh visible in shots that should have it
- ✓ No noise/grain in out-of-focus areas
- ✓ Professional composition and lighting
Self-assessment questions:
- Can you explain why you chose each f-stop value?
- Can you describe how DoF helps tell the story in each shot?
- Would you make the same choices for a client project?
- What did you learn about DoF that surprised you?
💡 The Portfolio Power of DoF Mastery: These four shots aren't just practice—they're portfolio gold. When art directors and clients see your work, they're not just looking at pretty pictures—they're assessing technical competence. A gallery showing mastery of shallow DoF, moderate DoF, animated focus, and deep DoF instantly communicates "this person understands cameras at a professional level." It says you can deliver the right depth of field for any project: intimate portraits, commercial products, cinematic storytelling, or epic environments. Many 3D artists neglect camera work, creating technically perfect models with novice camera technique. Don't be that artist. These DoF skills separate professionals from hobbyists, and this project proves you're the former.
📝 Lesson Summary
Congratulations! You've mastered one of the most powerful cinematic tools in your arsenal. Depth of field isn't just a technical camera setting—it's a storytelling language that guides attention, creates mood, and separates professional work from amateur renders.
🎯 Key Takeaways
- Aperture controls blur amount: Wide aperture (f/1.4-2.8) = shallow DoF, narrow aperture (f/11-16) = deep DoF
- Focus distance determines sharpness location: Use Focus Object for easy targeting and animation tracking
- Bokeh is blur aesthetics: Blade count and aperture shape affect out-of-focus quality—9+ blades for premium look
- Rack focus shifts attention: Animate focus to guide viewer's eye and reveal information progressively
- DoF is genre-specific: Portraits want shallow DoF, landscapes want deep DoF, products want moderate DoF
- Four factors affect DoF: Aperture, focal length, focus distance, and sensor size—master all four
What We Covered
📚 Complete DoF Knowledge
Fundamentals:
- What depth of field is and why it matters
- How aperture (f-stops) controls blur intensity
- The relationship between f-number and DoF depth
- Real-world photography terminology in 3D context
Technical control:
- Setting up DoF in Blender camera properties
- Manual focus distance vs Focus Object methods
- Visualizing focus plane with camera Limits display
- Aperture blade count and bokeh shape control
Focus techniques:
- Where to place focus for different subjects (eyes, logos, landmarks)
- Understanding focal plane and acceptable sharpness zone
- Hyperfocal distance for landscape photography
- Focus strategies for moving subjects and cameras
Bokeh mastery:
- What makes "good" vs "bad" bokeh
- How aperture blades create bokeh shapes
- Creating visible bokeh with lights and highlights
- Anamorphic and specialty bokeh effects
Rack focus:
- Animating focus shifts between subjects
- Timing and easing for natural focus pulls
- Narrative applications (reveals, reactions, discoveries)
- Advanced techniques (chain rack, motivated focus, whip rack)
Practical application:
- DoF settings for portraits, products, architecture, landscapes, action
- Cycles vs Eevee DoF characteristics and when to use each
- Troubleshooting common DoF problems
- Optimization for render performance
Skills You've Gained
✅ Professional Capabilities
You can now:
- ✓ Intentionally control what's sharp and what's blurred in any shot
- ✓ Choose appropriate f-stop for any scenario (portrait to landscape)
- ✓ Set up Focus Objects for precise, animation-friendly focus control
- ✓ Create beautiful bokeh with proper blade counts and background setup
- ✓ Animate rack focus to guide attention and reveal information
- ✓ Troubleshoot DoF issues systematically when renders don't look right
- ✓ Optimize DoF rendering for quality vs speed balance
- ✓ Match DoF aesthetics to genre expectations (commercial, cinematic, documentary)
- ✓ Explain your DoF choices with professional cinematography vocabulary
- ✓ Create portfolio-quality renders demonstrating camera mastery
The Creative Impact
🎨 Why This Matters
DoF as visual hierarchy:
- Sharp = important, look here
- Blurred = context, supporting information
- You control the visual hierarchy completely
- Shallow DoF isolates, deep DoF contextualizes
DoF as emotion:
- Extreme shallow DoF feels intimate, personal, emotional
- Deep DoF feels objective, documentary, informational
- Moderate DoF feels balanced, commercial, professional
- The same scene at different f-stops tells different stories
DoF as style signature:
- Consistent DoF approach creates visual identity
- Think Wes Anderson (deep DoF, everything sharp) vs Denis Villeneuve (selective focus)
- Your DoF choices become part of your artistic voice
- Clients recognize quality through intentional camera work
DoF separates professionals from novices:
- Beginners: everything sharp or everything blurred (extremes)
- Intermediate: using DoF but not always intentionally
- Professional: DoF choice deliberate for each shot, serves story/product
- You're now in the professional category
Common DoF Patterns to Remember
💡 The Essential Formulas
The shallow DoF formula:
- Wide aperture (f/1.4-2.8) + Long lens (85mm+) + Close subject + Far background = Maximum blur
The deep DoF formula:
- Narrow aperture (f/11-16) + Short lens (24-35mm) + Distant subject + Focus 1/3 into scene = Maximum sharpness
The commercial sweet spot:
- f/4-5.6 + 50-85mm lens + Moderate distance = Product visible, background pleasant
The portrait standard:
- f/1.8-2.8 + 85-135mm lens + Eyes in focus = Subject isolated, background bokeh
The landscape approach:
- f/11-16 + 24-50mm lens + Focus 1/3 into scene = Front-to-back sharpness
Next Steps in Your Journey
🚀 Continuing to Grow
Practice these skills:
- DoF study routine: Take one scene, render at f/1.4, f/2.8, f/4, f/5.6, f/8, f/11, f/16—see the progression
- Bokeh experiments: Try different blade counts (5, 7, 9, 12) and aperture ratios to see aesthetic differences
- Rack focus drills: Practice 10 different rack focus scenarios—foreground to background, character to object, reveal shots
- Match reference: Find professional photos/films, try to match their DoF in your renders
- Genre studies: Study DoF conventions in different film genres (noir, sci-fi, romance, action)
Analyze professional work:
- Watch movies with camera-focused commentary
- Study cinematography breakdowns on YouTube
- Look at photography portfolios, note f-stops used
- Ask yourself: "Why did they choose this DoF for this shot?"
- Notice when DoF changes within scenes (rack focus moments)
Build your DoF library:
- Save camera presets for common scenarios (portrait, product, landscape)
- Create Empty collections for focus targeting (eyes, logos, focal planes)
- Keep reference renders showing various f-stops
- Document your successful DoF setups for future projects
Combine with other techniques:
- DoF + Composition (previous lesson) = Visual hierarchy mastery
- DoF + Lighting = Mood control
- DoF + Animation (next lesson) = Dynamic storytelling
- DoF + Color grading = Complete aesthetic control
Avoiding Common Mistakes
⚠️ Long-Term Pitfalls to Avoid
Don't develop these bad habits:
- ❌ Always using extreme DoF: f/1.4 every shot becomes gimmicky—vary your approach
- ❌ Ignoring genre expectations: Clients expect certain DoF for certain projects—don't fight conventions without reason
- ❌ Forgetting focus point: Double-check focus is on subject, not background—easy to miss
- ❌ Over-relying on DoF: Bad composition + shallow DoF ≠ good image—fix composition first
- ❌ Never using deep DoF: Sometimes everything should be sharp—don't default to blur
- ❌ Unmotivated rack focus: Focus shifts should serve story, not just show off technique
- ❌ Forgetting render samples: Low samples = noisy DoF ruins otherwise good work
Instead, build these good habits:
- ✓ Ask "What should be sharp?" before setting up camera—intentional choices
- ✓ Test-render early: Quick low-sample render to verify DoF before final render
- ✓ Use viewport DoF preview: Camera icon → Depth of Field—see before rendering
- ✓ Document your settings: When DoF looks great, save camera settings for future reference
- ✓ Study the masters: Regularly analyze professional cinematography DoF choices
- ✓ Match DoF to intent: Every f-stop choice should support your story/message
Your DoF Toolkit
🛠️ Quick Reference
Essential hotkeys and shortcuts:
Numpad 0: Camera viewShift+Right-Click(in camera view): Set focus to clicked pointI: Insert keyframe (for animating focus)T(Graph Editor): Set interpolation type- Camera icon (viewport header) → Depth of Field: Toggle viewport DoF preview
Where to find settings:
- Camera Properties → Lens: Focal length, sensor size
- Camera Properties → Depth of Field: F-Stop, focus distance, focus object, blades
- Camera Properties → Viewport Display: Limits (shows focus plane)
- Render Properties → Sampling: Render samples (for clean DoF)
Quick DoF troubleshooting checklist:
- DoF enabled? (F-Stop set or Focus Object assigned)
- Focus distance correct? (Use Limits display to verify)
- Aperture appropriate? (f/2.8 or wider for visible DoF)
- Enough subject-background separation?
- Render samples sufficient? (256+ for Cycles)
- Eevee DoF enabled in camera properties?
💡 The DoF Mindset: The difference between amateur and professional camera work isn't technical knowledge—it's intentionality. Amateurs adjust DoF until it "looks good." Professionals ask: "What story am I telling? What should the viewer focus on? What emotion am I creating?" Then they choose the f-stop, focus point, and bokeh quality that serves those answers. You now have the technical skills to execute any DoF choice. The art is in making deliberate choices that serve your vision. Every time you set up a camera, pause and ask: "Why this f-stop? Why this focus point? What am I communicating?" When you can answer those questions clearly, you're thinking like a cinematographer. That's the mindset that creates memorable, powerful imagery.
🔮 What's Next?
You've completed the Camera and Composition module with mastery over camera basics, composition principles, and depth of field. You now control exactly what viewers see and how they see it. Next, we bring scenes to life with animation!
🎬 Coming Up: Lesson 23 - Camera Animation
In the next lesson, you'll learn to create dynamic camera movement that enhances storytelling and adds production value to your scenes:
- Camera animation fundamentals: Keyframes, interpolation, timing
- Classic camera moves: Dolly, crane, orbit, tracking shots
- Camera constraints: Follow path, track to, follow objects
- Handheld and stabilization: Realistic camera shake vs smooth motion
- Cinematic camera rigs: Professional multi-camera setups
- Animation timing: Speed ramping, easing, natural acceleration
Why it matters: Static cameras are fine, but moving cameras create energy, reveal space, and guide attention through time. Combined with your DoF and composition skills, camera animation will make your work feel truly cinematic.
The Complete Camera Mastery Picture
📸 What You've Built
Module 5 Complete: Camera and Composition
Camera Basics] --> B[Lesson 21:
Composition] B --> C[Lesson 22:
Depth of Field] C --> D[Lesson 23:
Camera Animation] style C fill:#4CAF50,stroke:#333,stroke-width:3px,color:#fff style D fill:#667eea,stroke:#333,stroke-width:2px,color:#fff
Your camera skill progression:
- Lesson 20: Camera technical foundation (focal length, sensor size, clipping)
- Lesson 21: Visual composition and framing (rule of thirds, leading lines, balance)
- Lesson 22: Depth of field and focus control (you are here! ✅)
- Lesson 23: Camera movement and animation (coming next)
After Lesson 23, you'll have complete camera mastery:
- Technical camera controls (focal length, DoF, sensor settings)
- Composition and framing for maximum impact
- Focus control and bokeh aesthetics
- Dynamic camera movement and timing
This is the complete toolkit professional cinematographers use. You're not just learning Blender—you're learning the visual language of cinema.
Before Moving On
✅ Readiness Check
Before starting Lesson 23, ensure you can:
- ✓ Explain how f-stops control depth of field
- ✓ Set up Focus Object for precise focus targeting
- ✓ Choose appropriate aperture for different scenarios (portrait, product, landscape)
- ✓ Create visible bokeh with proper lighting and blade count
- ✓ Animate rack focus with smooth easing
- ✓ Troubleshoot common DoF problems systematically
- ✓ Complete the DoF Mastery Gallery project with 4 quality renders
If you can do all of the above, you're ready for camera animation!
If any areas feel weak, revisit those sections and practice before moving on. Camera animation builds on these DoF skills—especially animated focus (rack focus is essentially camera animation for focus).
Keep Practicing
🎯 Daily DoF Exercise
5-minute DoF drill (do this daily):
- Open Blender, create simple scene (3 objects at different distances)
- Add camera, set 3 different f-stops (f/2, f/5.6, f/11)
- Render all three, compare DoF depth
- Change focal length (35mm, 50mm, 85mm), render again
- Observe how focal length + aperture = DoF control
This muscle memory is invaluable. After 2 weeks, you'll intuitively know which settings create which DoF without testing.
🎓 You're a Camera Master
Take a moment to appreciate what you've accomplished. Depth of field is one of those skills that separates "people who use cameras" from "cinematographers." You're now in the latter category. You understand f-stops, focus distance, bokeh, rack focus—concepts that professional camera operators train for years to master. And you didn't just memorize them—you understand WHY they work and WHEN to use them.
In your next renders, viewers won't consciously think "nice depth of field," but they'll FEEL the professionalism. They'll naturally look where you want them to look. They'll feel the intimacy of a shallow DoF portrait or the epic scope of a deep DoF landscape. That's the invisible art of great camera work—it guides without announcing itself.
Keep pushing forward. Camera animation awaits, and it's going to be spectacular. You're building something special here—not just technical skills, but artistic vision backed by professional technique. That combination is unstoppable.
See you in Lesson 23. Let's make those cameras move! 🎬