Welcome to the world of image-based lighting! HDRI (High Dynamic Range Imaging) represents a quantum leap in realistic 3D lighting—it allows you to capture and use real-world lighting in your scenes. Imagine photographing the lighting at sunset in a park, then using that exact lighting to illuminate your 3D characters. That's the power of HDRI. In this lesson, you'll learn how to use environment maps to create stunningly realistic outdoor scenes, convincing studio setups, and everything in between. HDRIs provide instant realism, beautiful reflections, and natural lighting that would take hours to recreate manually.
🎯 What You'll Learn
What HDRI is and why it's revolutionary for 3D lighting
Understanding HDR vs. LDR images and dynamic range
Setting up world lighting in Blender
Loading and using HDRI environment maps
Adjusting HDRI strength, rotation, and color
Combining HDRIs with manual lights for best results
Complete hands-on projects with different HDRI types
⏱️ Estimated Time: 55-70 minutes
🎯 Project: Create multiple scenes using different HDRI environments
📑In This Lesson▾
🌅 What is HDRI?
HDRI is one of the most powerful tools in modern 3D rendering. Let's understand what it is, how it works, and why it's become essential for realistic lighting.
Understanding HDRI
💡 High Dynamic Range Imaging
HDRI stands for:
High: Greater range of values than normal
Dynamic Range: Difference between darkest and brightest areas
Imaging: Photographic/image-based technique
What makes HDRI special:
Captures the full range of light in a scene (very dark to very bright)
Regular photos (LDR - Low Dynamic Range) can't capture this full range
Contains actual light information, not just colors
Can be used as a light source in 3D scenes
Provides both lighting and reflections simultaneously
Real-world analogy:
Normal photo: Like looking at the world with sunglasses—limited range
HDRI photo: Like your actual eyes—sees detail in shadows AND bright areas
Your eyes adjust; HDRI captures everything at once
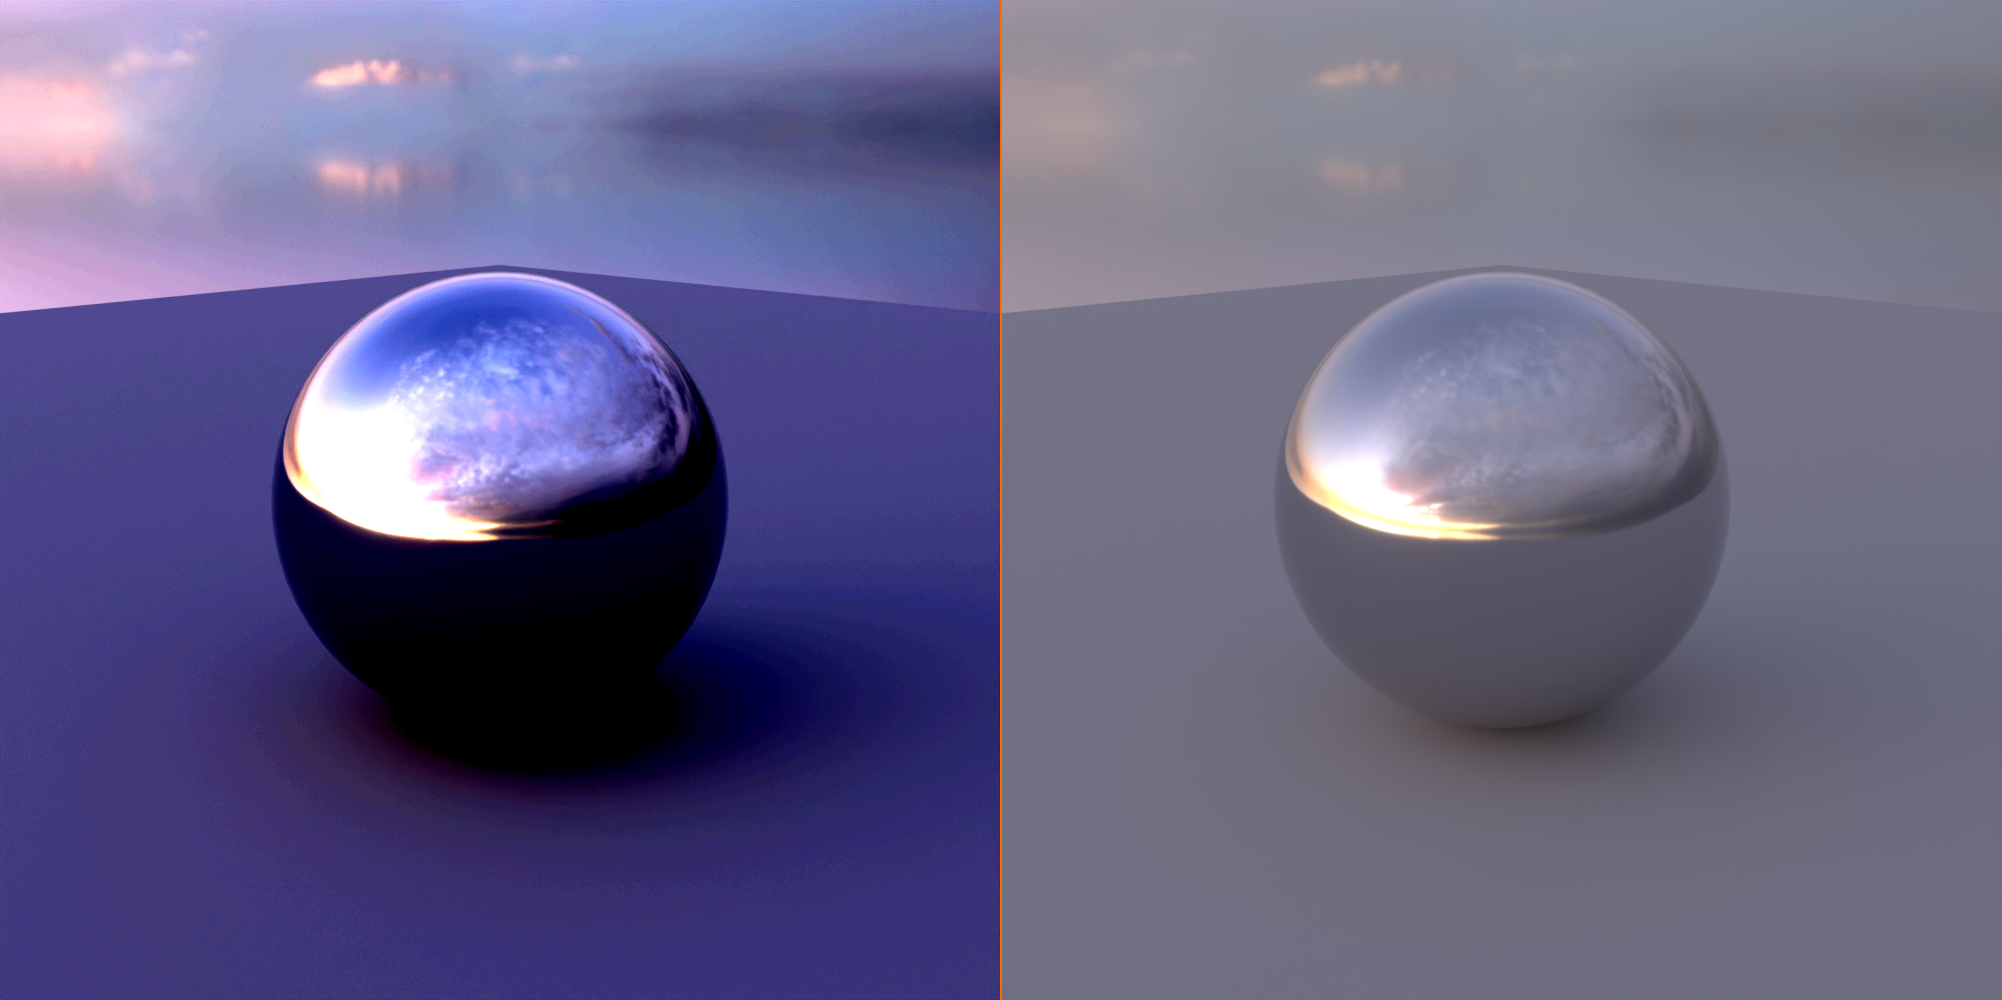
LDR versus HDR. The 8-bit LDR render clips: shadows crush to black and the bright sunset reflection blows out to white. The 32-bit HDR render keeps detail across the whole range, from the deep shadow to the sun, which is the information that lets an HDRI light a scene realistically.Dynamic range compared. An 8-bit LDR bar clamps at 255 and loses all detail beyond white, while a 32-bit HDR bar keeps storing values past 1.0 (a bulb at 2.0, the sun at 10.0 and beyond), which is the light data that makes HDRIs work.
HDR vs. LDR Images
📊 Dynamic Range Comparison
LDR (Low Dynamic Range) - Normal images:
Format: JPG, PNG (8-bit per channel)
Range: 0-255 values per color channel (256 levels)
Limitations:
Bright areas blow out to pure white (no detail)
Dark areas crush to pure black (no detail)
Must choose: expose for highlights OR shadows
Use as light source: Can work but not realistic (no true light data)
HDR (High Dynamic Range) - HDRI images:
Format: .hdr, .exr (32-bit per channel or 16-bit)
Range: Unlimited values (can store values above 1.0)
Benefits:
Detail in bright highlights (sun, sky, lights)
Detail in deep shadows
Contains actual light intensity information
Can expose render darker or brighter without losing detail
Use as light source: Realistic, physically accurate lighting
Example scenario:
Take photo of sunset with phone (LDR):
→ Expose for sky: Landscape goes black
→ Expose for landscape: Sky blows out to white
Take HDRI of same sunset:
→ Detail in both bright sky AND dark landscape
→ Can use as light source preserving sun's brightness
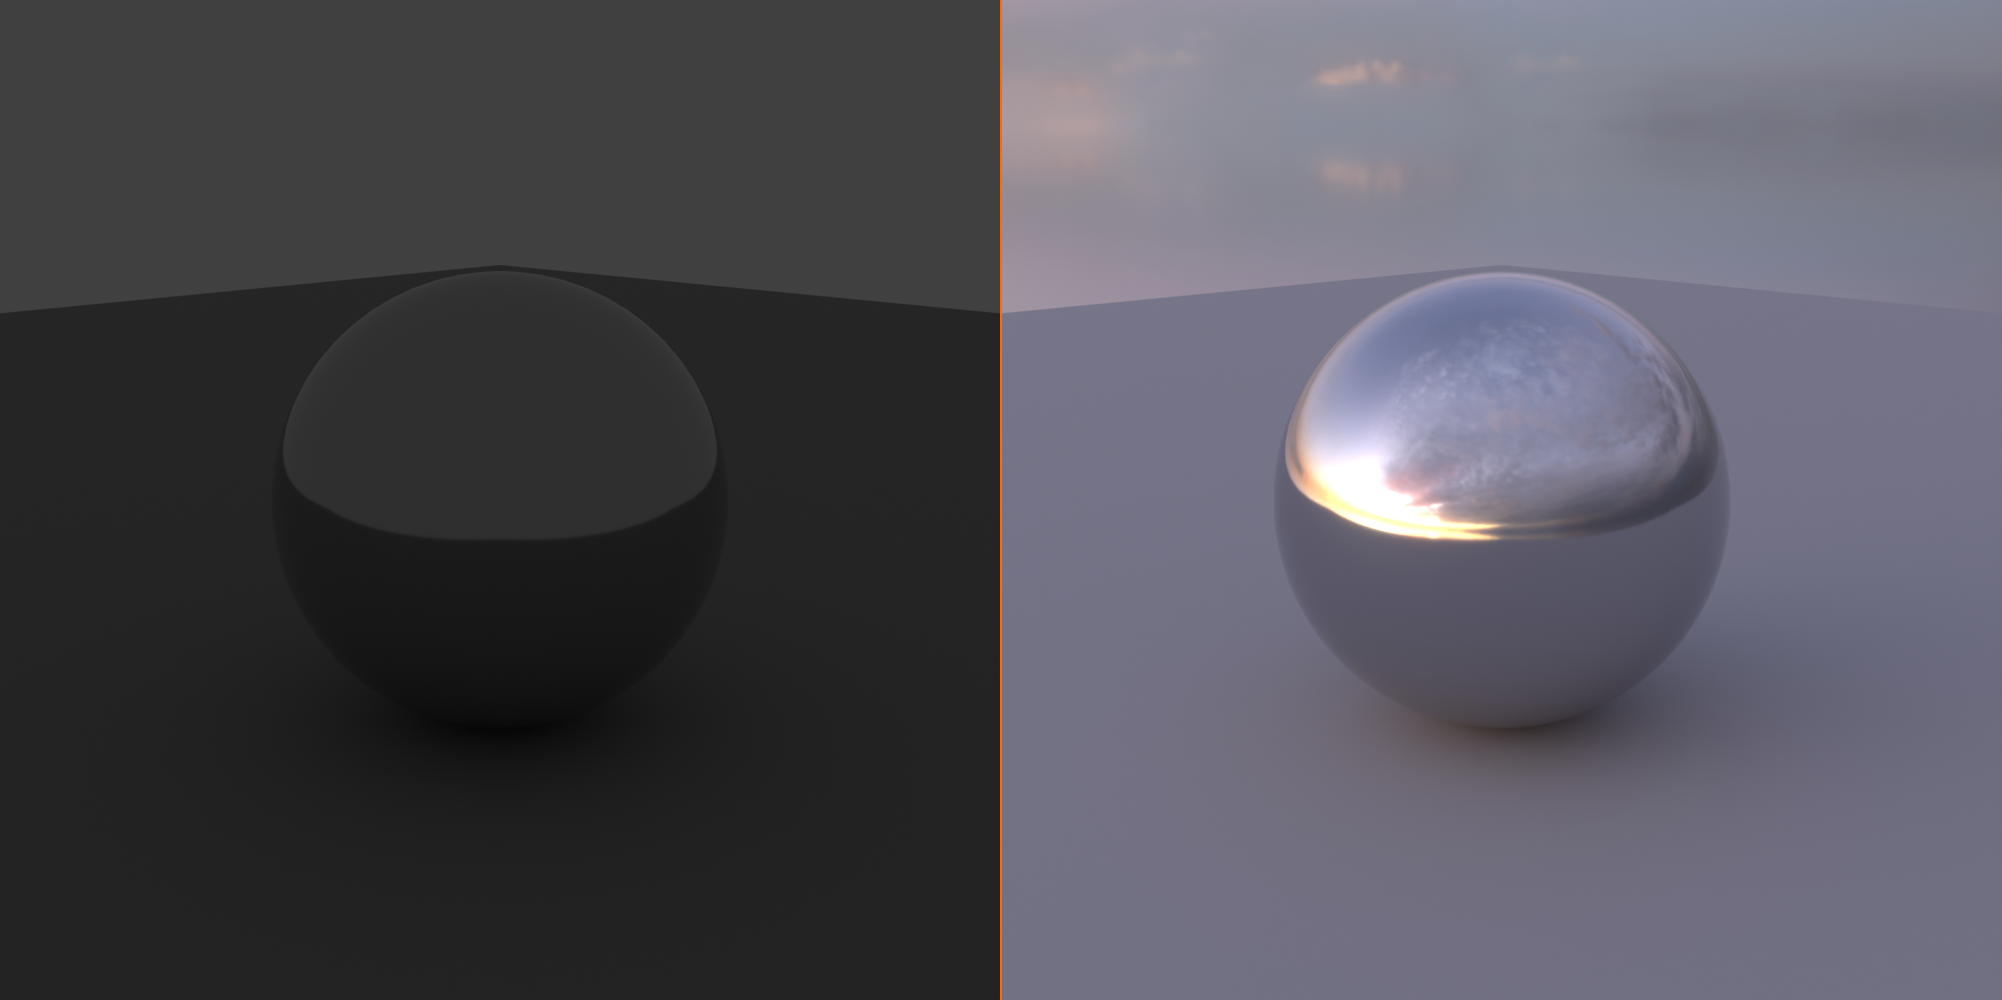
Before and after. With the default grey world the sphere reads flat and lifeless; swapping in a single outdoor HDRI gives it realistic environment reflections, directional warmth, and a soft shadow in one step.
How HDRIs Work as Lighting
🎨 Image-Based Lighting (IBL)
The concept:
HDRI wraps around your 3D scene like a sphere
Each pixel in the HDRI acts as a tiny light source
Bright pixels (sun, sky) emit strong light
Dark pixels (shadows, ground) emit little/no light
Scene receives lighting from all directions at once
What HDRI provides:
Ambient lighting: Overall illumination from environment
Directional lighting: Strong light from sun/bright areas
Reflections: Objects reflect the environment realistically
Color influence: Blue sky tints shadows, warm sun tints highlights
Recreating outdoor lighting manually = dozens of lights, hours of work
HDRI of same scene = one image, instant realistic result
Captures subtle variations impossible to recreate by hand
Reflections automatically match lighting (perfect integration)
💡 The HDRI Revolution: Before HDRIs became common (early 2000s), lighting outdoor 3D scenes realistically required expert-level manual lighting setups. An experienced lighter might spend days positioning sun lights, sky lights, bounce lights, and color-grading everything to look natural. HDRI changed everything—now a single environment map captures that complexity in one image. It's like going from painting every pixel by hand to using a photograph. Both can create great results, but HDRI is dramatically faster and often more realistic.
Image-based lighting. The HDRI wraps the scene like a sphere and every pixel acts as a small light: warm rays from the sun and bright pixels, cool rays from the sky, and dim rays from the shadowed ground all reach the object at once.
Types of HDRI Maps
🗺️ HDRI Projections
Equirectangular (most common):
360° panoramic image (like world map projection)
Entire sphere unwrapped to rectangular image
Distorted at top and bottom (like map poles)
Standard format for Blender and most 3D apps
Aspect ratio: Usually 2:1 (twice as wide as tall)
Mirror ball / Light probe:
Circular image captured in reflective sphere
Less common now (older method)
Can be converted to equirectangular
Angular map:
Fisheye-style circular projection
Less common, specific use cases
For Blender: Use equirectangular HDRIs
Native support, easiest to work with
Most HDRI websites provide this format
Equirectangular projection. A flat 2:1 panoramic map (360 by 180 degrees) wraps onto a sphere around your scene. Latitude lines bunch toward the top and bottom, which is why the poles look stretched in the flat image but map correctly once wrapped.
Stylized/artistic looks: May prefer manual lighting for full control
Interior scenes: Can work but often need manual lights for key lighting
Animated lighting: HDRI provides static lighting (though can be rotated)
Best practice:
Use HDRI as foundation
Add manual lights for control where needed
Combine the best of both approaches
🌐 World Lighting Basics
Before we use HDRIs, let's understand Blender's World lighting system—the foundation upon which HDRI lighting is built.
What is World Lighting?
🌍 The Environment System
World lighting defined:
Lighting that comes from the environment/background
Surrounds entire scene like a sphere
Provides ambient illumination from all directions
Also controls what you see in the background
Separate from light objects (Point, Sun, Area, Spot)
Components of World lighting:
Background color/image: What wraps around scene
Emission strength: How bright the environment is
Color: Tint of ambient lighting
Can be: Solid color, gradient, or HDRI image
Default World in Blender:
Gray color with strength 1.0
Provides subtle ambient light
Enough to see objects but not dramatic
We'll replace this with HDRIs!
Accessing World Properties
⚙️ The World Properties Panel
Location:
Properties panel (right side) → World Properties icon
Icon looks like a globe/sphere
Located between Scene and Object properties icons
Key settings in World Properties:
Surface:
Background shader controls
Color picker (for solid color background)
Strength slider (brightness multiplier)
Volume: Atmosphere effects (fog, volumetrics)
Settings: Advanced ray tracing options
Using the Shader Editor for World:
Open Shader Editor (split viewport or use Shading workspace)
Top dropdown: Select "World" instead of "Object"
Shows node setup for world lighting
This is where we'll add HDRI textures!
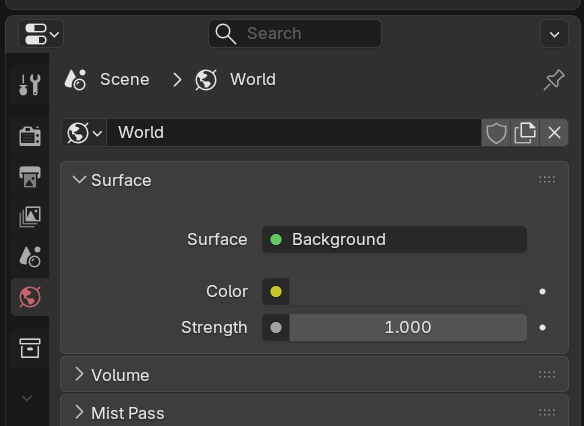
The World Properties tab. Select the world globe icon in the Properties editor, then use the Surface section to set the Background shader's Color and Strength. Strength controls how bright the world lighting is.
Default World Shader Setup
🎨 Understanding the World Nodes
Default setup (what you see initially):
Background node:
Shader that emits light from environment
Color input: What color/image to emit
Strength input: How bright (default 1.0)
World Output node:
Final output (like Material Output for objects)
Surface input: Connects to Background shader
Volume input: For atmospheric effects
The connection:
Background (Shader output) → World Output (Surface input)
Simple! Just two nodes by default
We'll add Environment Texture between them for HDRI
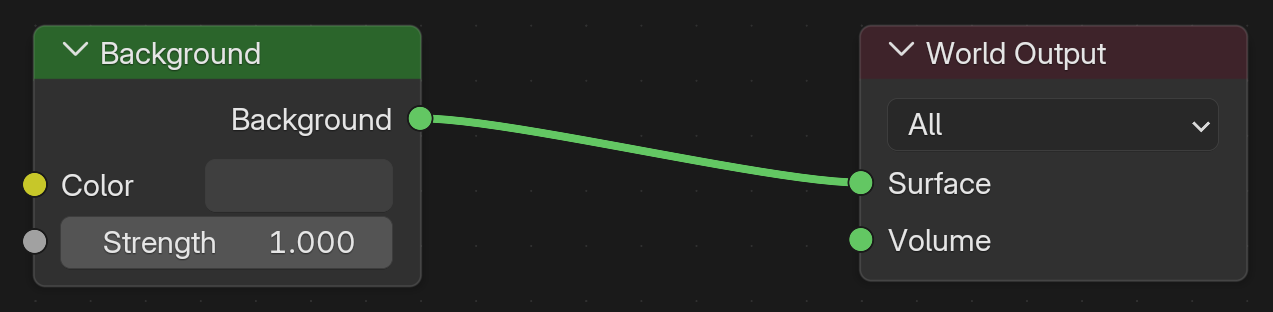
The default World shader in the Shader Editor (World mode). The Background node emits environment light from its Color and Strength inputs, and its output connects to the World Output node. To use an HDRI, you add an Environment Texture node before the Background node.
🔧 Setting Up HDRI in Blender
Now let's get hands-on! You'll learn the exact workflow to load and use HDRI images in Blender. This is surprisingly simple but incredibly powerful.
Step-by-Step HDRI Setup
📥 Loading Your First HDRI
Complete workflow:
Switch to Shading workspace:
Top of Blender window: Click "Shading" tab
Sets up ideal layout with Shader Editor visible
Switch Shader Editor to World:
In Shader Editor (bottom panel)
Top dropdown shows "Object" by default
Change to "World"
Shows world shader nodes (Background + World Output)
3D Viewport (top): Switch to Material Preview or Rendered mode
Z key → Material Preview or Rendered
Or click sphere icons top-right of viewport
Scene now lit by HDRI!
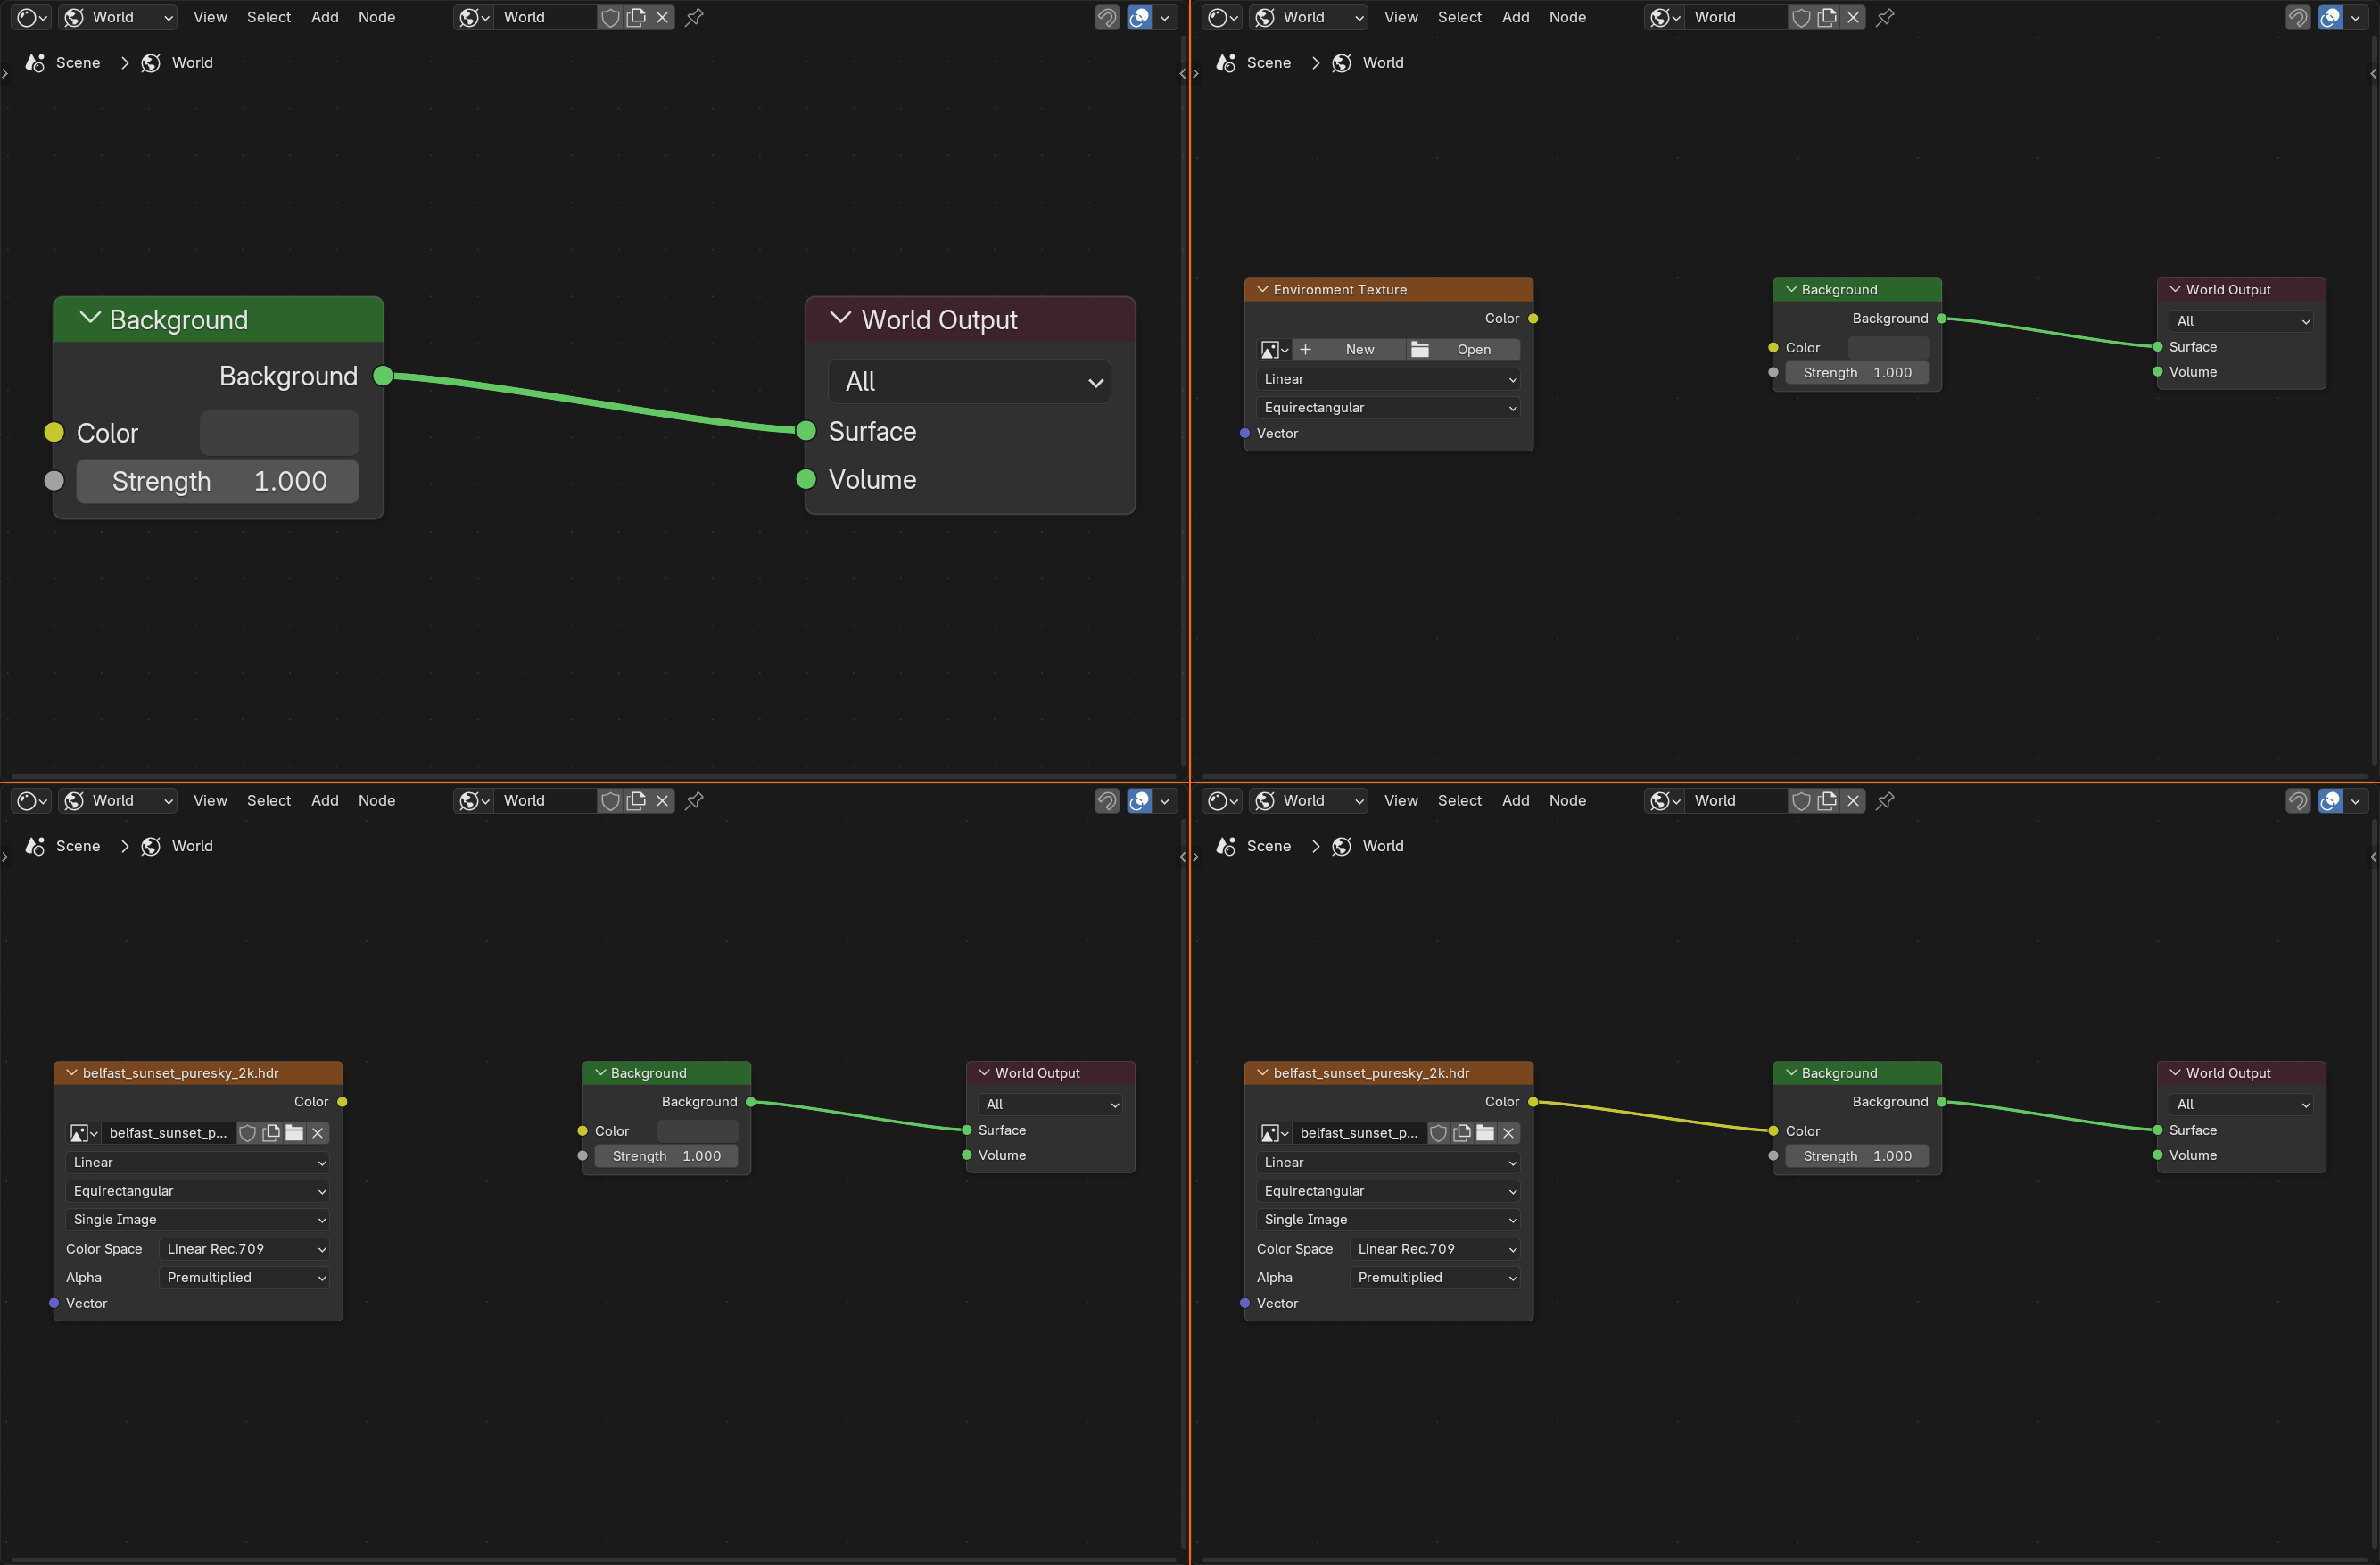
The HDRI setup workflow in four steps: start from the default world, add an Environment Texture node, load an HDRI image, then connect its Color output to the Background node.
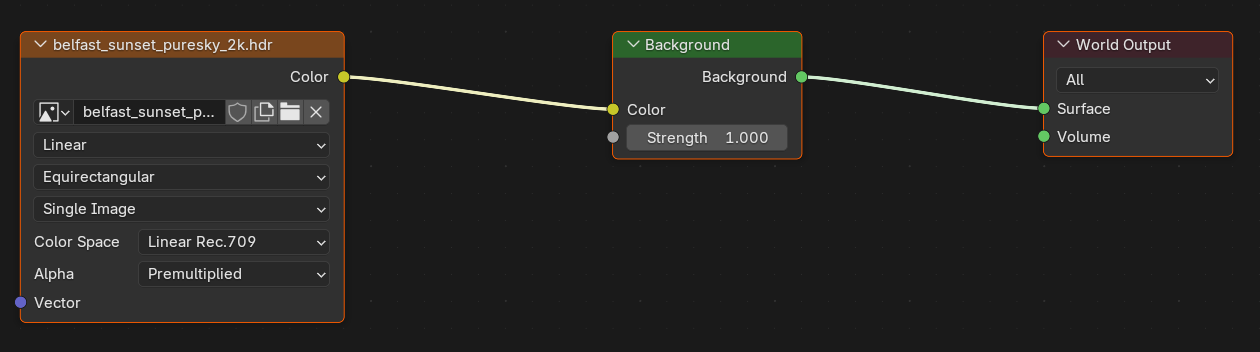
The complete HDRI node network: the Environment Texture supplies the HDRI image, the Background node controls brightness, and the World Output delivers the final result. The yellow noodle carries color data.
✅ Quick Setup Summary
The essential node setup:
Environment Texture (HDRI) → Background → World Output
        ↓
    Color Output                Shader       Surface
That's it! Three nodes, two connections, instant realism.
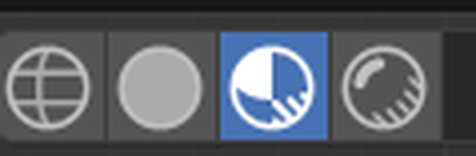
Use the Material Preview or Rendered shading mode (the two right-hand icons) to see HDRI lighting in the viewport. Solid and Wireframe modes do not show it.
Testing Your HDRI Setup
🧪 Verifying It Works
Quick test workflow:
Default scene test:
Keep default cube (or any object)
Delete default light (X → Delete)
Add HDRI as described above
Switch to Rendered view
What you should see:
Object lit from HDRI (not pitch black)
HDRI visible in background
Realistic lighting with direction and color
If object is reflective: HDRI visible in reflections
Troubleshooting if not working:
Check nodes are connected properly
Verify HDRI file loaded (shows preview in node)
Ensure viewport in Material Preview or Rendered mode
Check Background Strength isn't 0
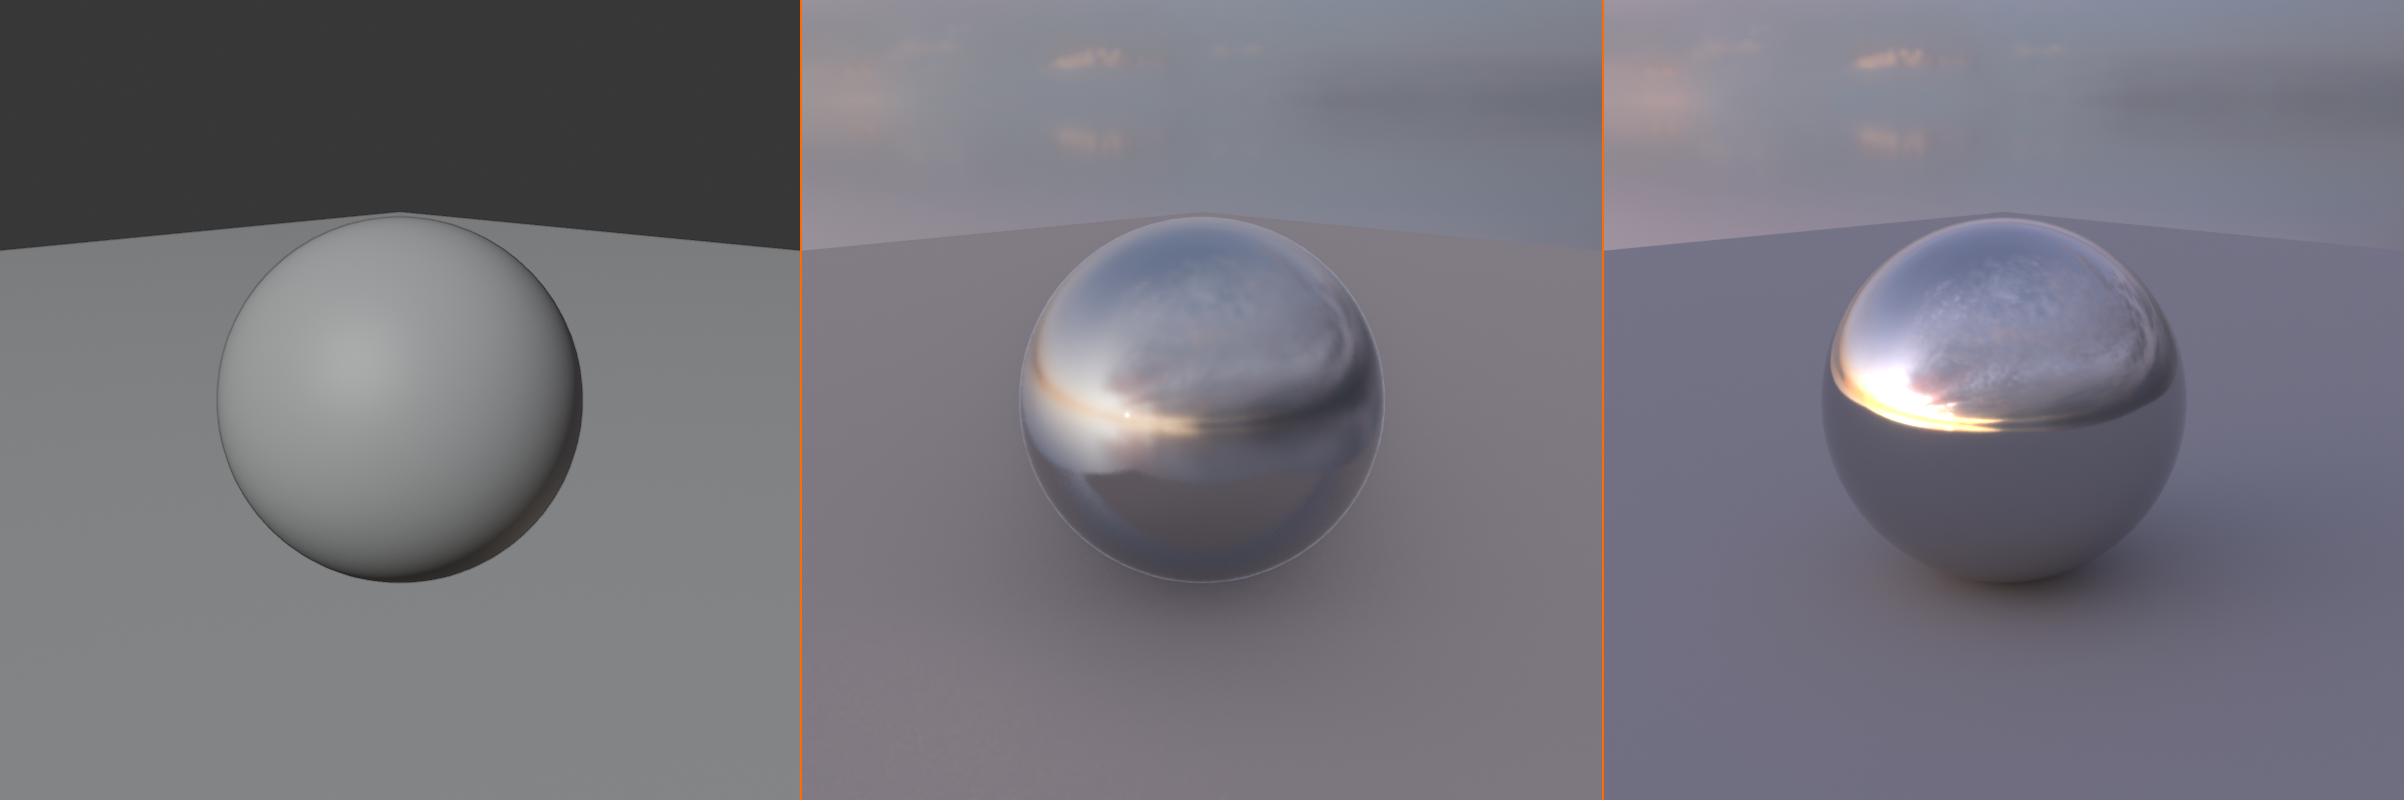
The same scene in three viewport shading modes. Solid mode shows flat clay with no HDRI, Material Preview shows HDRI reflections and lighting, and Rendered mode shows the full result. Use Material Preview or Rendered to see your HDRI.
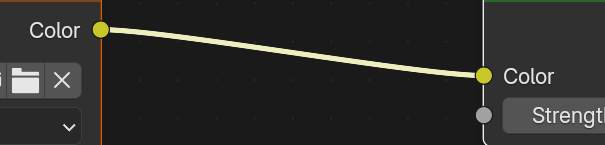
A close-up of the key connection: the Environment Texture Color output links to the Background Color input. Yellow sockets and noodles carry color data.
HDRI File Formats
📁 Supported Formats
.HDR format (Radiance HDR):
Most common HDRI format
Good compression, smaller files
32-bit floating point per channel
Universal support across 3D apps
Recommended: Best for most use cases
.EXR format (OpenEXR):
Industry standard for VFX
Can store additional data (layers, passes)
16-bit or 32-bit per channel
Larger files but more features
Use when: You need extra quality or data
Regular image formats (JPG, PNG):
Can be used but NOT true HDR
Limited dynamic range (8-bit)
Won't provide realistic lighting values
Avoid for lighting: Use only for low-priority backgrounds
Resolution considerations:
2K (2048x1024): Decent quality, smaller file
4K (4096x2048): Good quality, balanced (recommended)
8K (8192x4096): High quality, sharp reflections
16K+: Extreme quality, very large files
Higher resolution = sharper reflections and background details
HDRI file formats at a glance: .hdr and .exr store true 32-bit high dynamic range and are correct for lighting, while 8-bit .jpg and .png clamp brightness and should be avoided for lighting.
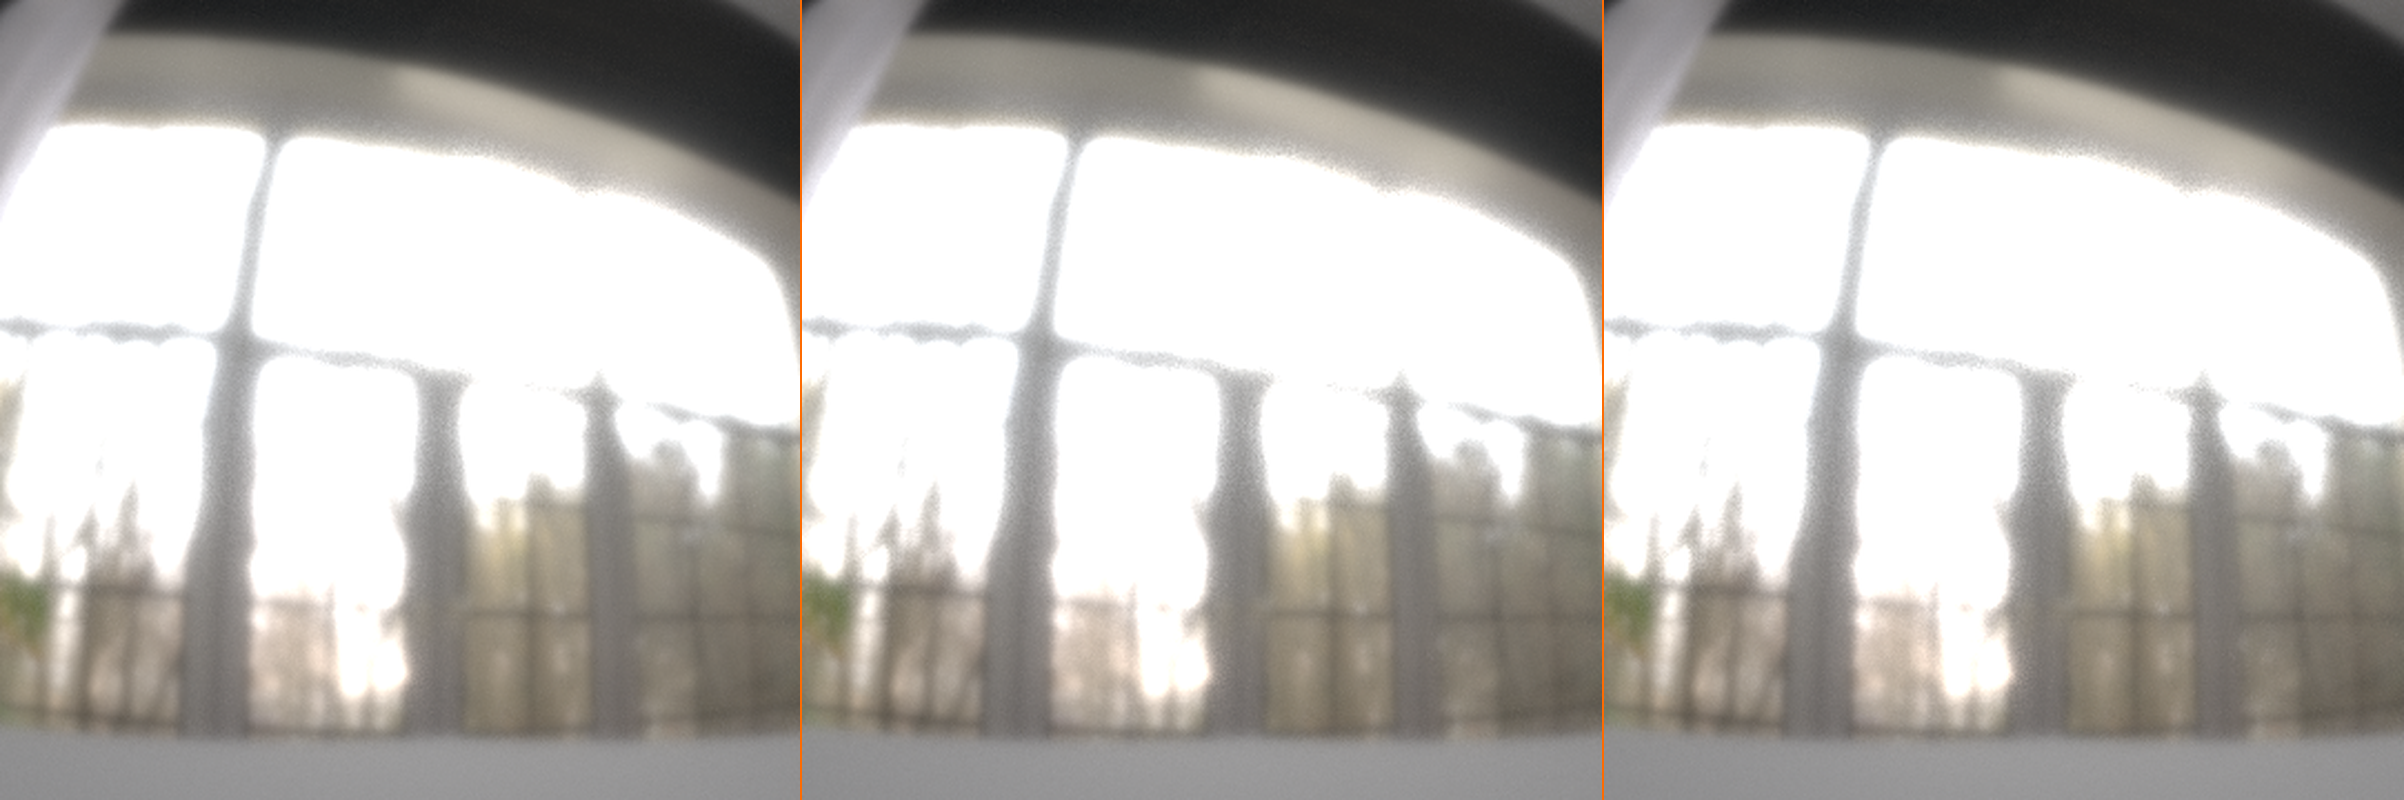
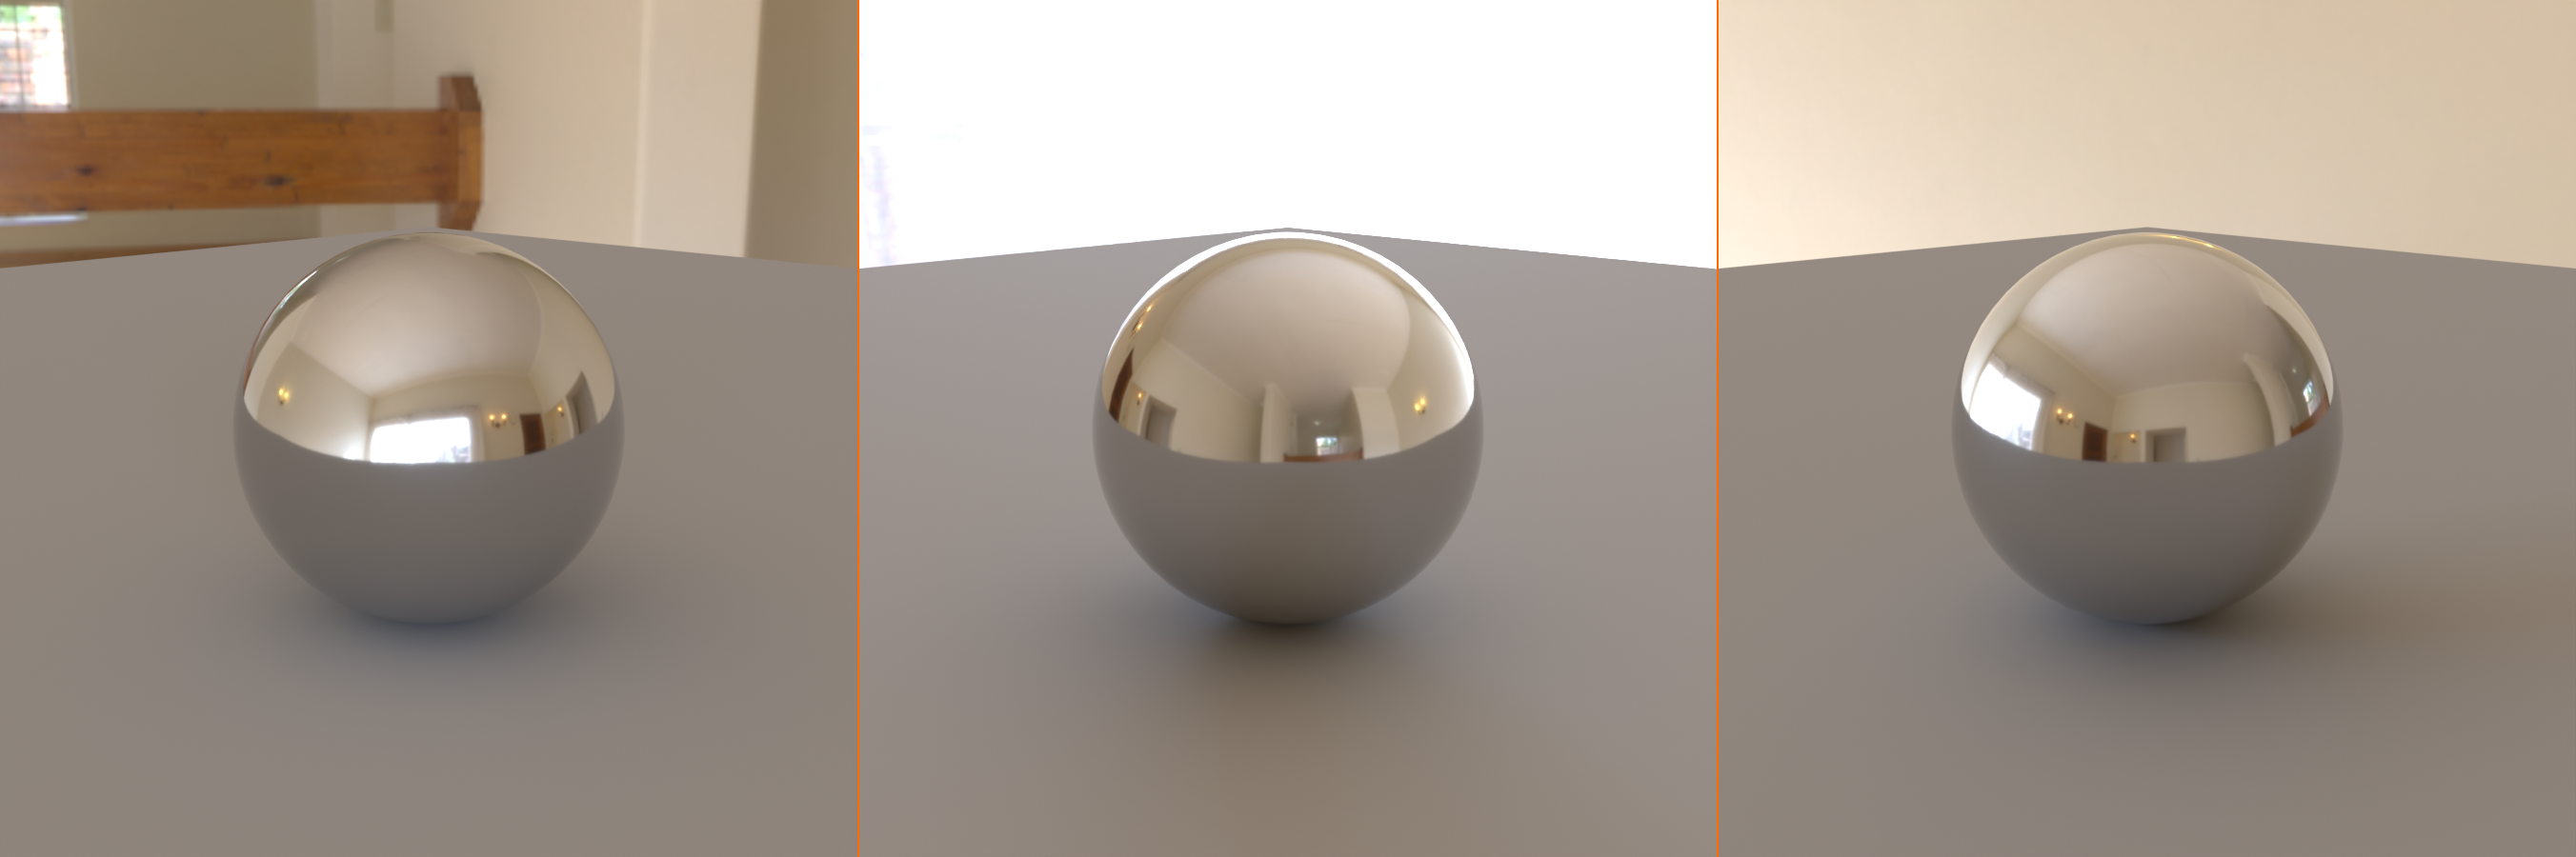
HDRI resolution compared in a chrome reflection. At 2K the reflected detail is soft and mushy; 4K is noticeably sharper; 8K resolves the window structure crisply. Higher resolution matters most on reflective surfaces and in close-ups.
💡 The Setup Philosophy: HDRI setup in Blender is intentionally simple—add one node, load one image, done. This simplicity is deceptive; you're replacing dozens of potential manual lights with a single image that captures real-world lighting complexity. The power isn't in the complexity of the setup, but in the quality and appropriateness of the HDRI you choose.
🎛️ Adjusting HDRI Properties
Once your HDRI is loaded, you'll want to adjust it for your specific scene. Let's learn how to control strength, rotation, color, and visibility to get perfect results.
Strength (Brightness)
💪 Controlling HDRI Intensity
The Strength parameter:
Located in Background node (World shader)
Slider or numeric input
Multiplier for HDRI brightness
Default: 1.0
Typical strength values:
0.5-0.8: Subtle ambient (when using manual key lights)
1.0: Default, balanced (good starting point)
1.5-2.0: Bright outdoor/studio lighting
3.0-5.0: Very bright (intense sun/sky)
0.1-0.3: Dim ambient (moonlight, interior)
When to adjust strength:
Scene too dark: Increase strength
Scene overexposed: Decrease strength
HDRI as primary light: Higher strength (1.5-3.0)
HDRI as ambient fill: Lower strength (0.3-0.7)
Combining with manual lights: Lower HDRI, stronger manual lights
Pro tip - separate background and lighting strength:
Sometimes you want bright lighting but dim background (or vice versa)
We'll cover this advanced technique later!
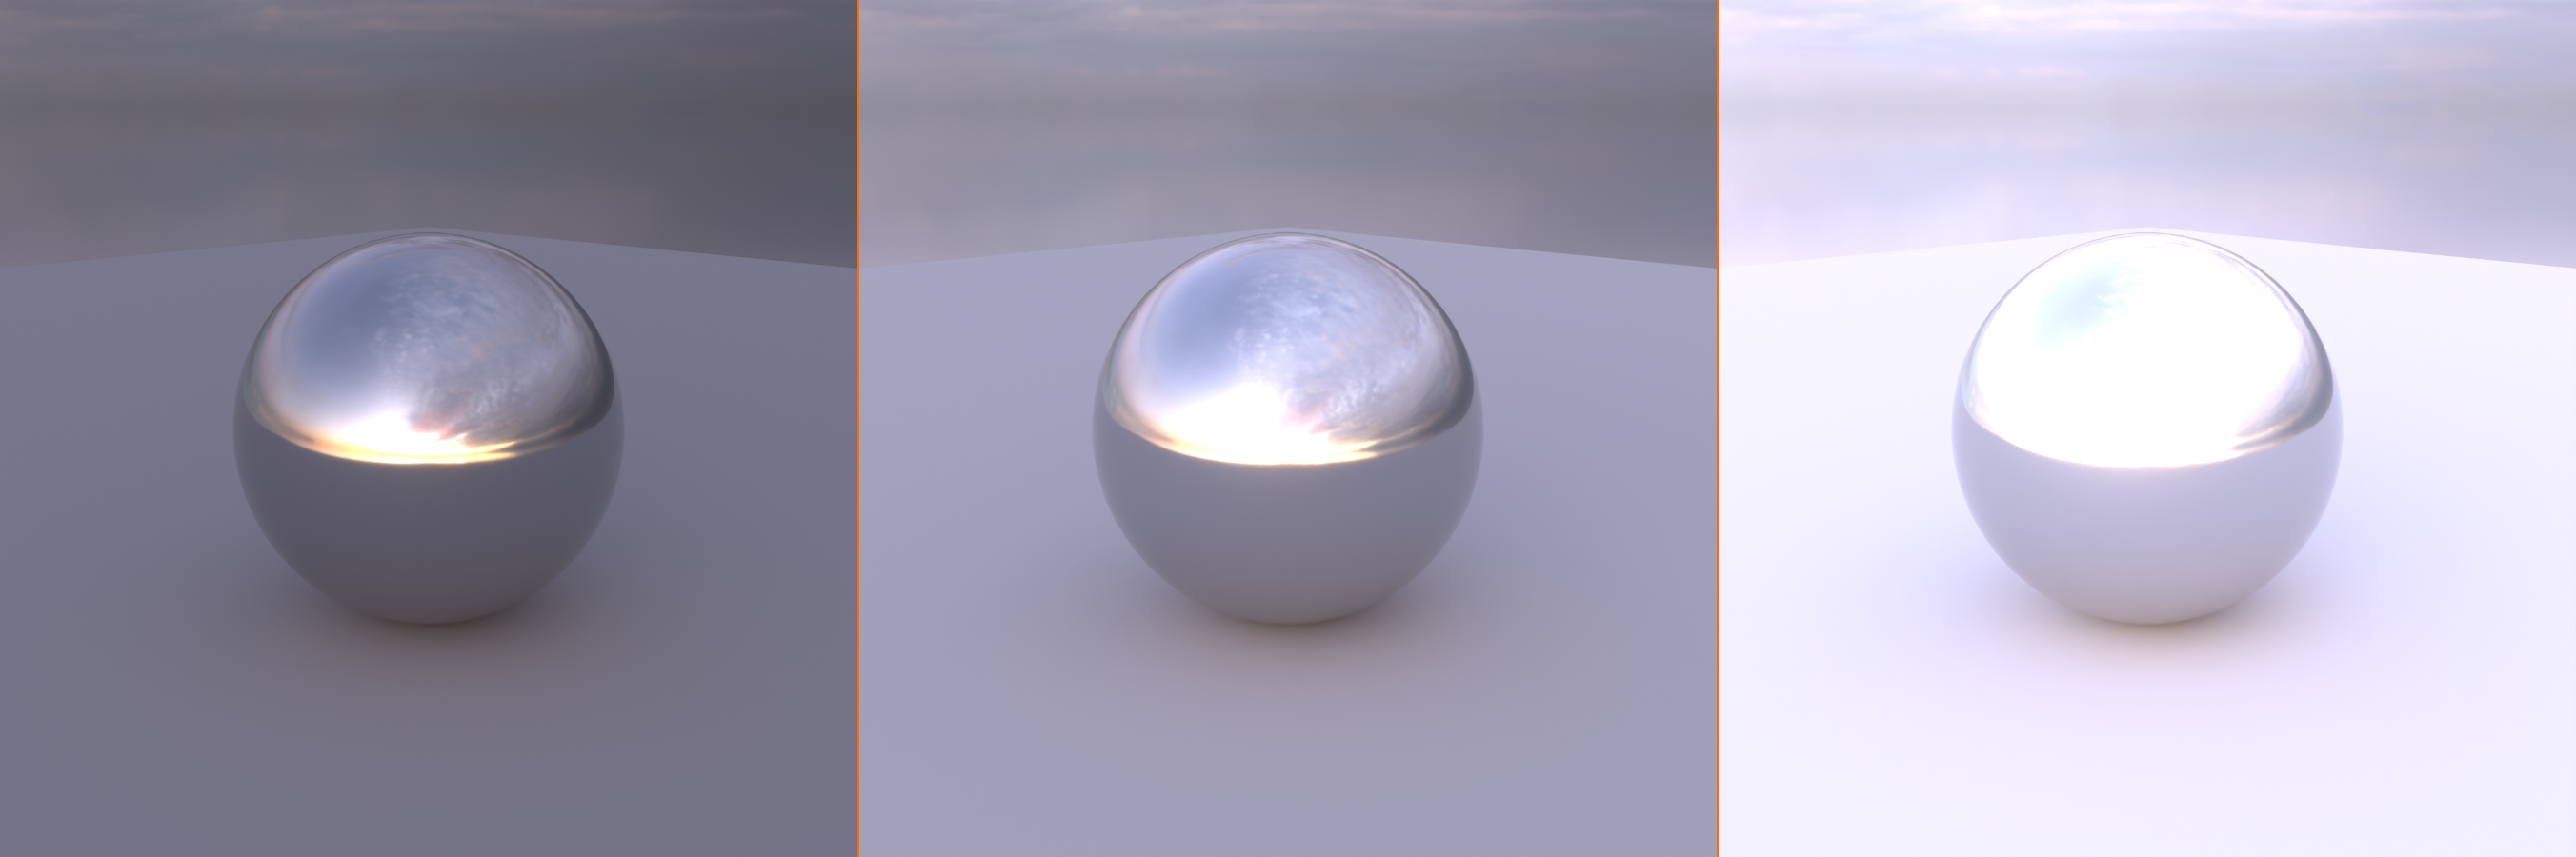
The same HDRI at three Background strength values. At 0.5 the scene is dim and underexposed; 1.0 is balanced; 2.5 is bright and punchy. Strength scales the overall light the environment contributes without changing its color or direction.
Rotation
🔄 Rotating the HDRI Environment
Why rotate?
Position sun/bright areas where you want them
Adjust lighting direction without moving camera
Find best angle for reflections
Match lighting direction of other scene elements
How to rotate HDRI:
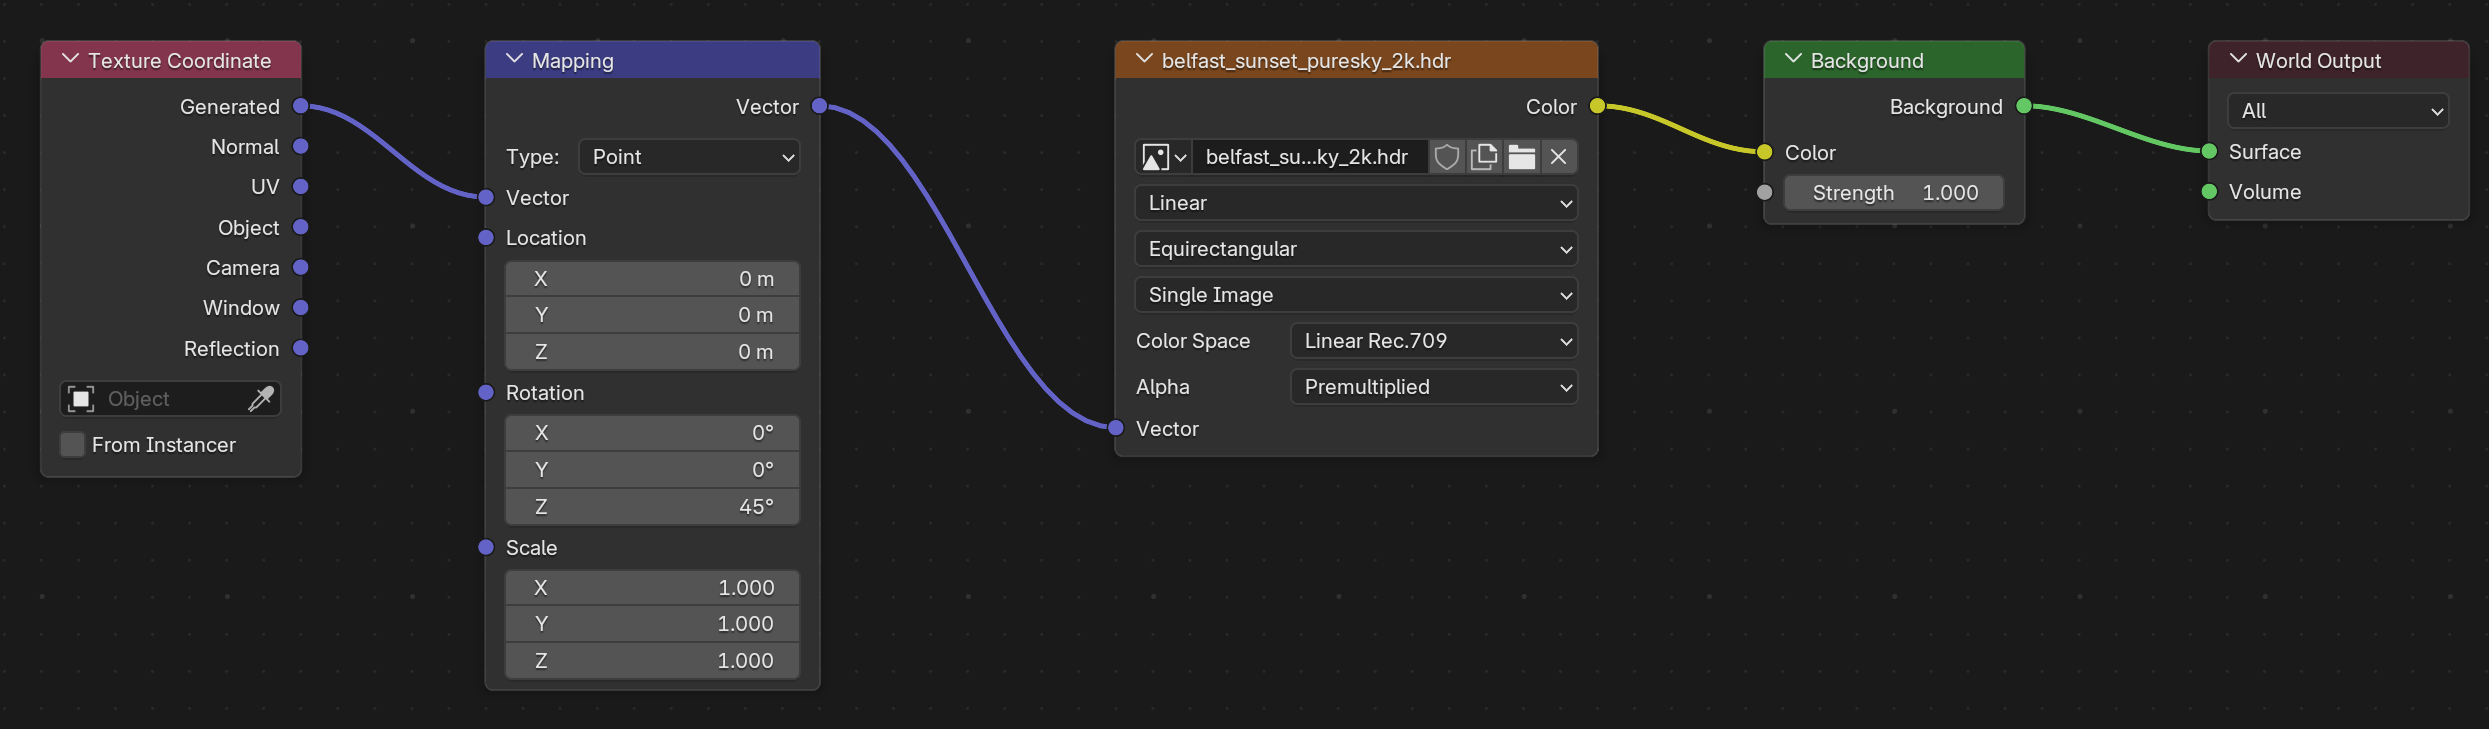
Add Mapping node:
Shader Editor: Shift+A → Vector → Mapping
Place between Texture Coordinate and Environment Texture
Add Texture Coordinate node:
Shift+A → Input → Texture Coordinate
Provides coordinate system for texture
Connect nodes:
Texture Coordinate "Generated" → Mapping "Vector"
Mapping "Vector" → Environment Texture "Vector"
Rotate using Mapping node:
Rotation → Z axis value
Adjust to rotate HDRI around scene
Watch in viewport as it rotates!
Rotation tips:
Z-axis rotation: Most common (horizontal spin)
Interactive rotation: Drag value slider while watching viewport
Finding the sun: Look for brightest spot in HDRI, rotate until positioned well
Reflection check: Add reflective object to see environment in reflections
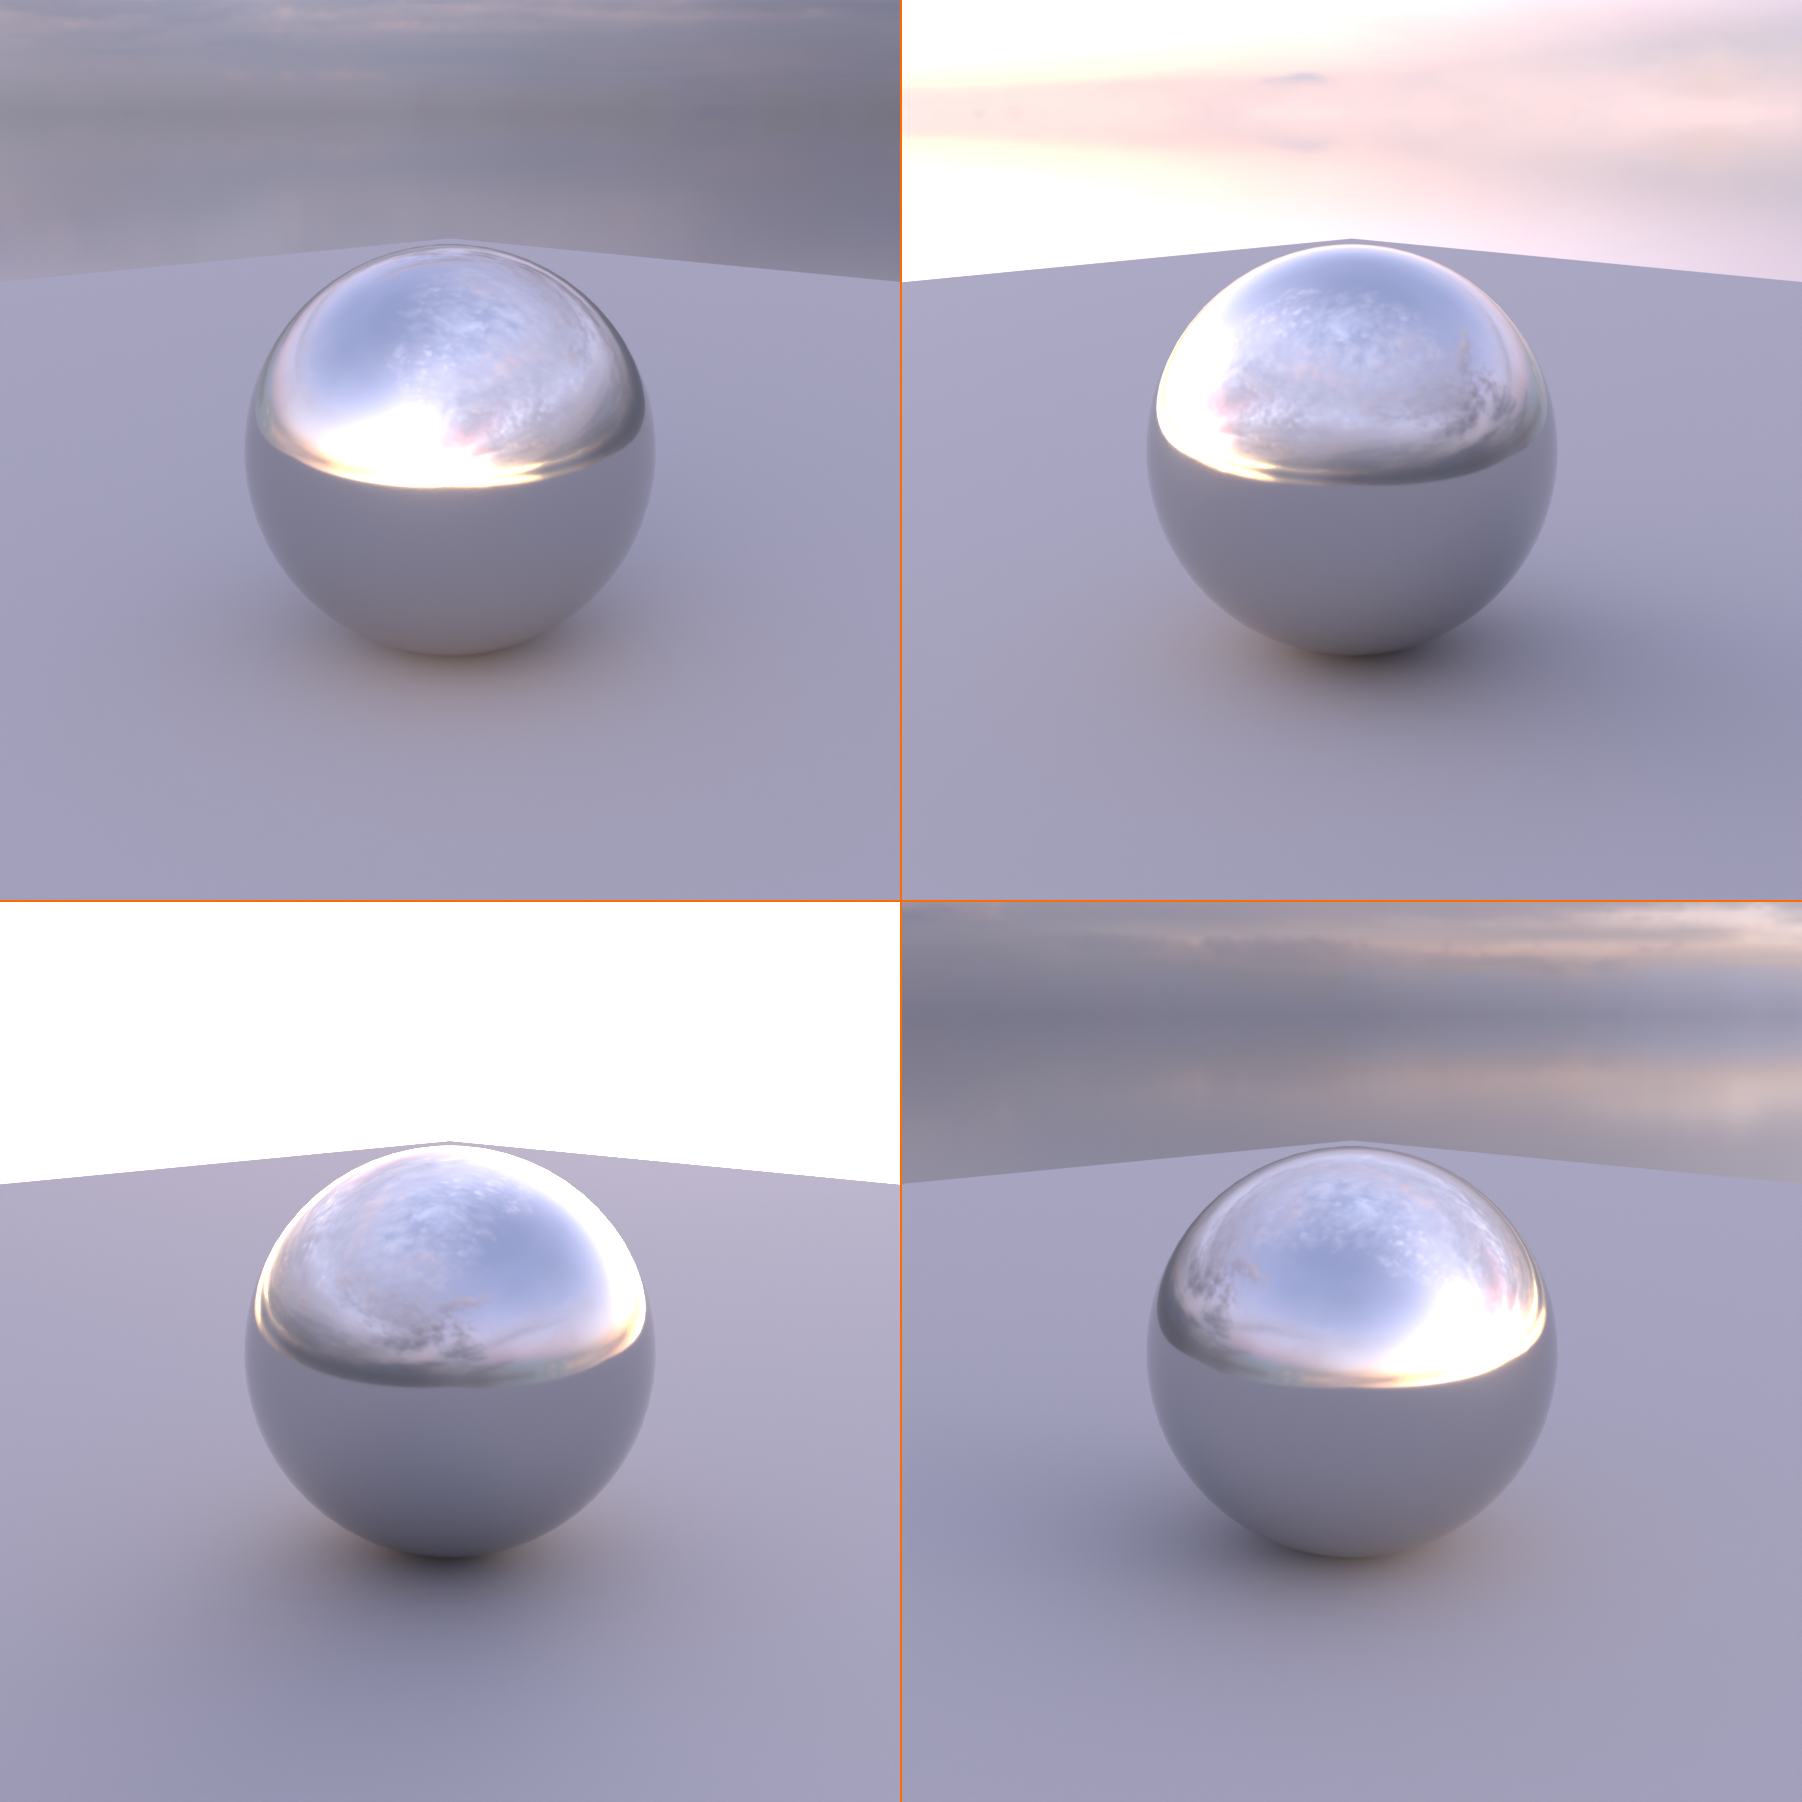
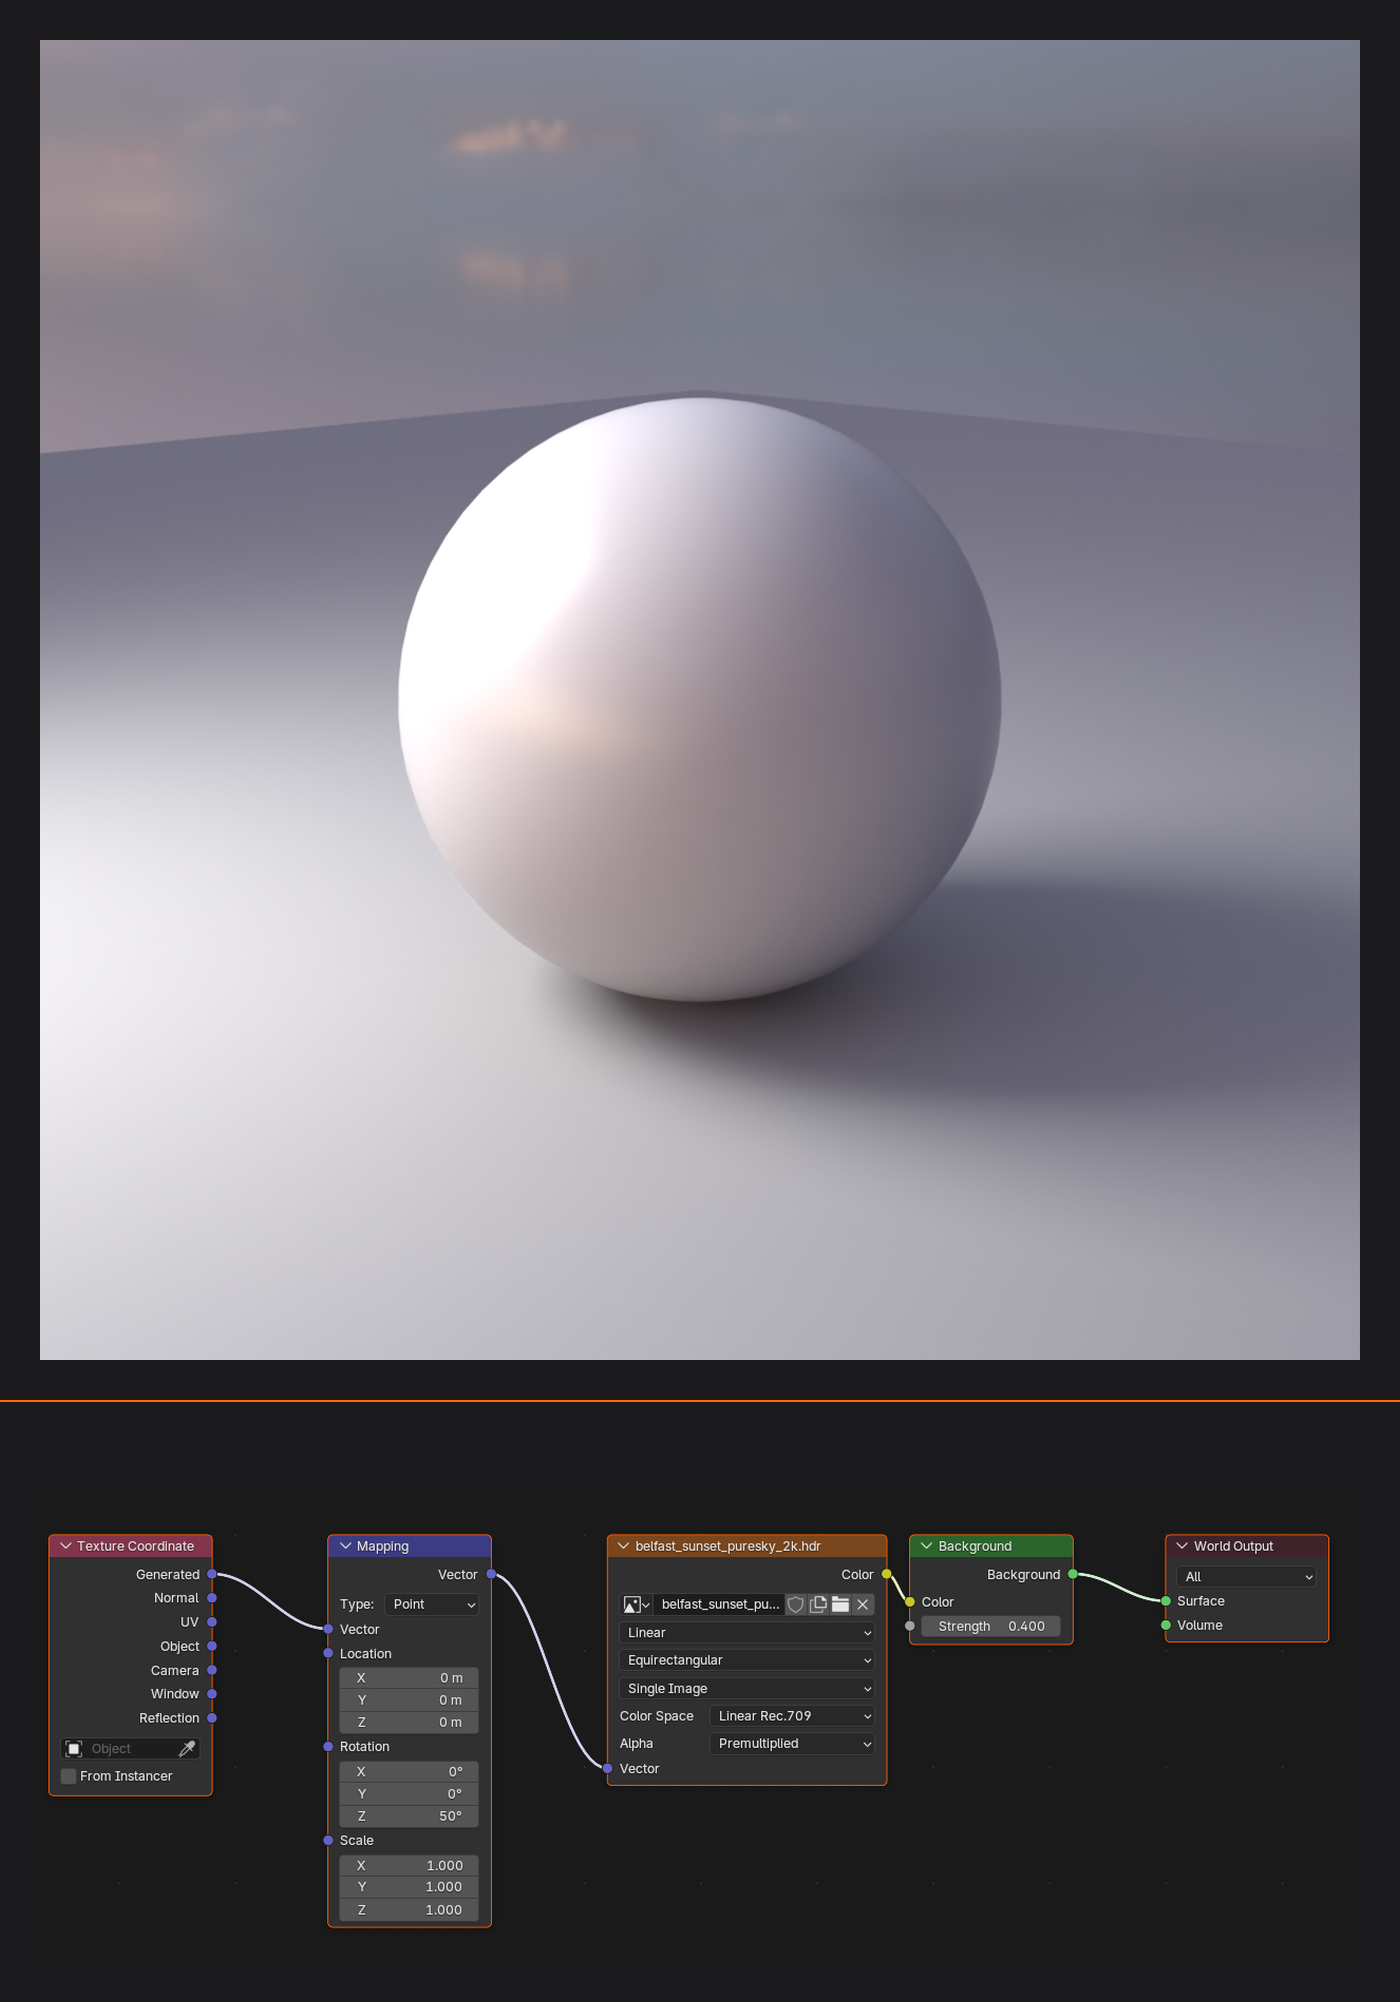
Rotating the HDRI on the Z axis swings the light direction around the subject. At each angle the bright sunset highlight and the shadow shift to a new side, letting you aim the key light without moving any lamp.
Insert a Mapping node (fed by Texture Coordinate) before the Environment Texture to control HDRI orientation. The Rotation Z value spins the environment around the vertical axis, aiming the light wherever you need it.
Color Adjustment
🎨 Tinting and Color Correction
Why adjust color?
Match scene mood (warmer, cooler)
Correct white balance
Stylize for artistic effect
Harmonize with other scene elements
Method 1: Background color tint (simple):
In Background node: Adjust Color value
Click color swatch, choose tint
Multiplies with HDRI color
Limitation: Affects entire HDRI uniformly
Method 2: Hue/Saturation/Value node (advanced):
Add HSV node: Shift+A → Color → Hue Saturation Value
Place between Environment Texture and Background
Connect: Environment Texture Color → HSV Color → Background Color
Adjust:
Hue: Shift colors (e.g., more blue/orange)
Saturation: More or less color intensity
Value: Brightness (alternative to Strength)
Common color adjustments:
Warmer: Slight orange tint or positive Hue shift
Cooler: Slight blue tint or negative Hue shift
Desaturate: Lower Saturation for overcast/moody look
Boost colors: Increase Saturation for vibrant look
Three ways to color-grade an HDRI before it reaches the Background node. Hue/Saturation/Value shifts overall tone, Color Ramp remaps brightness ranges, and RGB Curves gives fine per-channel control.
Background Visibility Control
👁️ Show or Hide HDRI Background
The scenario:
Sometimes you want HDRI lighting BUT different background
Example: HDRI lights scene, but render shows solid color background
Solution: Separate lighting from background visibility
Method: Light Path node (advanced):
Add Light Path node:Shift+A → Input → Light Path
Add Mix Shader:Shift+A → Shader → Mix Shader
Set up alternate background:
Add second Background node with solid color
Or Transparent shader for no background
Connect:
Light Path "Is Camera Ray" → Mix Shader "Fac"
HDRI Background → Mix Shader input 1
Alternate Background → Mix Shader input 2
Mix Shader → World Output
Result:
Camera sees alternate background
Reflections and lighting still use HDRI
Best of both worlds!
Simpler method (Eevee only):
Film Settings → Transparent (checkbox)
Background becomes transparent
HDRI still lights scene
Composite over different background in post
✅ Essential HDRI Adjustments Checklist
For every HDRI setup, consider:
Strength: Is exposure correct? Too bright/dark?
Rotation: Is sun/main light in the right direction?
Color: Does color temperature match scene mood?
Background: Should HDRI be visible in renders or hidden?
Start with strength and rotation—these have the biggest impact.
🏞️ Types of HDRIs
Not all HDRIs are created equal. Different HDRI types serve different purposes. Let's explore the main categories and when to use each.
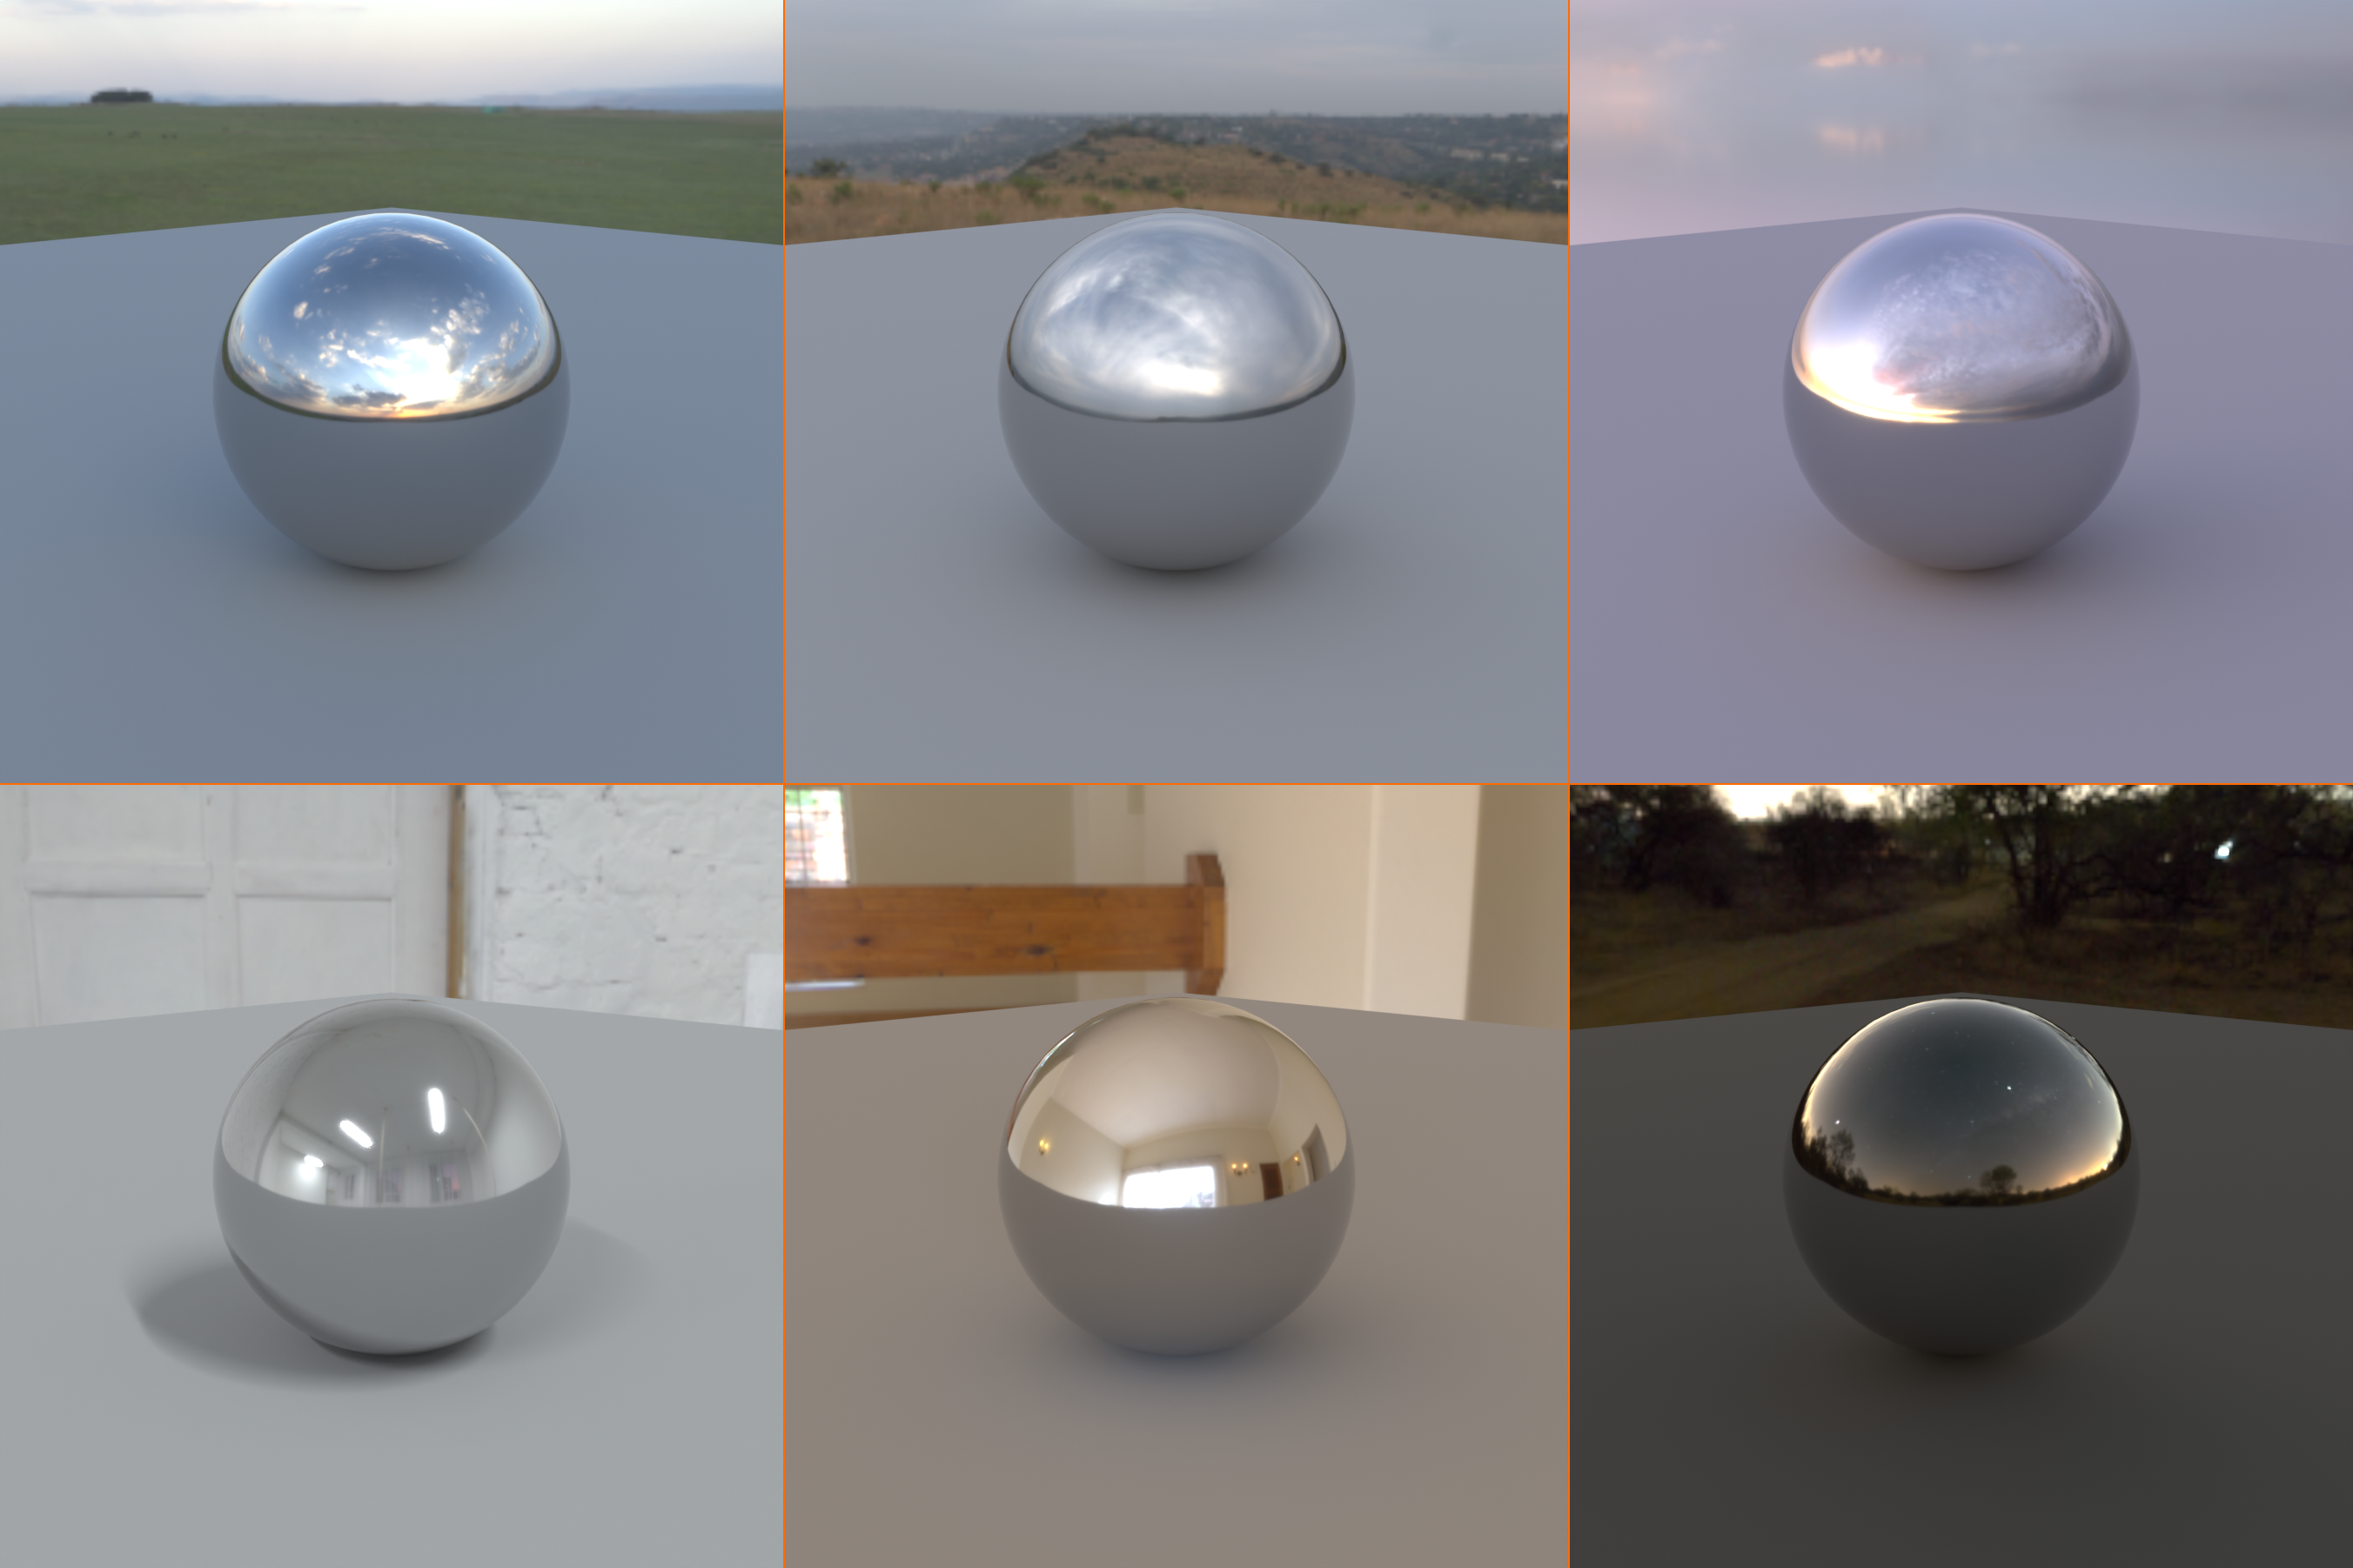
The six main HDRI categories on one chrome sphere · clear sky, cloudy, sunset (top) and studio, interior, night (bottom). Each environment produces a distinct reflection and overall light character.
Outdoor/Natural HDRIs
🌄 Sky and Landscape HDRIs
Characteristics:
Captured outdoors, shows sky and horizon
Contains sun (very bright spot) and sky (ambient blue/gradient)
Natural color temperature (warm sun, cool sky)
Provides realistic outdoor lighting instantly
Subcategories:
Clear sky: Bright sun, blue sky, high contrast
Use for: Bright outdoor scenes, product showcases
Mood: Cheerful, vibrant, energetic
Partly cloudy: Sun visible through clouds, mixed light
Use for: Natural outdoor scenes, balanced lighting
Mood: Natural, realistic, versatile
Overcast: No visible sun, even gray sky
Use for: Soft, diffused lighting, product photography
Mood: Calm, soft, even (less dramatic)
Sunrise/Sunset (golden hour): Low sun angle, warm colors
Use for: Dramatic lighting, warm atmospheric scenes
Mood: Romantic, dramatic, beautiful
Night/Dusk: Dark sky, minimal light
Use for: Night scenes, moonlight (add manual lights for drama)
Mood: Dark, mysterious, quiet
When to use outdoor HDRIs:
Architectural visualization exteriors
Product shots with outdoor context
Character renders in natural environments
Vehicles, outdoor equipment
Any time you want realistic outdoor lighting
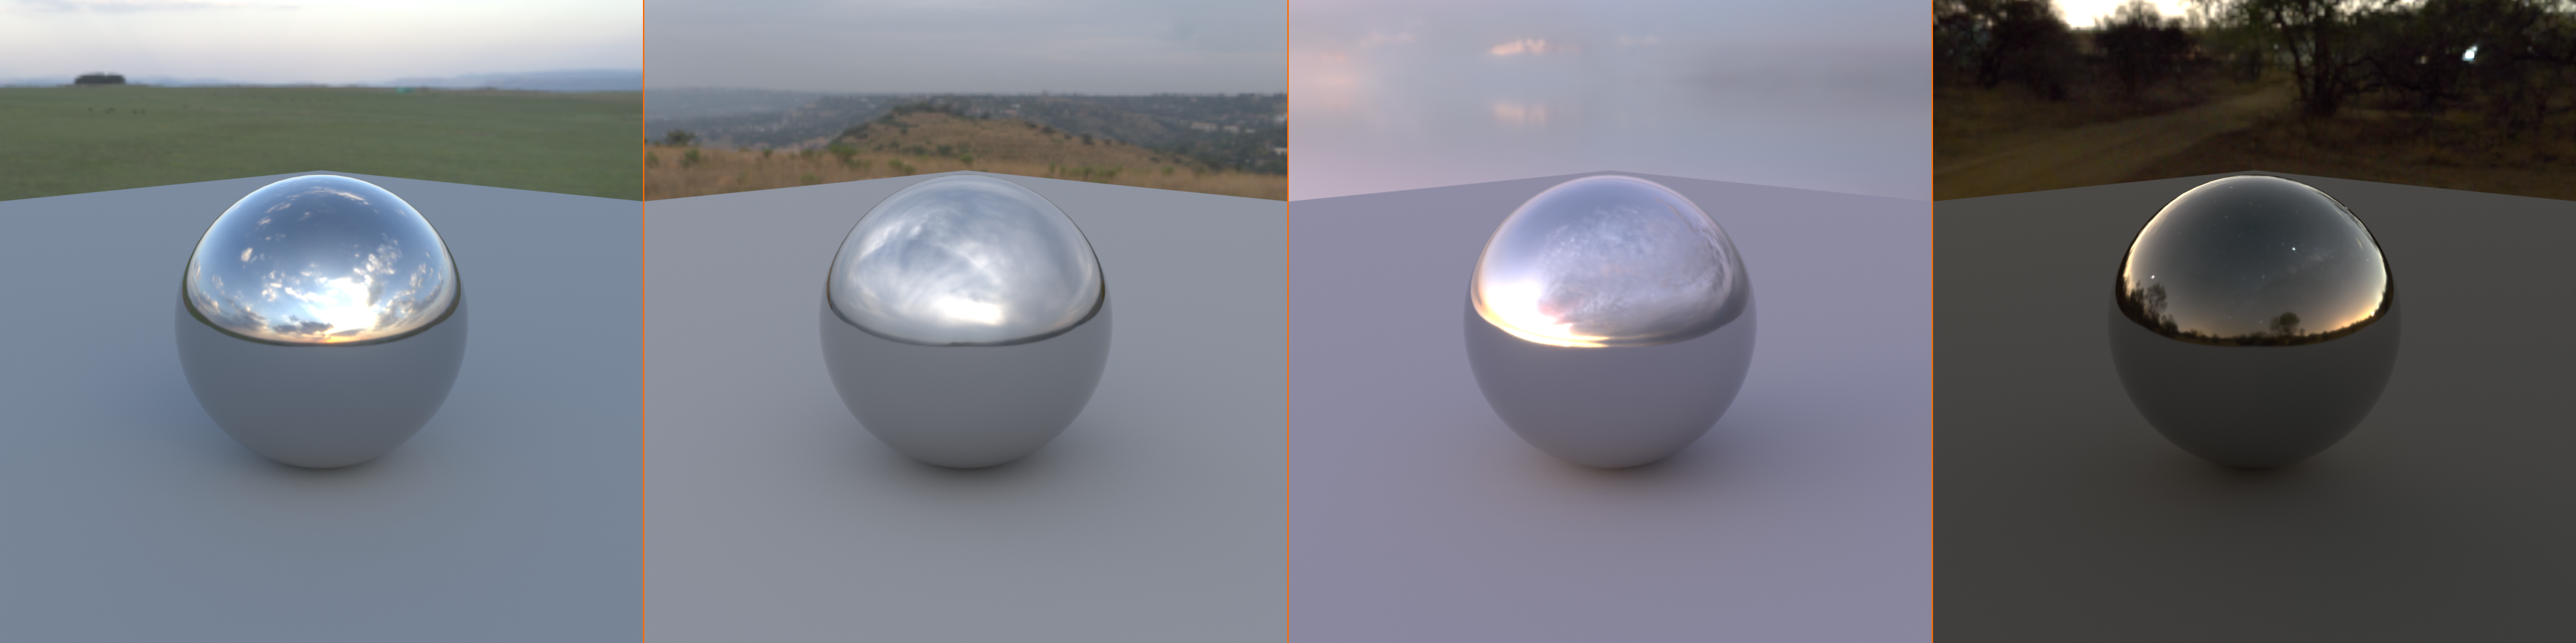
Outdoor HDRIs on the same object · clear sky, cloudy, sunset, and night. Notice how the sky’s color and brightness drives the entire mood.
Studio HDRIs
🎬 Professional Studio Lighting
Characteristics:
Captured in photo studio with controlled lighting
Multiple softboxes/lights in specific positions
Clean, neutral backgrounds (usually gray or white)
Professional product photography lighting instantly
Common studio setups:
Three-point studio: Key, fill, rim lights visible in HDRI
Pre-configured professional setup
Instant product lighting
Softbox grid: Multiple even lights from all sides
Very even, flat lighting
Good for technical/catalog photography
Single key + ambient: One main light plus ambient
Dimensional but controlled
Good starting point for further customization
When to use studio HDRIs:
Product visualization and e-commerce
Small object renders
When you want clean, professional lighting
Jewelry, electronics, packaged goods
Any product photography scenario
Benefits:
Instant professional lighting setup
Clean, predictable results
No unwanted background elements
Optimized for product rendering
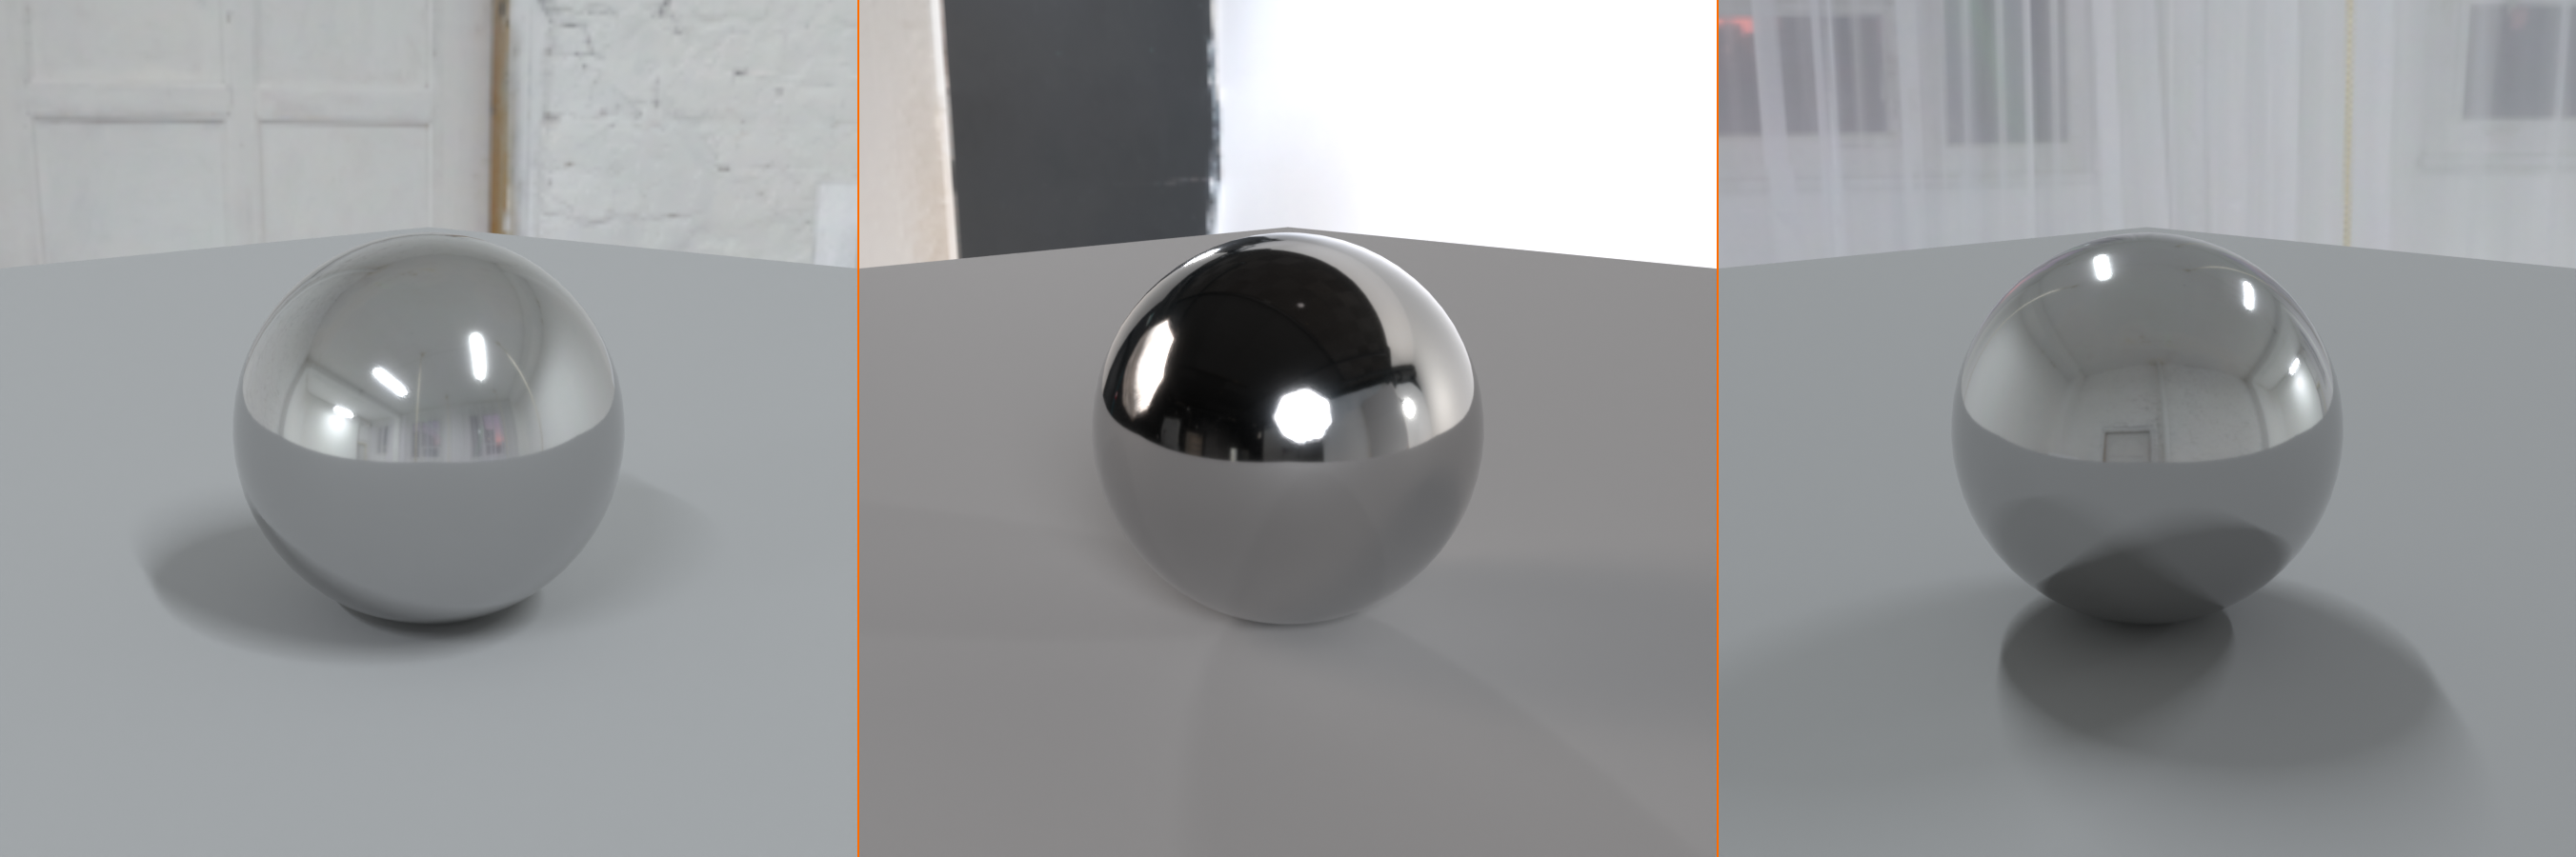
Studio HDRIs · three-point, softbox grid, and single key + ambient. Each pre-built lighting setup gives clean, professional reflections.
Use for: Motion graphics, abstract art, controlled reflections
Predictable, artistic lighting
Seasonal/weather:
Snow scenes, autumn colors, stormy skies
Use for: Seasonal products, weather-specific scenes
Provides specific atmospheric conditions
💡 Combining HDRI with Manual Lights
Here's where things get really powerful! While HDRIs provide fantastic ambient and environmental lighting, combining them with manual lights gives you the best of both worlds—realistic base lighting plus precise creative control.
Combining HDRI and manual lights: the HDRI gives realistic ambient base and reflections, while manual key · fill · rim add precise directional control. The overlap is the best result.
Why Combine HDRI and Manual Lights?
🎯 Best of Both Worlds
What HDRI provides:
Realistic ambient lighting from environment
Natural reflections and atmosphere
Complex lighting that's hard to recreate manually
Quick setup, instant realism
What HDRI lacks:
Precise control over specific light positions
Ability to emphasize specific areas
Dramatic lighting possibilities
Customization for your exact creative vision
What manual lights add:
Controllable key light (main light source)
Specific highlights and accents
Fill light to control contrast
Rim/back lights for separation
Dramatic shadows and mood control
The hybrid approach:
HDRI as foundation (ambient, reflections, environment)
Manual lights for control (key, fill, accents)
Adjust HDRI strength lower when adding manual lights
Result: Realistic AND artistically controlled
The hybrid setup in practice: a low-strength HDRI (Background 0.4) provides realistic ambient and reflections, while an added Area key light gives the controlled highlight and directional shaping.
Common Hybrid Lighting Setups
🎬 Practical Combinations
Setup 1: HDRI + Key Light (most common):
HDRI: Strength 0.3-0.7 (reduced for ambient only)
Manual light: Area or Sun light as main key
Use case: Product shots, character portraits
Benefit: Control main light direction while keeping realistic environment
Setup 2: HDRI + Three-Point Lighting:
HDRI: Strength 0.2-0.5 (subtle ambient)
Manual lights: Key, Fill, Rim (traditional setup)
Use case: Character renders, studio-style shots
Benefit: Full control with realistic reflections/environment
Setup 3: HDRI + Accent/Rim Only:
HDRI: Strength 1.0-2.0 (provides main lighting)
Manual lights: Just rim/accent lights
Use case: Outdoor scenes with edge highlights
Benefit: Natural HDRI lighting plus subject separation
Setup 4: Dim HDRI + Full Manual Lighting:
HDRI: Strength 0.1-0.3 (barely visible, just for reflections)
Manual lights: Complete lighting setup
Use case: Night scenes, dramatic lighting
Benefit: Full creative control, HDRI just adds realistic reflections
Workflow for Combining
📋 Step-by-Step Hybrid Setup
The recommended workflow:
Start with HDRI at full strength:
Load HDRI, set strength to 1.0
See base result, evaluate lighting
Rotate HDRI to best angle
Identify what's missing:
Is main subject well-lit or too flat?
Do you need more dramatic shadows?
Does subject blend into background?
Are important details in shadow?
Add manual lights to address issues:
Key light if subject needs definition
Fill light if shadows too dark
Rim light if subject needs separation
Reduce HDRI strength:
Lower to 0.3-0.7 typically
HDRI becomes ambient/fill role
Manual lights become primary
Balance manual lights with HDRI:
Adjust manual light strength
Fine-tune HDRI strength
Total lighting should feel cohesive
Manual lights shouldn't look "added on"
Refine:
Adjust colors to match (warm manual light with warm HDRI)
Check reflections still look realistic
Test render from multiple angles
✅ Pro Tip: The 70/30 Rule
A good starting point is the "70/30 rule"—let manual lights provide about 70% of the visible lighting (what you directly see on the subject), and HDRI provides about 30% (ambient fill and reflections). This gives you control while maintaining realism. Adjust this ratio based on your creative intent: more HDRI for natural looks, more manual lights for dramatic control.
Matching Manual Lights to HDRI
🎨 Creating Cohesive Lighting
Color matching:
If HDRI is warm (sunset): Use warm manual lights (orange/yellow)
If HDRI is cool (overcast): Use cool manual lights (blue/white)
Studio HDRIs: Neutral white manual lights (5000K-6500K)
Manual lights should feel like they "belong" in the environment
Three-point lighting combined with HDRI, top-down: a subtle HDRI ring lights the subject from all sides while key (45°), fill, and rim add directional shaping. Camera faces the subject with the rim behind it.
Common Use Cases
🎯 When to Use Hybrid Lighting
Product visualization:
Studio HDRI at 0.5 strength (ambient + reflections)
Large area light from above/front (key light)
Small area light from side (rim/accent)
Result: Professional product shot with control
Character portrait:
Outdoor HDRI at 0.4 strength (natural ambient)
Area light as key (face lighting)
Point light as rim (edge definition)
Result: Natural environment with flattering face lighting
Architectural exterior:
Outdoor HDRI at 1.0-1.5 strength (primary lighting)
Area light through windows (interior glow)
Point lights for landscape features
Result: Realistic outdoor scene with interior detail
Night scene:
Night HDRI at 0.2 strength (ambient moonlight)
Multiple point lights (street lamps, windows)
Area lights for specific illumination
Result: Believable night atmosphere with practical lights
💡 The Professional Approach: In professional VFX and visualization, pure HDRI lighting is rare for hero shots. The standard workflow is HDRI for base ambient and reflections, then manual lights for precise control. Think of HDRI as the "atmosphere" and manual lights as the "direction." This hybrid approach gives you photorealism from the HDRI while maintaining the artistic control that separates good renders from great ones.
🔍 Finding and Using HDRIs
Now that you know how to use HDRIs, where do you find them? Let's explore the best sources for free and premium HDRIs, plus tips for choosing the right one for your project.
Free HDRI Resources
🆓 Best Free HDRI Websites
Poly Haven (formerly HDRI Haven):
URL: polyhaven.com
Quality: Excellent, professionally captured
Quantity: 100+ HDRIs
License: CC0 (Public Domain - use anywhere, commercially)
Formats: Multiple resolutions (1K to 16K)
Categories: Outdoor, indoor, urban, studio
Why it's great: Best quality free HDRIs available, no attribution required
HDRIHaven.com (redirect to Poly Haven):
Original HDRI library, now part of Poly Haven
Same high-quality content
HDRI-Skies.com:
Focus: Sky and outdoor HDRIs
Quality: Very good
License: Free for personal use (check for commercial)
Selection: Large variety of sky conditions
Textures.com (formerly CGTextures):
Some free HDRIs with account
Limited free downloads per month
Good quality
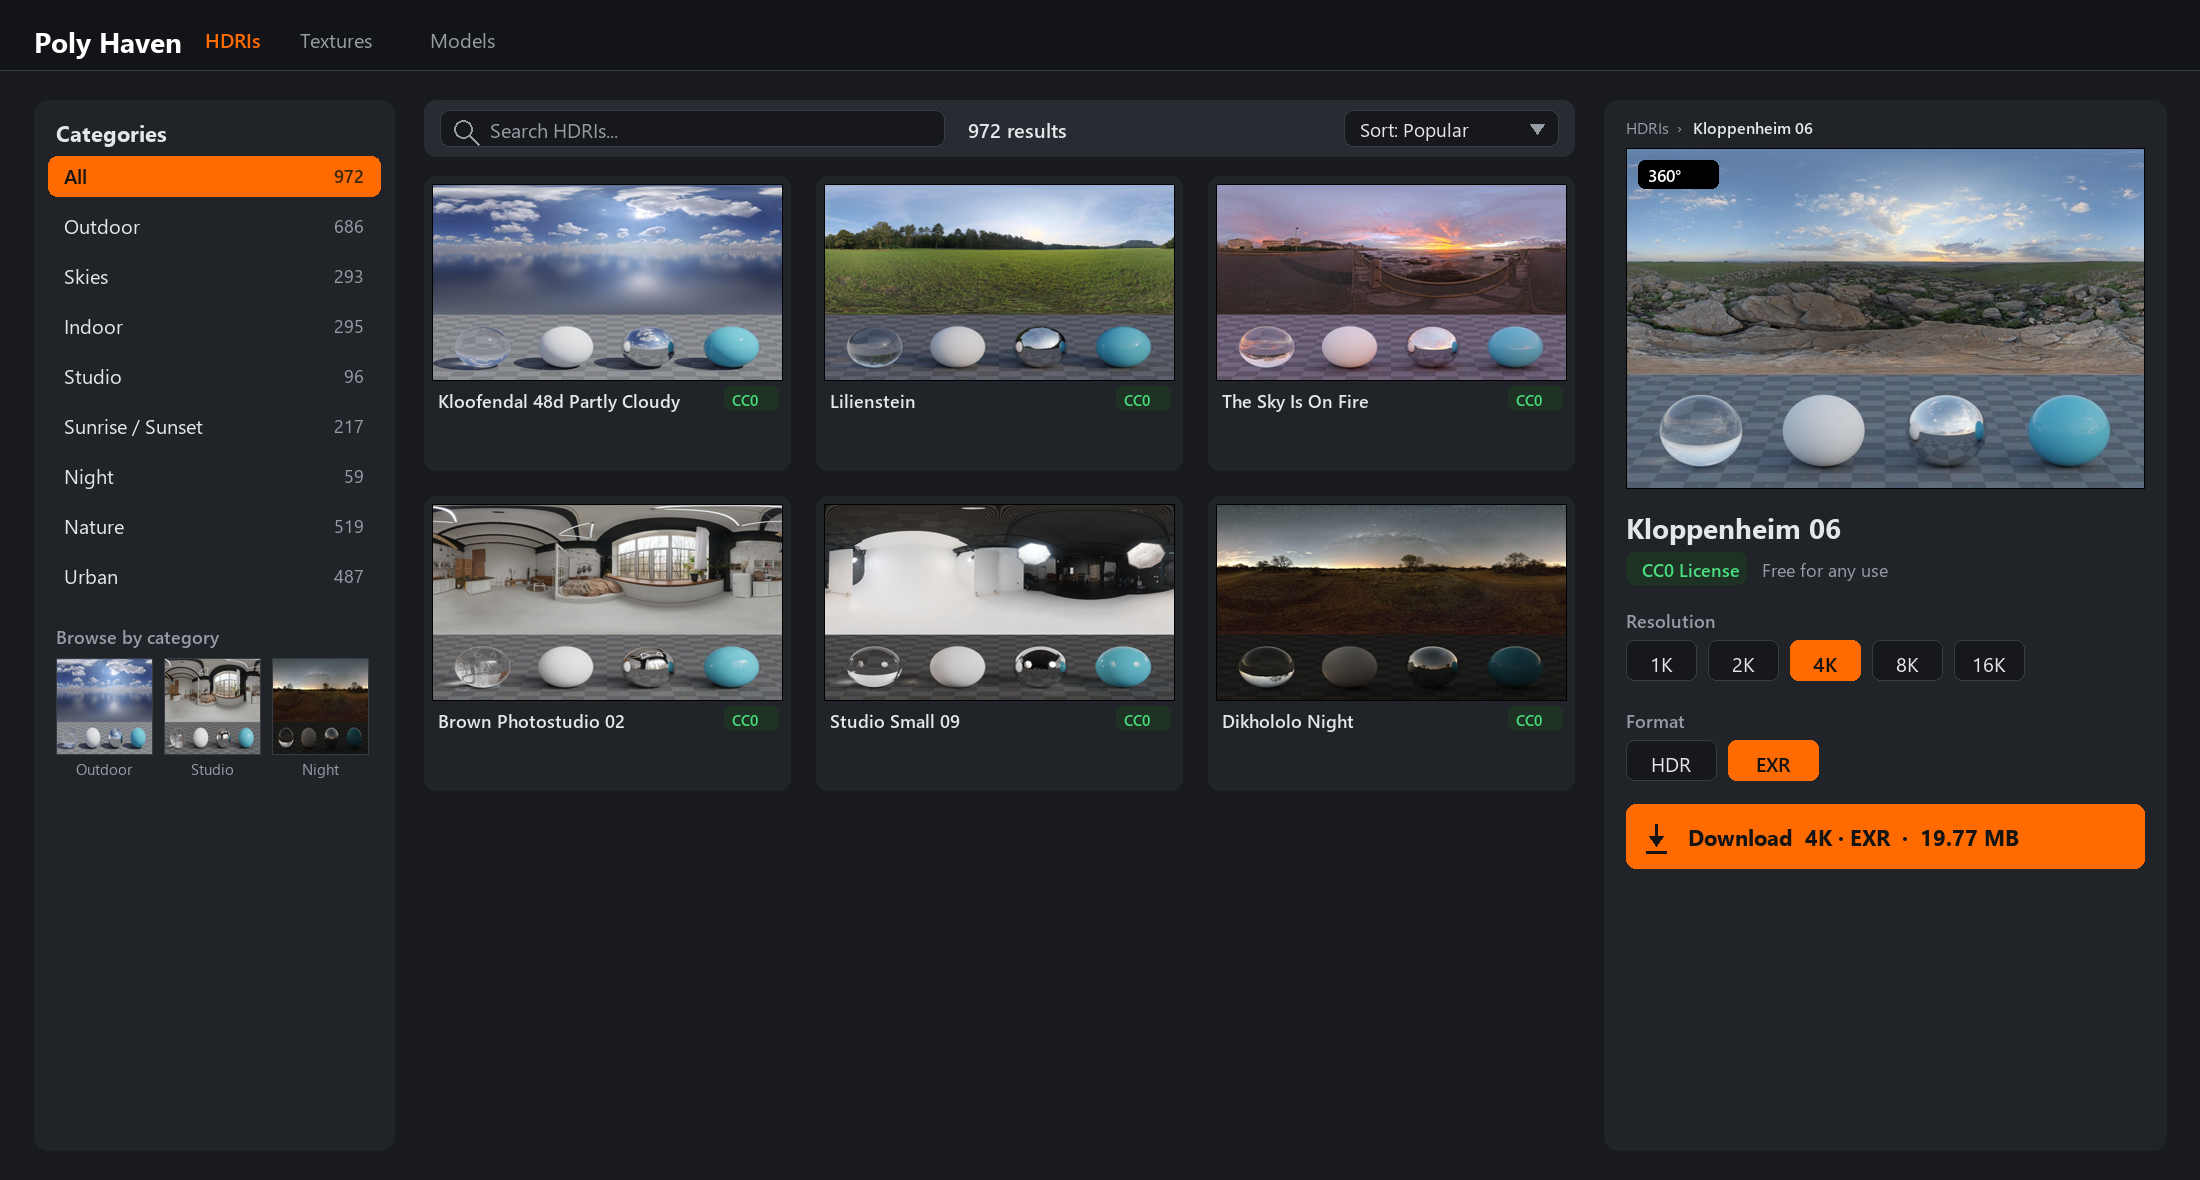
Poly Haven HDRI library navigation · filter by category, browse the grid, open a card, then download at the resolution you need
Premium HDRI Resources
💎 Professional HDRI Libraries
HDRI Link:
Large selection, organized by category
Studio, outdoor, urban environments
Individual purchase or subscription
CGAxis HDRI:
Premium quality, unique locations
Multiple resolutions available
Professional production quality
Evermotion HDRI:
High-end architectural focus
Interior and exterior environments
Often bundled with model collections
When to use premium HDRIs:
Client work requiring specific environments
Need unique locations not in free libraries
Require highest possible quality (16K+)
Commercial licensing peace of mind
Choosing the Right HDRI
🎯 Selection Criteria
Consider these factors:
Environment type:
Does scene need outdoor, studio, or interior lighting?
Match HDRI category to scene context
Time of day:
Morning, midday, evening, night?
Light angle and color temperature matter
Weather/mood:
Clear, cloudy, dramatic, overcast?
Weather affects light quality and mood
Contrast needs:
High contrast (clear sky, sun) = dramatic shadows
Low contrast (overcast) = soft, even lighting
Background visibility:
Will HDRI be visible in render?
Choose one with appropriate background
Or plan to hide/replace background
Resolution:
4K sufficient for most uses
8K+ for close-up reflections or visible backgrounds
Higher resolution = larger file, longer load times
Recommended HDRI library folder structure · group by category, then by lighting type for fast browsing
✅ Starting HDRI Collection Recommendation
Download these 10 essential HDRIs from Poly Haven to cover most scenarios:
2-3 outdoor clear sky (different times of day)
1-2 cloudy/overcast outdoor
1 sunset/golden hour
2-3 studio lighting setups
1 interior with window light
1 night/urban environment
This covers 90% of beginner projects while keeping your library manageable!
🚀 Advanced HDRI Techniques
Ready to take your HDRI skills to the next level? These advanced techniques give you even more control and creative possibilities.
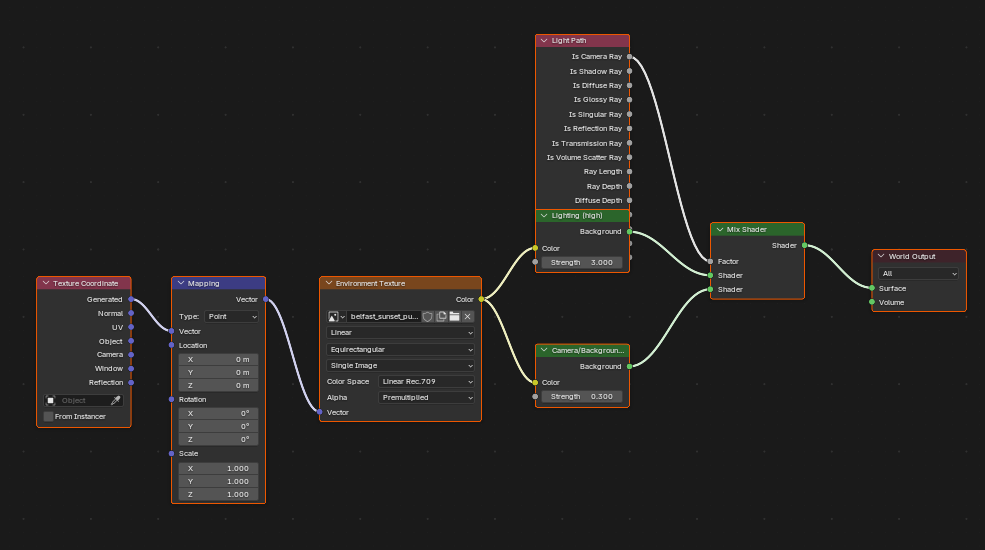
Separate lighting and background strength · the Light Path node's Is Camera Ray output drives a Mix Shader so the visible background can stay dim while the scene lighting stays bright.
Separate Lighting and Background
🎭 Independent Control
The problem:
Sometimes you want bright HDRI lighting but dim background
Or vice versa: visible HDRI background but subtle lighting
Lift blacks (raise bottom-left of curve) for faded look
Pull down highlights (lower top-right) for muted look
S-curve for increased contrast
Adjust individual R/G/B channels for color shifts
Animated HDRI Rotation
🔄 Rotating Lighting Over Time
Use case:
Simulate sun moving across sky
Create dynamic lighting changes in animation
Showcase product from different lighting angles
Setup:
Set up Mapping node: (as described in rotation section earlier)
Keyframe rotation:
Frame 1: Set Z rotation to 0
Hover over Z rotation value, press I to insert keyframe
Frame 100 (or end): Set Z rotation to 360
Press I again to keyframe
Result:
HDRI rotates smoothly over animation
Lighting direction changes
Sun/bright spots move around scene
Tips:
Use slow rotation (360° over many frames) for subtle effect
Or fast rotation to show multiple lighting scenarios quickly
Combine with camera rotation for product turntable effect
Multiple HDRI Mixing
🎭 Blending Multiple Environments
Advanced technique: Combine two HDRIs
Example: Sunset HDRI for warm light + Studio HDRI for fill
Use Mix Shader to blend them
Fac value controls blend amount (0.0 = first HDRI, 1.0 = second)
When to use:
Need characteristics from two different HDRIs
Create unique lighting not available in single HDRI
Highly artistic/stylized results
Warning:
Can look unnatural if not careful
Reflections may show conflicting environments
Use sparingly, mostly for artistic work
💡 Advanced Workflow Philosophy: These advanced techniques are powerful, but remember: the best lighting often comes from simple setups executed well. Use HDRI strength and rotation first, add manual lights second, and only reach for these advanced techniques when you have a specific creative challenge that simpler methods can't solve. Master the basics before adding complexity.
🔧 Troubleshooting HDRI Issues
Running into problems with your HDRI setup? Let's solve the most common issues you'll encounter.
HDRI troubleshooting decision tree · check visibility first, then colors, rotation, and grain
HDRI Not Showing/Scene Too Dark
⚠️ Problem: HDRI loaded but scene is black or very dark
Possible causes and fixes:
Viewport shading mode:
❌ Solid mode doesn't show HDRI lighting
✅ Switch to Material Preview or Rendered mode (Z key)
Nodes not connected:
❌ Environment Texture not connected to Background
✅ Verify: Environment Texture Color → Background Color
Background strength too low:
❌ Strength set to 0 or very low (0.1)
✅ Increase Background shader Strength to 1.0+
Very dark HDRI:
❌ Night HDRI provides minimal light
✅ Use higher strength (2.0-5.0) or choose different HDRI
Wrong image format:
❌ Using regular JPG/PNG (not true HDR)
✅ Use .hdr or .exr file format
HDRI Visible But Not Lighting Scene
⚠️ Problem: See HDRI in background but objects not illuminated
Possible causes and fixes:
Cycles: Light bounces too low:
❌ Render Properties → Light Paths → Max Bounces set to 0
✅ Set Max Bounces to at least 4 (12 default)
Eevee: World lighting disabled:
❌ Render Properties → Ambient Occlusion disabled
✅ Enable Ambient Occlusion
✅ Or add Irradiance Volume to scene
Manual lights overpowering HDRI:
❌ Very bright manual lights hiding HDRI contribution
✅ Reduce manual light strength or increase HDRI strength
Grainy/Noisy Renders
⚠️ Problem: Render is grainy or noisy (Cycles)
Causes and solutions:
Low sample count:
❌ Render samples set too low (64-128)
✅ Increase to 256-1024 for cleaner results
Viewport samples can stay low (32-64)
Small bright spots in HDRI:
❌ Sun or small lights create difficult lighting
✅ Use higher samples
✅ Or blur HDRI slightly
Denoising not enabled:
❌ No denoiser in Render Properties
✅ Enable Denoising in Render Properties → Denoising
✅ Use OptiX or OpenImageDenoise
HDRI Looks Washed Out or Wrong Colors
⚠️ Problem: HDRI colors look wrong or too bright
Fixes:
Color management:
Render Properties → Color Management → View Transform
Should be "Filmic" or "Standard" (not "Raw")
"Raw" will make HDRI look washed out
Exposure too high:
Color Management → Exposure slider
Try 0.0 or slightly negative value
HDRI strength too high:
Reduce Background shader Strength
Try 0.5-1.5 instead of 3.0+
HDRI Rotated Wrong Direction
⚠️ Problem: Sun/bright areas in wrong position
Quick fix:
Add Mapping + Texture Coordinate nodes (as described earlier)
Adjust Mapping node → Rotation → Z value
Rotate until lighting direction is correct
Watch in viewport while adjusting for instant feedback
HDRI Won't Load
⚠️ Problem: Error loading HDRI file
Checks:
File format:
Verify it's .hdr or .exr extension
Some corrupted files won't load
Try re-downloading
File path:
Special characters in path can cause issues
Very long file paths may fail
Move file to simpler location
File size:
Extremely large HDRIs (16K+) may be slow to load
Wait longer or use smaller resolution
Blender version:
Very old Blender versions may not support some .exr variants
Update Blender or convert file
Performance Issues
🐌 Problem: Slow viewport or rendering
Optimization strategies:
Lower resolution HDRI for viewport:
Use 2K HDRI for viewport work
Switch to 8K for final render
Save both versions, swap as needed
Viewport render settings:
Reduce viewport samples (32-64)
Enable viewport denoising
Scene optimization:
Hide objects not in current view
Use lower poly counts during lighting setup
Disable heavy modifiers temporarily
✅ Troubleshooting Checklist
When HDRI isn't working, check in this order:
Viewport mode (Material Preview or Rendered?)
Nodes connected correctly?
Background Strength above 0?
Using .hdr or .exr file?
Color Management set to Filmic?
For Cycles: Light bounces enabled?
For Eevee: Ambient Occlusion on?
90% of issues are solved by checking these seven items!
🎨 Project: HDRI Environment Showcase
Time to put everything you've learned into practice! In this project, you'll create three different lighting scenarios using HDRIs, demonstrating the versatility and power of image-based lighting.
Project Overview
🎯 Project Goals
What you'll create:
Three renders of the same object using different HDRIs
Outdoor scene with natural lighting
Studio setup with professional lighting
Creative/artistic lighting scenario
Learning objectives:
Practice HDRI setup workflow
Learn to choose appropriate HDRI for different contexts
Adjust HDRI properties for optimal results
Combine HDRI with manual lights (optional advanced)
Compare different lighting approaches
Time estimate: 60-90 minutes
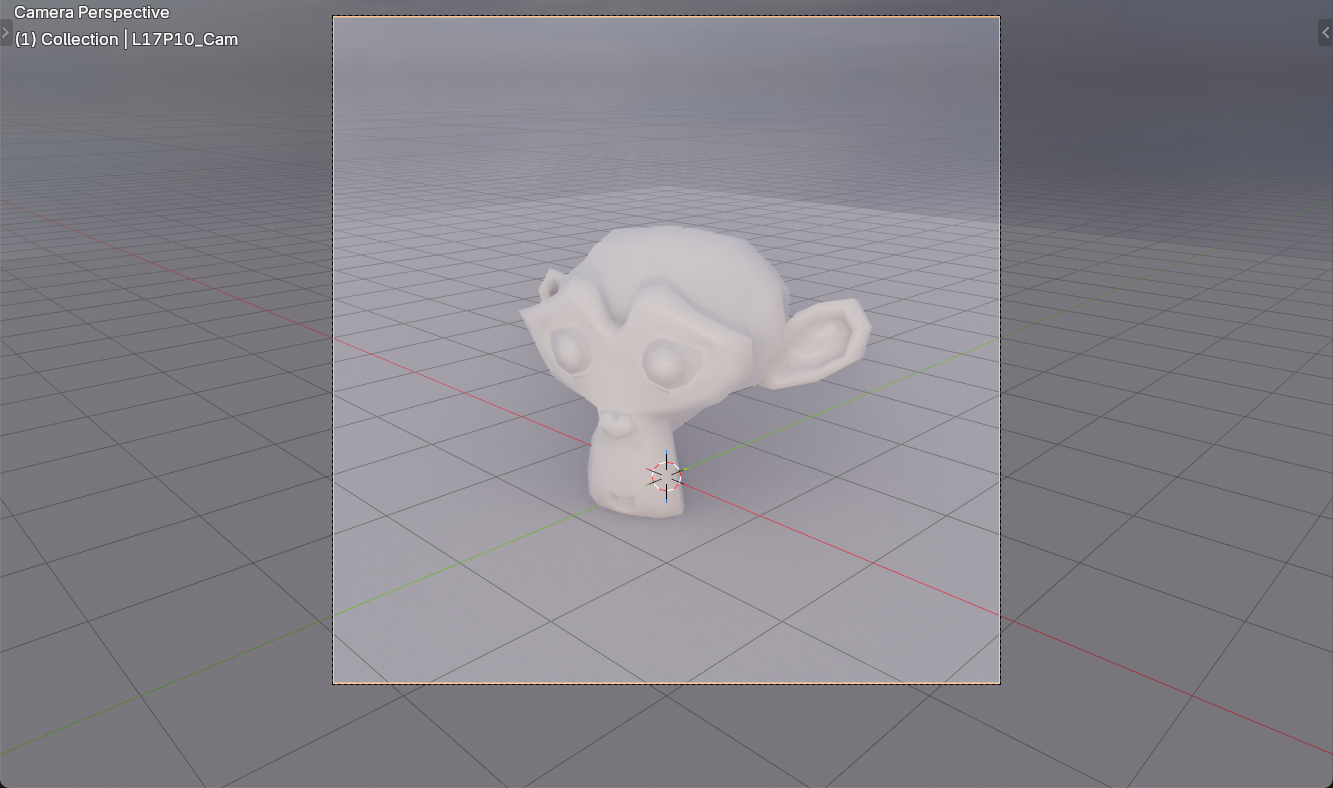
Project scene setup · a test object on a ground plane, framed by the camera at about 45°, lit entirely by the HDRI environment with the default light deleted.
Part 1: Scene Setup
🏗️ Building Your Test Scene
Step 1: Create or import object
Option A: Use a simple object you've modeled (cup, vase, etc.)
Option B: Model a new object specifically for this project
Option C: Use default Suzanne (monkey head):
Shift+A → Mesh → Monkey
Quick and recognizable test object
Recommendation: Choose object with some surface variation (not just flat)
Goal: Something visually different from outdoor and studio
Step 2: Load and adjust
Load your creative HDRI choice
Rotate to most interesting angle
Adjust strength for mood:
Lower strength (0.3-0.7) for moody/dramatic
Higher strength (1.5-3.0) for vibrant
Step 3: Experiment with color grading
Add HSV node (optional):
Shift+A → Color → Hue Saturation Value
Place between Environment Texture and Background
Adjust colors:
Hue: Shift colors for artistic effect
Saturation: Increase for vibrant, decrease for muted
Value: Alternative brightness control
Goal: Create unique mood/atmosphere
Step 4: Add complementary manual light (optional)
If scene too dark or needs accent:
Add Point or Area light
Colored light for artistic effect
Example: Blue rim light on warm sunset scene
Lower HDRI strength to balance
Step 5: Render and save
F12 to render
Save as: "creative_lighting_01.png"
Part 5: Comparison and Analysis
🔍 Comparing Your Results
Step 1: View renders side-by-side
Open all three renders in image viewer
Or arrange in Photoshop/GIMP
Compare differences
Step 2: Analyze each render
Outdoor lighting:
What direction is light coming from?
How do shadows look?
What colors are visible in reflections?
Does it feel natural and realistic?
Studio lighting:
Is object evenly lit?
Are shadows soft or hard?
Does it look professional?
If you added rim light, does it help?
Creative lighting:
What mood does it convey?
How do colors affect the feeling?
Is it more dramatic or subtle?
What story does the lighting tell?
Step 3: Note your favorites
Which render do you like best? Why?
Which HDRI was easiest to work with?
Which required most adjustment?
What would you do differently?
Bonus Challenges
💪 Take It Further
Challenge 1: Material variations
Re-render outdoor scene with highly reflective material (Metallic: 1.0, Roughness: 0.1)
See how HDRI shows clearly in reflections
Compare to your original material
Challenge 2: Time of day progression
Find 3 outdoor HDRIs: morning, midday, sunset
Render same scene with each
Create progression showing day passing
Challenge 3: Advanced hybrid lighting
Choose one scene
Set HDRI to 0.4 strength
Add full three-point lighting with manual lights
Compare to HDRI-only version
Challenge 4: Background separation
Use Light Path technique
Keep HDRI lighting but change background to solid color
Render with multiple background colors
Challenge 5: HDRI rotation animation
Keyframe HDRI rotation from 0° to 360°
Animate over 120 frames
Render animation showing lighting change
Project Success Checklist
✅ Completion Criteria
You've successfully completed this project when you have:
Created test scene with object, ground plane, and camera
Loaded and used at least 3 different HDRIs
Adjusted HDRI rotation and strength for each scene
Rendered and saved all three lighting scenarios
Compared results and analyzed differences
Understood how HDRI type affects mood and appearance
Bonus completion (optional):
Combined HDRI with manual lights in at least one scene
Experimented with color grading or advanced techniques
Tried one or more bonus challenges
💡 Project Reflection: This project demonstrates one of the most important concepts in 3D lighting: the same object can tell completely different stories depending on how it's lit. The outdoor HDRI might make it feel natural and approachable. The studio HDRI could make it look premium and desirable. The creative lighting might make it mysterious or dramatic. You just controlled storytelling through lighting alone—that's the power of mastering HDRIs!
📚 Lesson Summary
Congratulations on completing this comprehensive lesson on HDRI and world lighting! You've learned one of the most powerful techniques in modern 3D rendering.
🎯 Key Takeaways
HDRI fundamentals:
HDRIs capture full range of light (very dark to very bright)
Each pixel acts as a light source
Provides lighting AND reflections simultaneously
Instant realism that manual lighting can't easily match
HDRI setup:
Environment Texture → Background → World Output
Simple three-node setup for powerful results
Works in both Cycles and Eevee
Essential adjustments:
Strength controls brightness
Rotation (via Mapping node) controls light direction
Color grading for mood and style
Background visibility can be separated from lighting
HDRI types serve different purposes:
Outdoor: Natural lighting, sky, sun
Studio: Professional product lighting
Interior: Indoor environments with mixed lighting
Creative: Artistic and stylized atmospheres
Hybrid approach is best:
HDRI provides realistic ambient and reflections
Manual lights add precise control
Combining gives both realism and artistic direction
Using wrong HDRI category: Studio HDRI for outdoor scene looks fake—match type to context
Not testing in rendered view: Material Preview doesn't show full HDRI quality—use Rendered mode
🚀 Next Steps in Your Journey
To continue improving with HDRIs:
Build your HDRI library:
Download 15-20 HDRIs from Poly Haven
Organize by category
Have ready collection for any project
Practice with different objects:
Try HDRIs on various materials (glass, metal, plastic)
See how reflections and lighting change
Understand which HDRIs work best for which materials
Study real photography:
Look at professional product photography
Identify lighting setup used
Try to recreate in Blender with HDRIs
Combine with other lighting lessons:
Use HDRI as base for three-point lighting
Layer HDRI with techniques from previous lessons
Develop your signature lighting style
Experiment freely:
Try "wrong" combinations (indoor HDRI for outdoor object)
Break rules to discover creative possibilities
Some "mistakes" become signature styles
🎬 Real-World Applications
How professionals use HDRIs:
Product visualization: Studio HDRIs provide instant professional lighting for e-commerce and marketing
Architectural rendering: Outdoor HDRIs give realistic natural lighting and sky for building exteriors
VFX and film: HDRIs shot on-location provide perfect ambient light for integrating CG into live-action
Game development: HDRIs baked into reflection probes give realistic environmental reflections
Motion graphics: Studio and abstract HDRIs provide consistent lighting for animated product demos
🌟 You've Mastered a Professional Tool!
HDRI lighting is used in virtually every high-end 3D production—films, commercials, product visualization, and games. By mastering this lesson, you've learned the same technique used by professionals at Pixar, ILM, and major advertising studios. The ability to quickly set up realistic lighting with HDRIs, then refine it with manual lights, is one of the most valuable skills in 3D lighting.
What separates beginners from professionals isn't access to HDRIs (they're free!)—it's knowing which HDRI to choose, how to adjust it properly, and when to combine it with manual lights. You now have that knowledge.
🎓 What's Next?
Coming Up in Lesson 18: Eevee Real-Time Rendering
Now that you understand lighting with HDRIs and manual lights, you'll learn how to render your scenes efficiently with Eevee, Blender's real-time render engine. You'll discover:
How Eevee differs from Cycles (speed vs. accuracy trade-offs)
Configuring Eevee settings for best quality
Ambient Occlusion, Screen Space Reflections, and Bloom
Optimizing scenes for real-time performance
When to use Eevee vs. Cycles
Get ready to see your HDRIs render in seconds instead of minutes!
✅ Before Moving On
Make sure you can:
Load an HDRI and see it lighting your scene
Rotate HDRI to position lighting correctly
Adjust strength to control brightness
Choose appropriate HDRI for different scenarios
Combine HDRI with at least one manual light
Download HDRIs from Poly Haven
If you can do these things confidently, you're ready for the next lesson!