🎨 Lesson 38: Weight Painting
You've built a beautiful armature—now it's time to connect it to your character mesh! Weight painting is the art of telling each bone exactly how much influence it has over each vertex. Think of it as painting instructions onto your mesh: "This vertex belongs 100% to the forearm," "This vertex is 50% shoulder and 50% upper arm." Master weight painting and your character will bend, twist, and move naturally. Skip it or rush it, and you'll get broken, twisted, candy-wrapper deformation. This lesson teaches you the essential skill that bridges the gap between static skeleton and living, breathing character!
🎯 What You'll Learn
- Skinning Fundamentals: How meshes bind to armatures and what vertex weights mean
- Automatic Weights: Blender's automatic skinning and when it works (or doesn't)
- Weight Paint Mode: The specialized painting interface for vertex weights
- Painting Techniques: Brushes, strengths, and strategies for smooth deformation
- Testing and Refinement: Using Pose Mode to verify weight painting quality
- Common Problems: Fixing candy-wrapping, volume loss, and broken deformation
- Advanced Tools: Weight transfer, mirroring, and gradient tools
- Professional Workflow: Efficient weight painting strategies used in production
⏱️ Estimated Time: 90-120 minutes
🎯 Project: Fully weight-painted character ready for animation
In This Lesson
🔗 Understanding Skinning and Vertex Weights
Before we dive into painting, let's understand the fundamental concept: how does moving a bone actually deform the mesh? The answer lies in a system of invisible "weights" assigned to every vertex. Understanding this system is crucial—it's the foundation of all character deformation!
What Is Skinning?
🎭 The Puppet Skin Analogy: Imagine a puppet made of cloth (the mesh) with a wooden frame inside (the armature). The cloth must be attached to the frame somehow—maybe sewn at certain points, glued at others. "Skinning" is the process of attaching mesh to skeleton. But unlike a physical puppet where attachment points are fixed, in 3D we can make each vertex follow multiple bones with varying amounts of influence. This flexibility creates smooth, organic deformation!
✅ Skinning Core Concepts
The Binding Process:
- Armature: The skeleton you created in Lesson 37
- Mesh: The character surface that needs to deform
- Skinning/Binding: Creating the relationship between armature and mesh
- Vertex Groups: Lists of vertices assigned to each bone
- Weights: Numbers (0.0 to 1.0) defining how much each bone influences each vertex
How It Works (The Magic Explained):
- You bind mesh to armature (parent with "Automatic Weights" or manual)
- Blender creates a "vertex group" for each deform bone
- Each vertex gets assigned to one or more vertex groups
- Each assignment has a weight value (0.0 = no influence, 1.0 = full influence)
- When bone moves, vertices follow based on their weights
- If vertex has multiple bone weights, it averages their influences
Simple Example:
- Vertex at elbow joint
- Assigned 50% weight to upper_arm bone
- Assigned 50% weight to forearm bone
- When forearm rotates, vertex moves halfway between both bones
- Result: Smooth bending at elbow instead of sharp crease!
Understanding Vertex Weights
⚖️ What Weights Mean
Weight Values Explained:
- 1.0 (100%): Vertex completely follows this bone
- Example: Forearm vertices fully controlled by forearm bone
- Bone moves, vertex moves identically
- 0.5 (50%): Vertex follows this bone halfway
- Example: Elbow vertex split between upper arm and forearm
- Creates smooth transition at joint
- 0.0 (0%): Vertex doesn't follow this bone at all
- Example: Hand vertices have 0% weight to spine bone
- Spine moves, hand stays put (unless parent bones move)
Multiple Bone Influence:
- A single vertex can have weights assigned to multiple bones
- Total weights typically sum to 1.0 (100%) but not required
- Blender normalizes weights when painting (keeps them summing to 1.0)
- Example: Shoulder vertex
- 0.3 (30%) spine weight
- 0.4 (40%) shoulder bone weight
- 0.3 (30%) upper arm weight
- Total: 1.0 (100%)
Vertex Groups - The Container System
Weights are stored in vertex groups—one group per bone. Understanding vertex groups is essential for efficient weight painting!
💡 Vertex Groups Explained
What Are Vertex Groups?
- Named collections of vertices with associated weights
- Each bone gets a matching vertex group (same name)
- Groups stored in mesh object, not armature
- Can be used for many things, but primarily for bone weights
Automatic Creation:
- When you bind mesh to armature, vertex groups auto-create
- One group per deform bone (bones with "Deform" checkbox enabled)
- Group names match bone names exactly
- Example: "upper_arm.L" bone → "upper_arm.L" vertex group
Viewing Vertex Groups:
- Select mesh object
- Properties panel > Mesh Data Properties (green triangle icon)
- Vertex Groups section
- List shows all vertex groups for this mesh
- Each group shows how many vertices assigned
Important Note:
- Vertex group names MUST match bone names exactly
- Rename a bone? Must rename the vertex group too!
- Misspelled group name = bone has no influence
Visual Representation of Weights
🎨 Weight Visualization
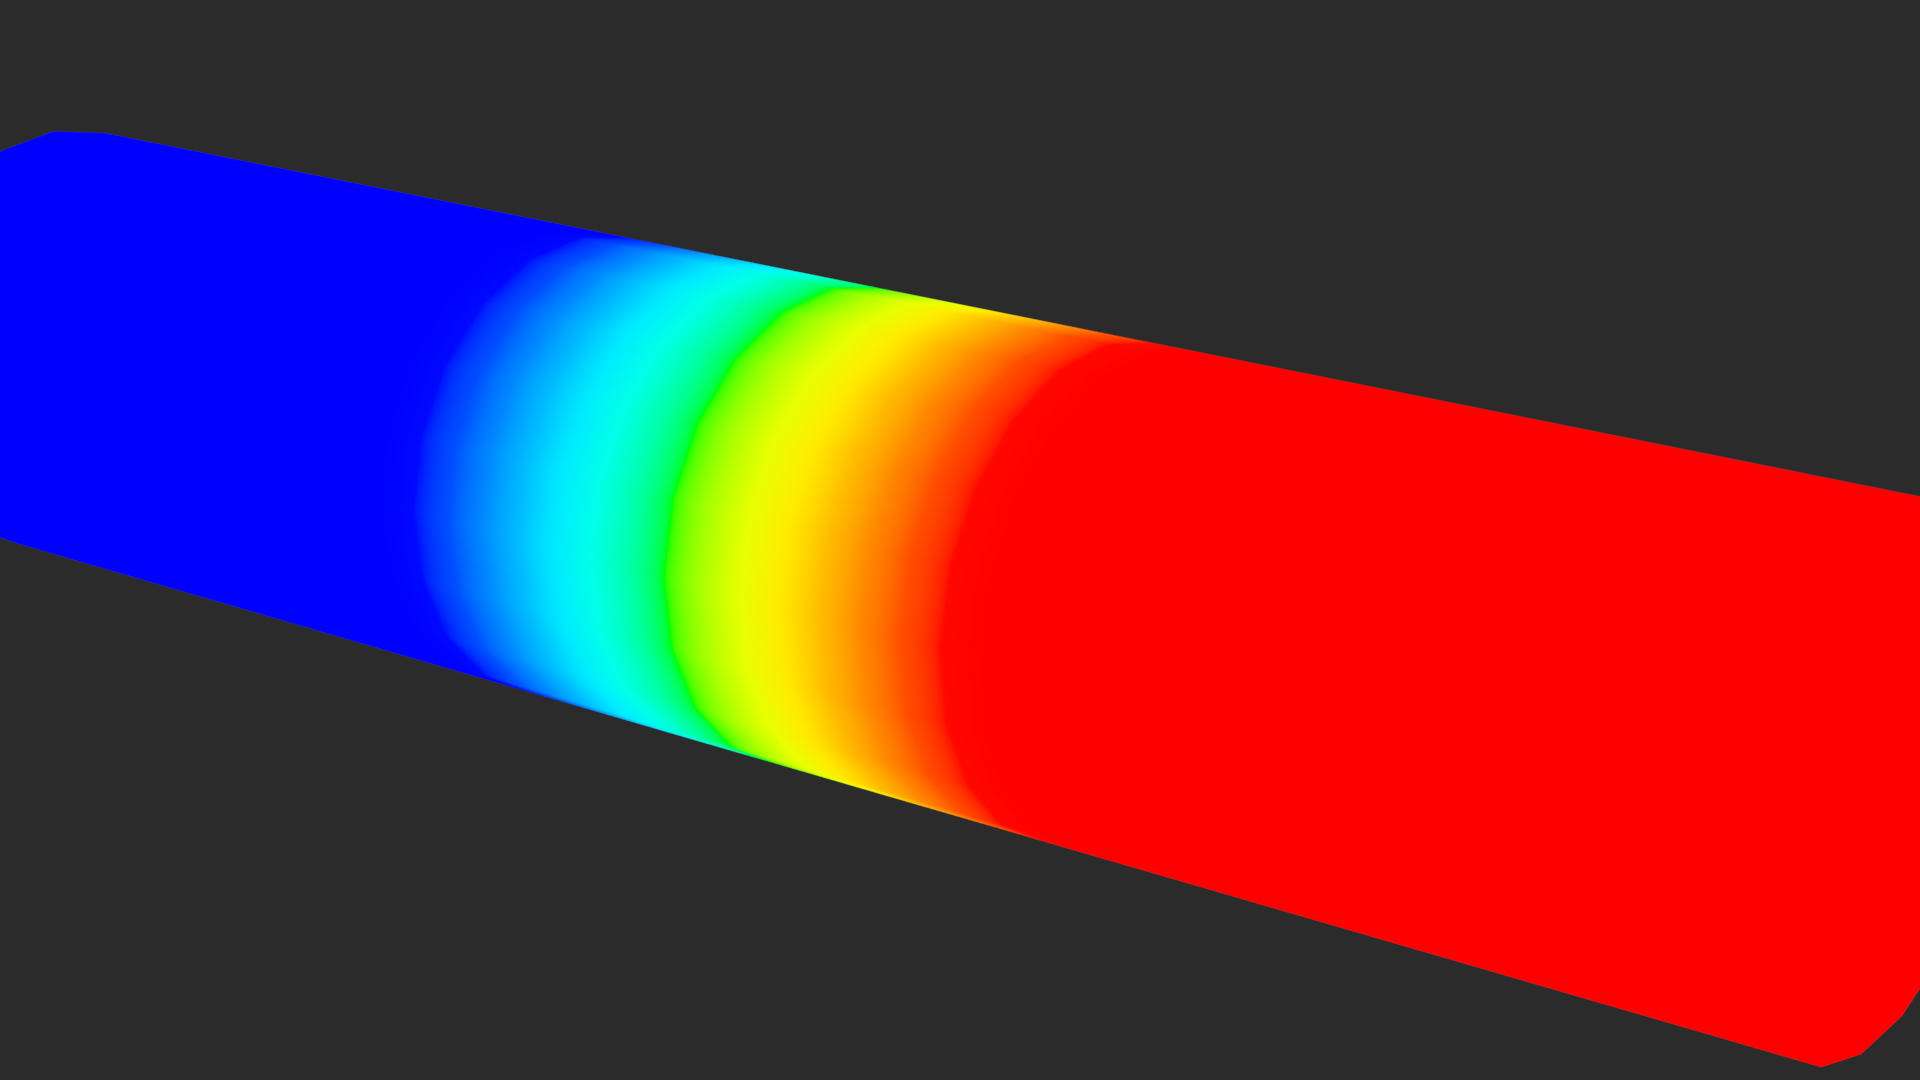
Color-Coded Weight Display:
In Weight Paint Mode, Blender shows weights as colors on your mesh:
| Color | Weight | Meaning |
|---|---|---|
| 🔵 Blue | 0.0 (0%) | No influence from this bone |
| 🔵 Cyan | 0.25 (25%) | Low influence |
| 🟢 Green | 0.5 (50%) | Medium influence (typical at joints) |
| 🟡 Yellow | 0.75 (75%) | High influence |
| 🔴 Red | 1.0 (100%) | Full influence (vertex completely owned by bone) |
What You'll See:
- Solid red areas: Vertices fully controlled by selected bone (forearm middle)
- Blue areas: Vertices not controlled by selected bone (hand when forearm selected)
- Green/yellow gradient: Transition zones (elbow joint area)
- Colors update as you paint, showing weight changes in real-time
Why Weight Painting Matters
⚠️ The Make-or-Break Skill
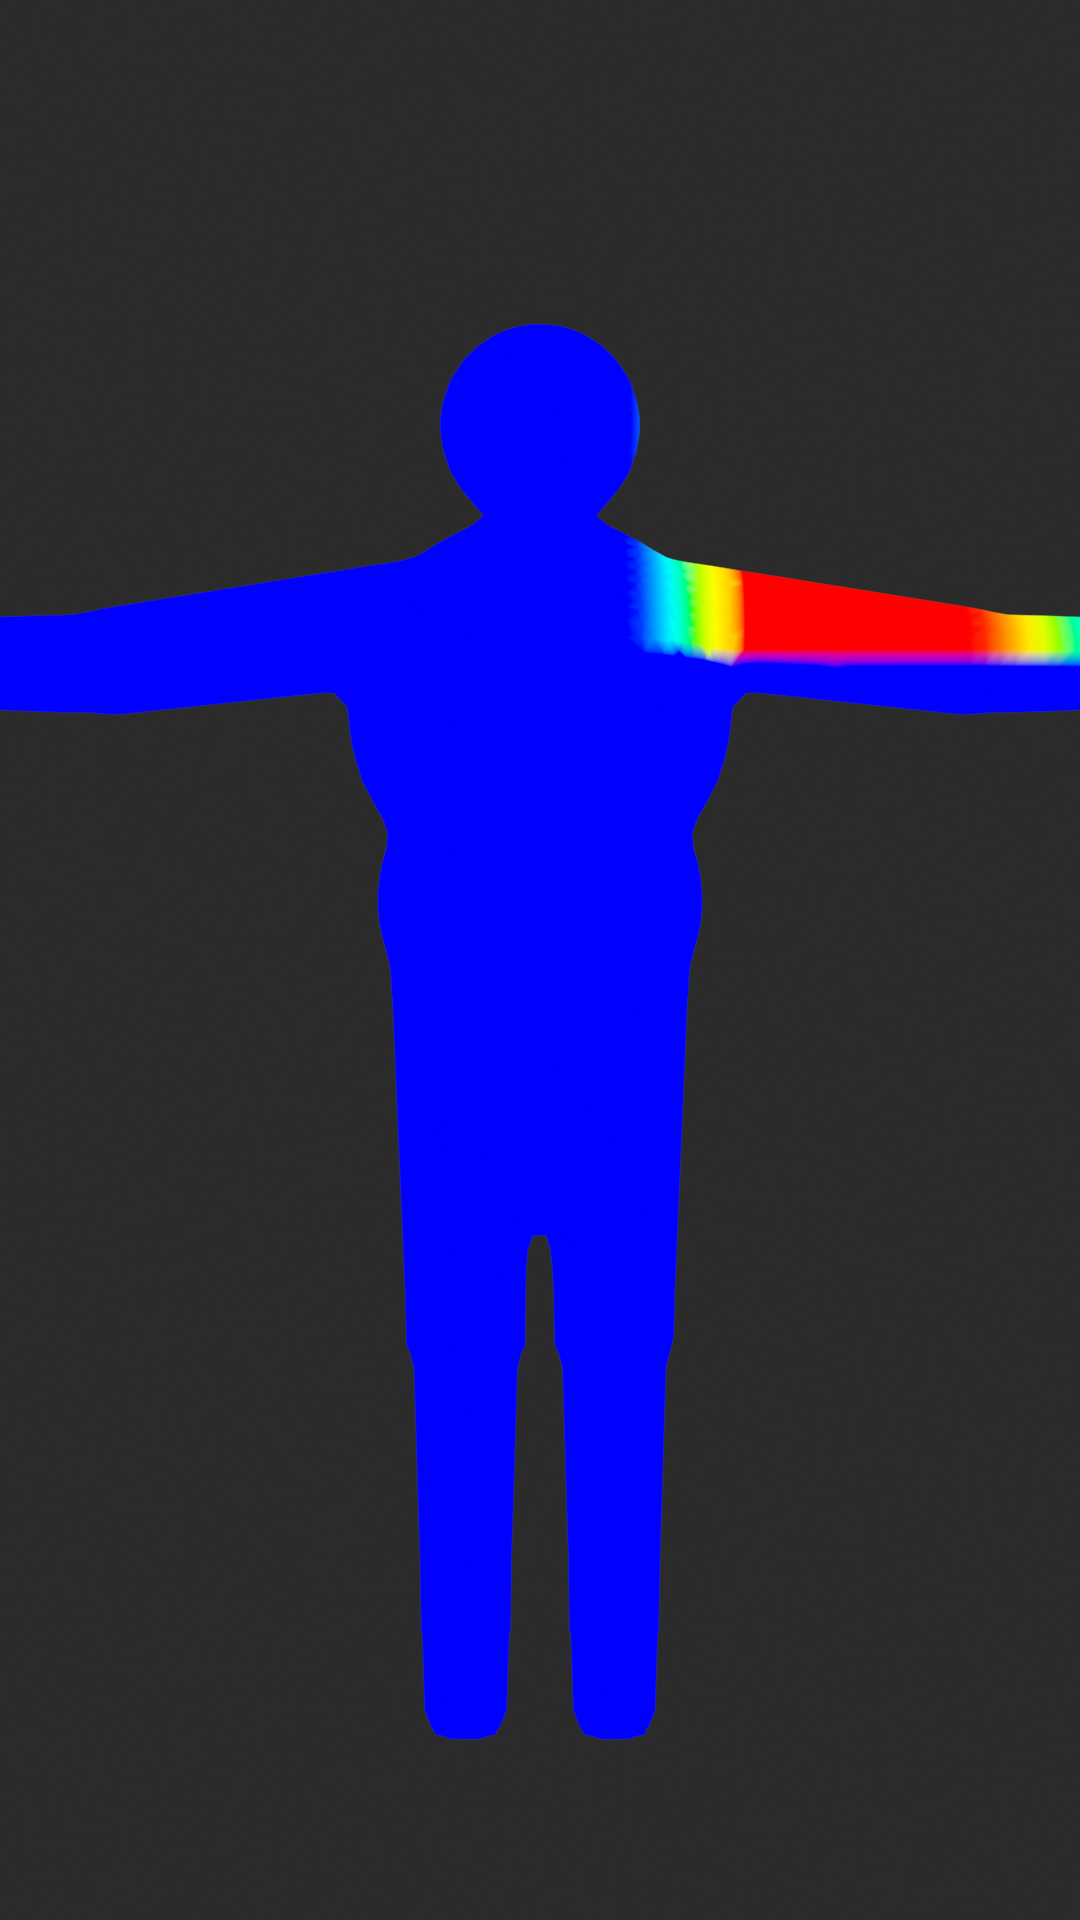
Good Weight Painting = Natural Movement:
- Joints bend smoothly without creasing
- Volume is preserved (arms stay round when bent)
- No mesh distortion or twisting (candy-wrapper effect)
- Character looks alive and believable
- Animator can focus on performance, not fixing broken deformation
Bad Weight Painting = Broken Character:
- Sharp creases at joints (elbow collapses)
- Volume loss (arm becomes stick when bent)
- Candy-wrapper twisting (mesh spirals unnaturally)
- Vertices "pop" to wrong side of joint
- Character looks robotic or broken
- Animation becomes frustrating nightmare
The Hard Truth:
- Weight painting is tedious and time-consuming
- Professional riggers spend 30-50% of rigging time on weights
- But: good weights make animation 10x easier
- Bad weights can't be fixed with clever animation
- Investment here pays massive dividends later
💭 Industry Perspective: At Pixar, Disney, and major game studios, weight painting is considered a specialized skill. Some studios have dedicated "skin weight artists" whose sole job is perfecting character deformation. The difference between good and great weight painting can make or break a character's believability. We're not just painting colors—we're defining how a character will move for every pose in every shot!
🎯 Skinning Fundamentals Summary
- Skinning: Binding mesh to armature so bones control deformation
- Vertex weights: Numbers (0.0-1.0) defining bone influence on each vertex
- Vertex groups: Containers storing weights, one per bone
- Color visualization: Blue (0%) → Green (50%) → Red (100%)
- Multiple influences: Vertices can follow multiple bones simultaneously
- Weight painting: The process of manually adjusting these weights
- Critical importance: Good weights = natural deformation, bad weights = broken character
Understanding weights is the foundation—now let's bind that armature!
🔗 Binding Armature to Mesh
Now that you understand the theory, let's do the actual binding! This is the moment where your armature and mesh become connected. Blender offers several binding methods, each with pros and cons. We'll explore all of them so you know which to use in different situations. Let's make that connection!
Prerequisites for Binding
🏗️ Before You Bind: Think of binding like welding two metal pieces together—once it's done, undoing it is messier than doing it right the first time. Make sure your armature is positioned correctly, your mesh is finalized, and both are at the world origin before binding. These few minutes of preparation save hours of frustration later!
⚠️ Pre-Binding Checklist
Armature Requirements:
- ✓ Armature is complete and positioned inside mesh
- ✓ All bones properly named (no Bone.001!)
- ✓ Hierarchy tested and working in Pose Mode
- ✓ Bone roll corrected (Ctrl + N)
- ✓ Symmetry verified for left/right bones
Mesh Requirements:
- ✓ Mesh is finalized (no more major modeling changes)
- ✓ Clean topology (no overlapping faces, no holes)
- ✓ Modifiers applied (except those you want to keep)
- ✓ Scale applied (Object > Apply > Scale)
- ✓ Mesh origin at correct location
Position Requirements:
- ✓ Both armature and mesh at world origin (0, 0, 0) or near it
- ✓ Character in neutral pose (T-pose or A-pose)
- ✓ No rotation on armature object (0, 0, 0)
- ✓ Both objects in same collection/layer
Why These Matter:
- Non-applied scale causes weight painting issues
- Rotated armature objects create offset problems
- Objects far from origin can cause calculation errors
- Fix these issues NOW—they're harder to fix after binding!
The Binding Process (Automatic Weights)
The most common binding method is "Automatic Weights"—Blender calculates initial weights based on bone proximity. Let's do it step-by-step!
✅ Binding with Automatic Weights (Recommended)
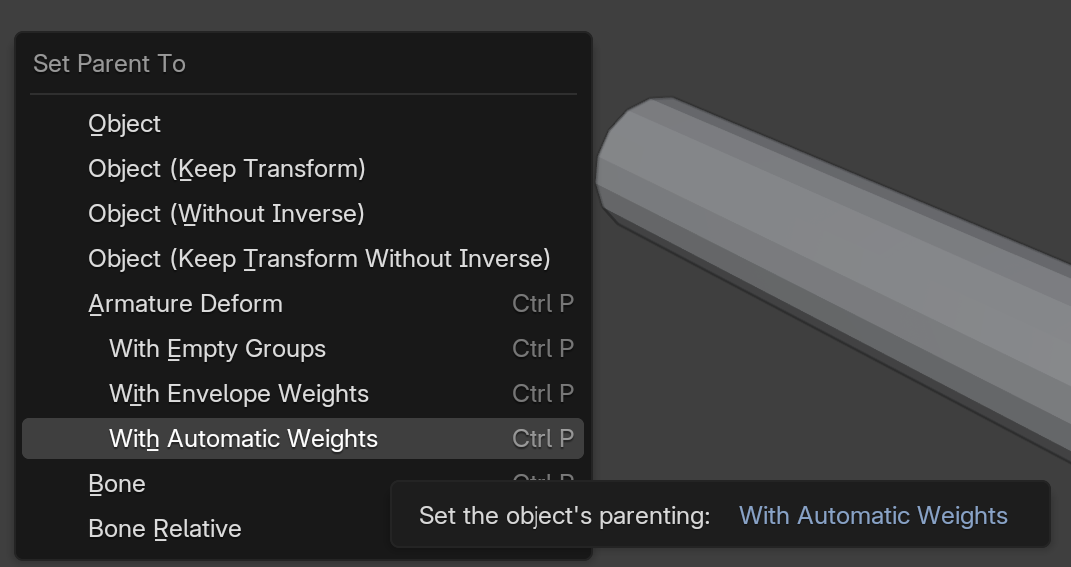
Step-by-Step Binding:
- Select objects in correct order:
- First: Click mesh object to select it
- Then: Hold
Shift, click armature object - Both should be selected, armature highlighted (active)
- Order matters! Mesh first, then armature
- Parent with Automatic Weights:
- Press
Ctrl + Pto open parent menu - Choose "With Automatic Weights"
- Blender calculates weights automatically
- This takes a few seconds (longer for high-poly meshes)
- Press
- Confirmation:
- You'll see brief "Generating weights..." message
- When finished, mesh is now child of armature
- Vertex groups created automatically
- Initial weights assigned to all vertices
What Just Happened:
- Blender created vertex groups (one per deform bone)
- Calculated initial weights based on vertex-to-bone distance
- Closer vertices get higher weights to nearby bones
- Distant vertices get little or no weight
- Mesh is now parented to armature (moves with it in Object Mode)
Testing the Binding
Before weight painting, verify the binding worked! A quick test saves confusion later.
🧪 Verification Tests
Test 1: Object Mode Movement
- Select armature (Object Mode)
- Press
Gto move it - Expected: Mesh moves with armature
- If not: Binding failed, mesh isn't parented
- Press
Escto cancel move
Test 2: Pose Mode Deformation
- Select armature
- Press
Ctrl + Tabto enter Pose Mode - Select a bone (e.g., forearm.L)
- Press
Rto rotate it - Expected: Nearby mesh deforms and follows bone
- If not: Weights missing or incorrect
Alt + Rto clear rotation
Test 3: Vertex Groups Created
- Select mesh object
- Properties panel > Mesh Data (green triangle icon)
- Expand Vertex Groups section
- Expected: List of groups matching bone names
- Should see: pelvis, spine_01, upper_arm.L, etc.
- If empty: Binding didn't create groups
Test 4: Weight Visualization
- Select mesh object
- Change mode to Weight Paint Mode (mode dropdown)
- Expected: Mesh shows colors (red, green, blue)
- Select different bones in outliner—colors update
- If all blue: No weights assigned
Alternative Binding Methods
Automatic Weights is usually best, but other methods exist for special situations.
💡 Other Binding Options
Method 2: With Empty Groups
- Select mesh, Shift-select armature
Ctrl + P> With Empty Groups- Creates vertex groups but NO weights assigned
- All vertices start at 0.0 weight (all blue)
- Use when: You want complete manual control
- Pros: No bad automatic weights to fix
- Cons: Must paint ALL weights from scratch
Method 3: With Envelope Weights
- Select mesh, Shift-select armature
Ctrl + P> With Envelope Weights- Uses bone envelope radius to calculate weights
- Legacy method, rarely used in modern workflow
- Use when: Almost never (automatic weights are better)
- Why avoid: Less predictable, harder to control
Method 4: Armature Modifier (Manual)
- Don't parent mesh to armature
- Select mesh > Modifiers > Add Modifier > Armature
- Set "Object" field to your armature
- Manually create vertex groups and paint weights
- Use when: Multiple meshes share one armature
- Advanced: More control but more complex
Recommendation:
- Beginners: Use Automatic Weights (99% of cases)
- Intermediates: Automatic Weights, then manual refinement
- Advanced: Empty Groups or Armature Modifier when needed
Understanding the Armature Modifier
When you bind with Automatic Weights, Blender adds an Armature modifier to your mesh. Understanding this modifier helps troubleshoot issues!
⚙️ Armature Modifier Settings
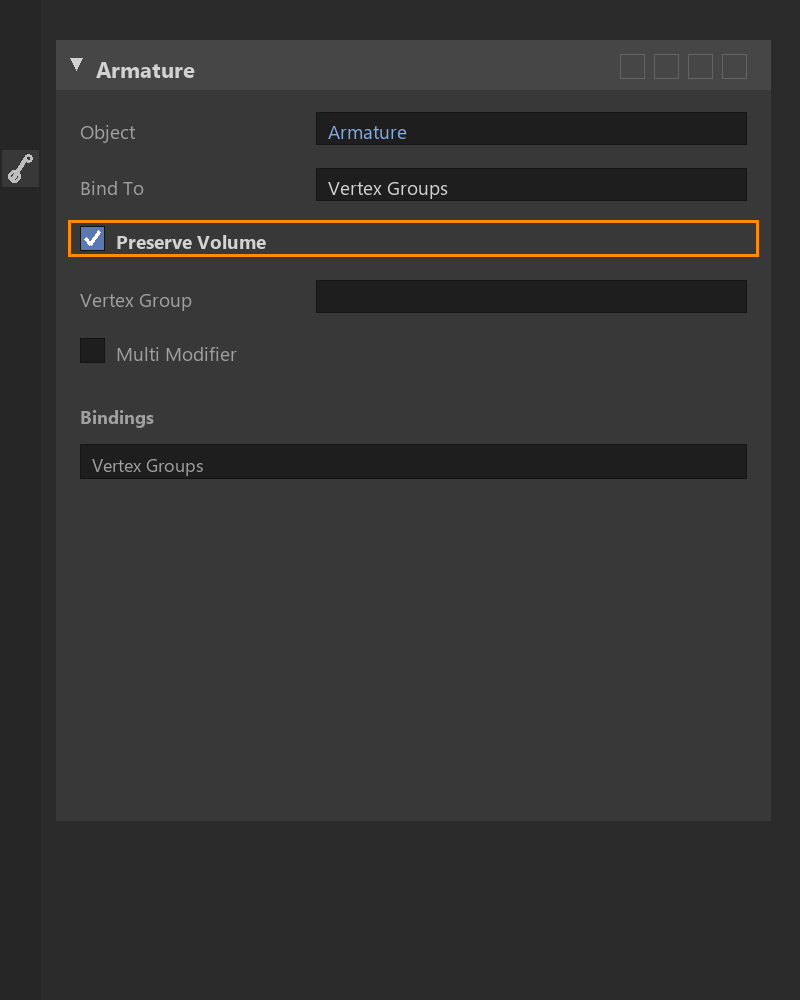
Finding the Modifier:
- Select mesh object
- Properties panel > Modifier Properties (wrench icon)
- Look for "Armature" modifier
- If not there after binding, something went wrong!
Key Settings:
- Object: Which armature controls this mesh
- Should point to your character's armature
- If empty or wrong, mesh won't deform
- Bind To: Usually "Vertex Groups"
- Other options: Bone Envelopes (legacy)
- Keep on Vertex Groups for weight painting workflow
- Preserve Volume: Attempts to maintain volume when deforming
- Can help prevent "stick arm" syndrome
- Enable for organic characters
- Disable for mechanical/hard surface
- Vertex Group: (Advanced) Limit modifier to specific group
- Usually left empty (affects all vertices)
- Can use to exclude certain areas from deformation
Modifier Stack Order:
- Armature modifier should typically be LAST in stack
- Other modifiers (Subdivision Surface, etc.) go before it
- Reason: Deformation should happen after mesh refinement
- Exception: Cloth/physics modifiers might go after
Unbinding and Re-binding
Sometimes you need to start over. Here's how to unbind safely!
🔓 How to Unbind Mesh from Armature
Method 1: Clear Parent (Keep Weights)
- Select mesh object
- Press
Alt + P - Choose "Clear Parent"
- Mesh unparented, but vertex groups remain
- Armature modifier still present
- Use when: Want to re-parent differently but keep weights
Method 2: Delete Armature Modifier (Keep Groups)
- Select mesh
- Modifier Properties > Armature modifier
- Click X to delete modifier
- Vertex groups still exist
- Use when: Want to test without deformation
Method 3: Complete Unbind (Delete Everything)
- Clear parent (
Alt + P) - Delete Armature modifier
- Select mesh > Mesh Data Properties
- Vertex Groups: Select all groups, click - (minus) to delete
- Now completely unbound and clean
- Use when: Starting completely over
Re-binding After Unbind:
- If you deleted everything, just bind again normally
- If vertex groups still exist, Automatic Weights might conflict
- Safe approach: Delete all vertex groups before re-binding
Common Binding Problems
❌ Troubleshooting Binding Issues
Problem 1: Mesh Doesn't Deform at All
- Symptom: Pose bones, mesh stays frozen
- Causes:
- No Armature modifier on mesh
- Armature modifier's "Object" field is empty
- All vertex groups have 0.0 weights
- Bone "Deform" checkbox disabled
- Solutions:
- Check Armature modifier exists and points to armature
- Verify vertex groups exist and have non-zero weights
- Check bone Deform setting in bone properties
Problem 2: Mesh Explodes When Posing
- Symptom: Vertices fly away randomly when bones move
- Causes:
- Scale not applied to mesh or armature
- Armature object has rotation
- Mesh has unapplied modifiers interfering
- Solutions:
- Select both,
Ctrl + A> Apply All Transforms - Apply rotation specifically
- Apply Mirror modifier before binding
- Select both,
Problem 3: Only Part of Mesh Deforms
- Symptom: Arm works but leg stays frozen
- Causes:
- Some vertex groups missing or empty
- Some bones don't have "Deform" enabled
- Automatic weights failed for some areas
- Solutions:
- Check vertex groups list—all bones present?
- Weight Paint Mode—check if areas are all blue
- May need manual weight painting for those areas
Problem 4: "With Automatic Weights" Option Missing
- Cause: Selected in wrong order or wrong objects
- Solution:
- Deselect all (
Alt + A) - Click mesh FIRST
- Shift-click armature SECOND
- Try
Ctrl + Pagain
- Deselect all (
💭 Pro Tip: The best time to bind is AFTER the armature is 100% finalized but BEFORE you start detailed weight painting. If you change bone positions or add new bones after extensive weight painting, you'll have to redo a lot of work. Get the skeleton right first, then commit to binding. Professional studios often have a formal "rig approval" step before weight painting begins!
🎯 Binding Armature Summary
- Binding process: Select mesh, Shift-select armature, Ctrl + P > With Automatic Weights
- Prerequisites: Apply scale, zero rotation, armature finalized, mesh at origin
- What it creates: Parent relationship, vertex groups, Armature modifier, initial weights
- Test immediately: Move in Object Mode, pose in Pose Mode, check vertex groups
- Armature modifier: Controls deformation, should point to armature, usually last in stack
- Unbinding: Alt + P (clear parent), delete modifier, delete vertex groups if starting over
- Automatic Weights: Best starting point, calculates initial weights from bone proximity
- Common fix: Apply transforms if mesh explodes!
Armature bound! Now let's explore Weight Paint Mode!
🎨 Weight Paint Mode Interface
Welcome to Weight Paint Mode—your specialized workspace for adjusting vertex weights! This mode transforms Blender into a painting application where colors represent bone influence. Understanding the interface, tools, and visualization options is essential for efficient weight painting. Let's explore this powerful mode and make you comfortable with every control!
Entering Weight Paint Mode
🎨 A Different Kind of Painting: Weight Paint Mode is like a specialized art studio where you're not painting colors for aesthetics—you're painting instructions for how your character should move. Each brush stroke adjusts how much influence a bone has over vertices. The "canvas" is your 3D character, the "paint" is numerical weight values, and the "result" is natural, believable movement!
✅ Accessing Weight Paint Mode
Method 1: Mode Dropdown (Standard)
- Select your mesh object (character)
- Top left corner: Find mode dropdown (says "Object Mode")
- Click dropdown, choose "Weight Paint"
- Viewport changes—mesh shows colors!
Method 2: Quick Toggle (Faster)
- Select mesh object
- Press
Ctrl + Tab - Pie menu appears
- Select Weight Paint
What Changes When You Enter:
- Mesh displays with color overlay (red/green/blue)
- Cursor changes to circle brush (adjustable size)
- Header shows weight painting tools
- Sidebar has weight paint-specific options
- Can't select vertices directly (mode is for painting, not selecting)
Weight Paint Mode Interface Layout
🖥️ Interface Overview
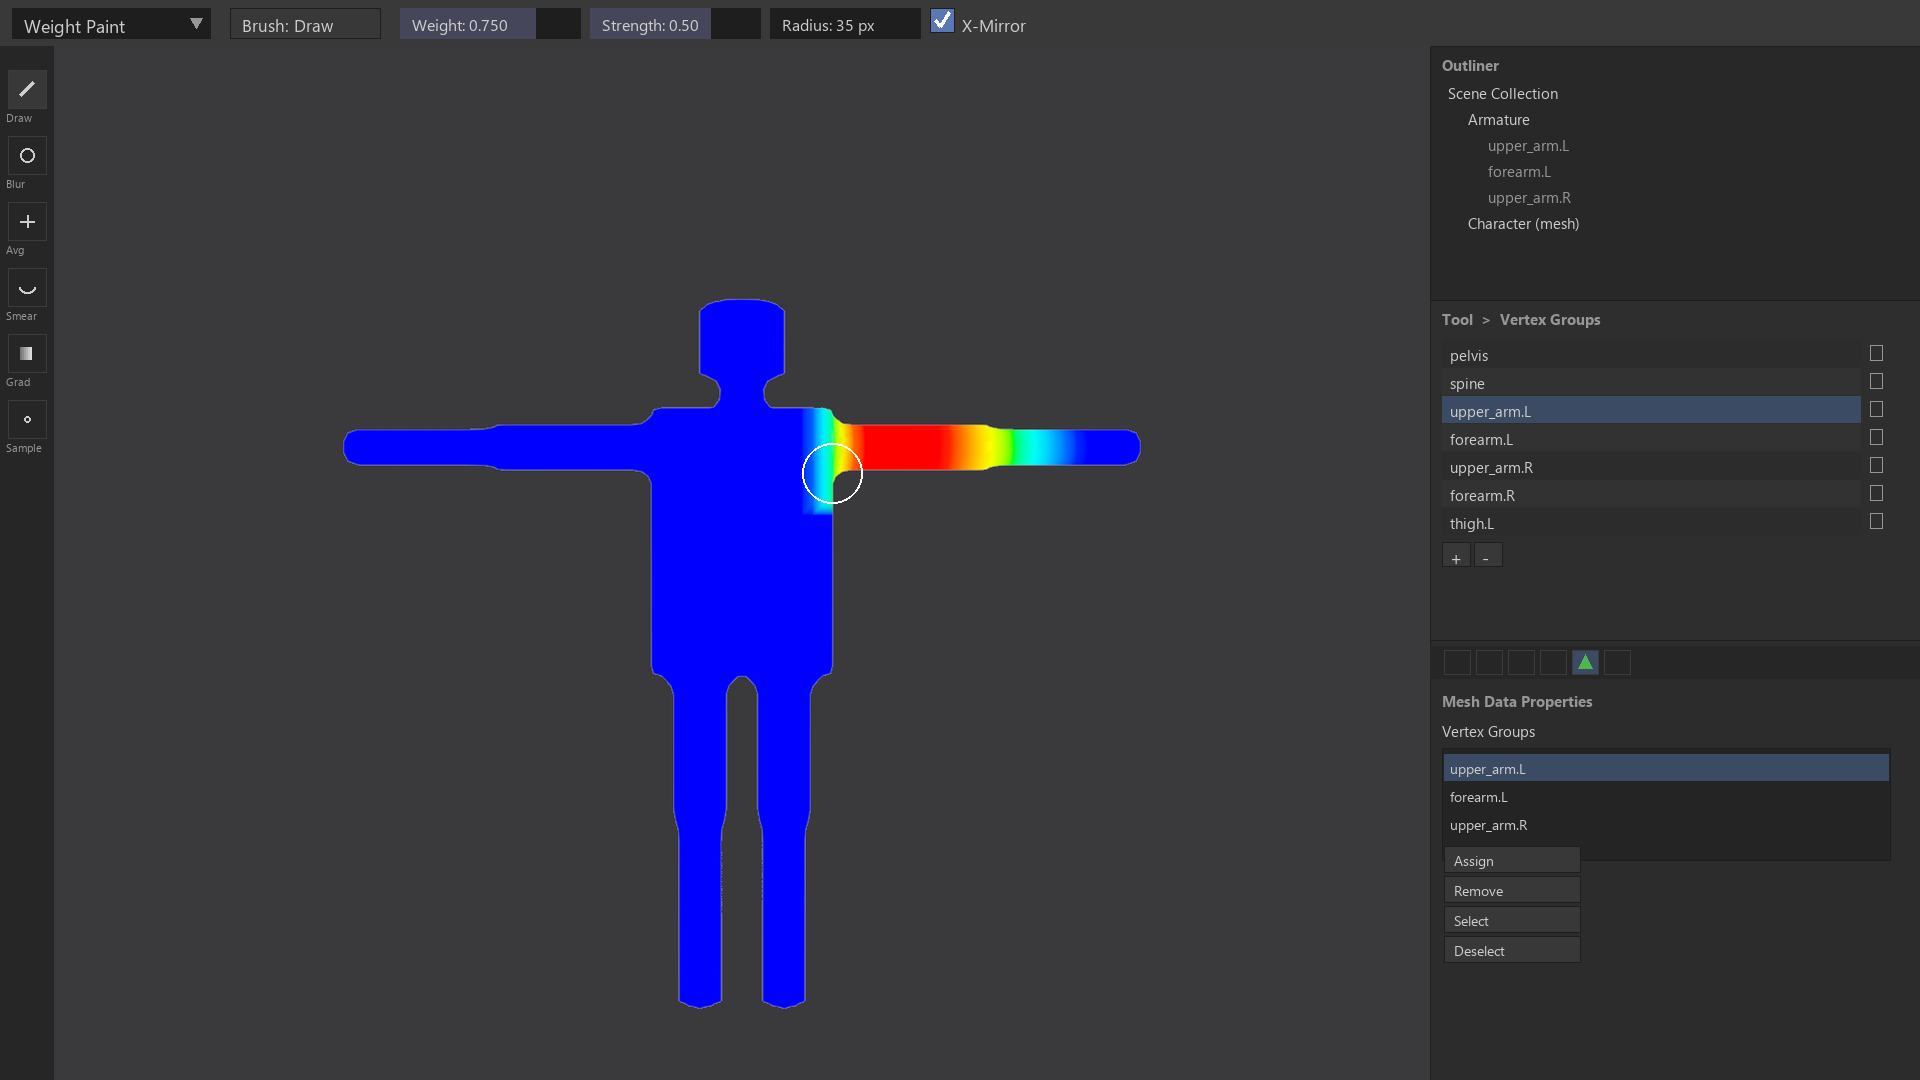
Top Header (Tool Controls):
- Mode dropdown: Switch between modes
- Brush selector: Draw, Mix, Blur, Average, Smear, etc.
- Brush settings: Radius, Strength, Weight value
- Symmetry options: Mirror painting across X-axis
- Auto Normalize: Keep weights summing to 1.0
Left Toolbar (T to toggle):
- Weight painting tools (brushes)
- Draw, Blur, Average, Smear
- Sample Weight, Gradient tools
- Similar to texture painting tools but for weights
Right Sidebar (N to toggle):
- Tool tab: Active brush settings
- Item tab: Vertex groups list
- Symmetry tab: Mirror options
- Options tab: Display and overlay settings
Outliner (Top Right):
- Shows armature hierarchy
- Click bone name to switch active vertex group
- Mesh updates to show that bone's weights
- Essential for quickly switching between bones!
Properties Panel (Right Side):
- Mesh Data Properties: Vertex Groups list
- Shows all groups, can assign/remove vertices
- Weight value display when vertices selected
Selecting Active Bone/Vertex Group
You can only paint weights for ONE bone at a time. The "active" bone/vertex group determines what you're painting!
💡 Choosing What to Paint
Method 1: Click Bone in Outliner (Easiest)
- Weight Paint Mode active
- Outliner panel (top right)
- Expand armature hierarchy
- Click bone name (e.g., "upper_arm.L")
- Mesh colors update—shows that bone's weights
- Red areas = 100% weight, blue = 0%, green = 50%
Method 2: Vertex Groups List (Precise)
- Properties panel > Mesh Data (green triangle)
- Vertex Groups section
- Click vertex group name in list
- Highlights the group (shows it's active)
- Mesh colors update to show this group's weights
Method 3: Pose Mode + Weight Paint Hybrid
- Split viewport (drag corner to create two views)
- Left view: Armature in Pose Mode
- Right view: Mesh in Weight Paint Mode
- Select bone in Pose Mode
- Weight Paint view updates automatically
- Best workflow! See bone + weights simultaneously
Visual Confirmation:
- Active vertex group name appears in header
- Mesh colors show only that bone's influence
- Painting now affects only this bone's weights
- Switch bones to paint different areas
Understanding the Weight Display
🌈 Reading the Color Visualization
Default Color Scheme:
- 🔴 Red (1.0): Full influence—vertex completely follows this bone
- 🟡 Orange/Yellow (0.75): Strong influence—mostly follows this bone
- 🟢 Green (0.5): Medium influence—split between bones
- 🔵 Cyan (0.25): Low influence—barely follows this bone
- 🔵 Blue (0.0): No influence—ignores this bone completely
What You're Actually Seeing:
- Colors show weights for ACTIVE vertex group only
- Other bones' influences are hidden (not zero—just hidden)
- Switch active bone to see different weight distribution
- Example: Forearm selected—see forearm weights, hand is blue
- Switch to hand bone—now hand is red, forearm might be blue
Understanding Gradients:
- Sharp transitions: Sudden color change (red to blue with no gradient)
- Creates creasing at joints—usually undesirable
- Smooth gradients: Gradual color change (red → yellow → green → cyan → blue)
- Creates smooth bending—this is the goal!
- Most joints should have 2-3 edge loop wide gradients
Weight Paint Mode Tools
Weight Paint Mode has several brush types, each for different tasks. Let's explore the essential ones!
🖌️ Essential Weight Paint Brushes
Draw (Primary Brush)
- Purpose: Paint weight value directly onto vertices
- How it works: Brush applies set weight value (0.0-1.0)
- Settings:
- Weight: Target value to paint (0.0-1.0)
- Strength: How quickly paint applies (0.0-1.0)
- Radius: Brush size
- Use for: Initial weight assignment, major adjustments
- Shortcut: Default brush when entering mode
Blur (Smoothing Brush)
- Purpose: Smooth weight transitions between vertices
- How it works: Averages weights of nearby vertices
- Use for: Removing sharp gradients, creating smooth joints
- Essential tool! Use after Draw to smooth transitions
- Similar to Blur in photo editing—softens "edges"
Average (Leveling Brush)
- Purpose: Average weights across brush area
- How it works: Calculates mean weight, applies to all
- Use for: Evening out irregular weight distribution
- Similar to Blur but more aggressive averaging
Smear (Drag/Spread Brush)
- Purpose: Drag/spread weights like wet paint
- How it works: Moves weight values spatially
- Use for: Extending weight influence, artistic control
- Less commonly used but handy for specific fixes
Gradient (Linear Falloff Tool)
- Purpose: Create linear weight gradient between two points
- How it works: Click-drag to set start/end, creates smooth gradient
- Use for: Quick joint gradients (elbow, knee)
- Very useful! Fast way to create smooth transitions
Sample Weight (Eyedropper)
- Purpose: Pick weight value from vertex
- How it works: Click vertex, brush Weight becomes that value
- Use for: Matching existing weights, precise copying
- Shortcut: Hold
Shiftwhile painting
Brush Settings and Controls
⚙️ Configuring Your Brush
Weight (Target Value):
- The value you're painting (0.0 to 1.0)
- Header shows "Weight: 1.000" (or current value)
- Common values:
- 1.0 (red) = Full influence for current bone
- 0.5 (green) = Split influence at joints
- 0.0 (blue) = Remove bone influence
- Adjust with slider or type exact value
Strength (Opacity):
- How quickly weight applies (0.0 to 1.0)
- 1.0 = Full strength (paint applies immediately)
- 0.2 = Low strength (gradual buildup with multiple strokes)
- Tip: Use lower strength (0.3-0.5) for better control
- Multiple gentle strokes better than one heavy stroke
Radius (Brush Size):
- Size of brush circle in viewport
- Adjust with
Fkey + mouse movement - Or use bracket keys:
[smaller,]larger - Or mouse wheel (if configured)
- Large brush = broad strokes, small brush = detail work
Falloff (Brush Gradient):
- How brush strength diminishes from center to edge
- Smooth: Gradual falloff (default, most useful)
- Sharp: Hard edge, no falloff
- Custom curves: Click curve widget to adjust
- Smooth falloff creates more natural weight transitions
Blend Mode:
- Mix (default): Blends toward target weight
- Add: Adds weight value (increases influence)
- Subtract: Removes weight value (decreases influence)
- Mix is usually best choice
Display and Overlay Options
👁️ Customizing Weight Visualization
Viewport Overlays (Important!):
- Top right corner: Overlays dropdown
- Weight Paint:
- Opacity: How transparent weight colors are
- 100% = Solid colors, 0% = See mesh texture
- Adjust for balance between weights and mesh detail
- Zero Weights:
- How to display vertices with 0.0 weight
- Active = Shows as special color
- None = Normal blue color
Shading Options:
- Top right: Shading dropdown
- Solid: Best for weight painting (default)
- Material Preview: Can work, but colors less clear
- Avoid Rendered mode—weight colors won't show
Showing Bone in Weight Paint:
- Enable armature X-ray: Armature Properties > Viewport Display > In Front
- Now bones visible through mesh in Weight Paint Mode
- Helps align painting to bone positions
- Essential for understanding what you're painting!
Wireframe Overlay:
- Press
Alt + Zor Overlays > Wireframe - Shows mesh edges over weight colors
- Helps see vertex positions precisely
- Useful for detail work on specific vertices
Important Weight Paint Settings
⚙️ Critical Settings (Don't Miss These!)
Auto Normalize (Usually ON):
- Header option: Small icon or checkbox
- When enabled: Keeps all bone weights summing to 1.0
- When you increase one bone, others automatically decrease
- Result: Prevents over-weighted vertices (values >1.0)
- Recommendation: Keep enabled for most work
- Disable only for special cases (partial influence)
X Mirror (Symmetry):
- Header option: Mirror icon
- When enabled: Painting left side auto-paints right side
- Essential for symmetrical characters!
- Works with .L and .R bone naming
- Paint upper_arm.L, upper_arm.R updates automatically
- Requirement: Mesh must be symmetrical
Multi-Paint (Advanced):
- Sidebar (N) > Options
- Allows selecting multiple bones to paint simultaneously
- Advanced feature, beginners should leave disabled
- Can be confusing when learning
Show Zero Weights:
- Options > Zero Weights: Active/None
- Active: Highlights vertices with no weights (special color)
- Useful for finding unassigned vertices
- Important for complete coverage!
💭 Interface Comfort: Weight Paint Mode looks complex at first, but you'll quickly develop muscle memory. Most work uses just: Draw brush, Blur brush, Weight value, Radius adjust, and bone selection. The other tools are there when you need them, but 90% of weight painting is these five basics. Don't feel overwhelmed—focus on the essentials first!
🎯 Weight Paint Mode Summary
- Enter mode: Select mesh, Ctrl + Tab > Weight Paint
- Select bone: Click bone name in Outliner (colors update)
- Color code: Blue (0%) → Green (50%) → Red (100%)
- Draw brush: Paint target weight value onto vertices
- Blur brush: Smooth weight transitions (essential!)
- Weight value: What you're painting (0.0-1.0)
- Strength: How quickly it applies (use 0.3-0.5)
- Radius: Brush size (F to adjust)
- Auto Normalize: Keep ON—maintains total weight = 1.0
- X Mirror: Enable for symmetrical characters
Interface mastered! Now let's see automatic weights in action!
🤖 Automatic Weights and When They Work
You've bound your mesh with Automatic Weights—but what did Blender actually calculate? And how good is it? Understanding automatic weights helps you know which areas need manual refinement and which are already perfect. Sometimes automatic weights are 90% there, sometimes they're a disaster. Let's learn to evaluate and understand what Blender gave you!
How Automatic Weights Work
🧮 The Algorithm Explained: Blender's automatic weight calculation is like assigning students to classrooms based on proximity—the closer a student lives to a school, the more likely they attend that school. Similarly, vertices get higher weights to closer bones. It also considers bone hierarchies and tries to create smooth transitions. It's smart, but not perfect—it can't read your mind about artistic intent!
💡 What Automatic Weights Calculate
The Algorithm's Logic:
- Distance-based weighting:
- Measures distance from each vertex to each bone
- Closer bones get higher weights
- Distant bones get little or no weight
- Hierarchy awareness:
- Considers parent-child bone relationships
- Child bones often "inherit" influence from parents
- Helps with natural deformation chains
- Heat diffusion:
- Uses "heat" simulation to spread weights smoothly
- Imagines bones as heat sources
- Heat diffuses through mesh volume
- Creates organic falloff patterns
- Normalization:
- Ensures weights per vertex sum to 1.0
- Balances multiple bone influences
- Prevents over/under-weighting
What It Does Well:
- Simple limbs with clear bone-to-mesh correspondence
- Torso areas where bones are well-centered in volume
- Characters with good topology (clean edge loops at joints)
- Symmetrical meshes with properly positioned bones
- Initial pass that gets you 70-90% of the way there
What It Struggles With:
- Complex joint areas (shoulders, hips)
- Overlapping geometry (fingers, toes)
- Clothing layers (dress over legs, sleeves over arms)
- Asymmetrical characters or poses
- Poor topology (faces spanning multiple bones)
- Bones positioned at mesh surface instead of center
Evaluating Automatic Weight Quality
Before diving into manual painting, assess what automatic weights gave you. This saves time and shows you where to focus!
✅ Quality Assessment Workflow
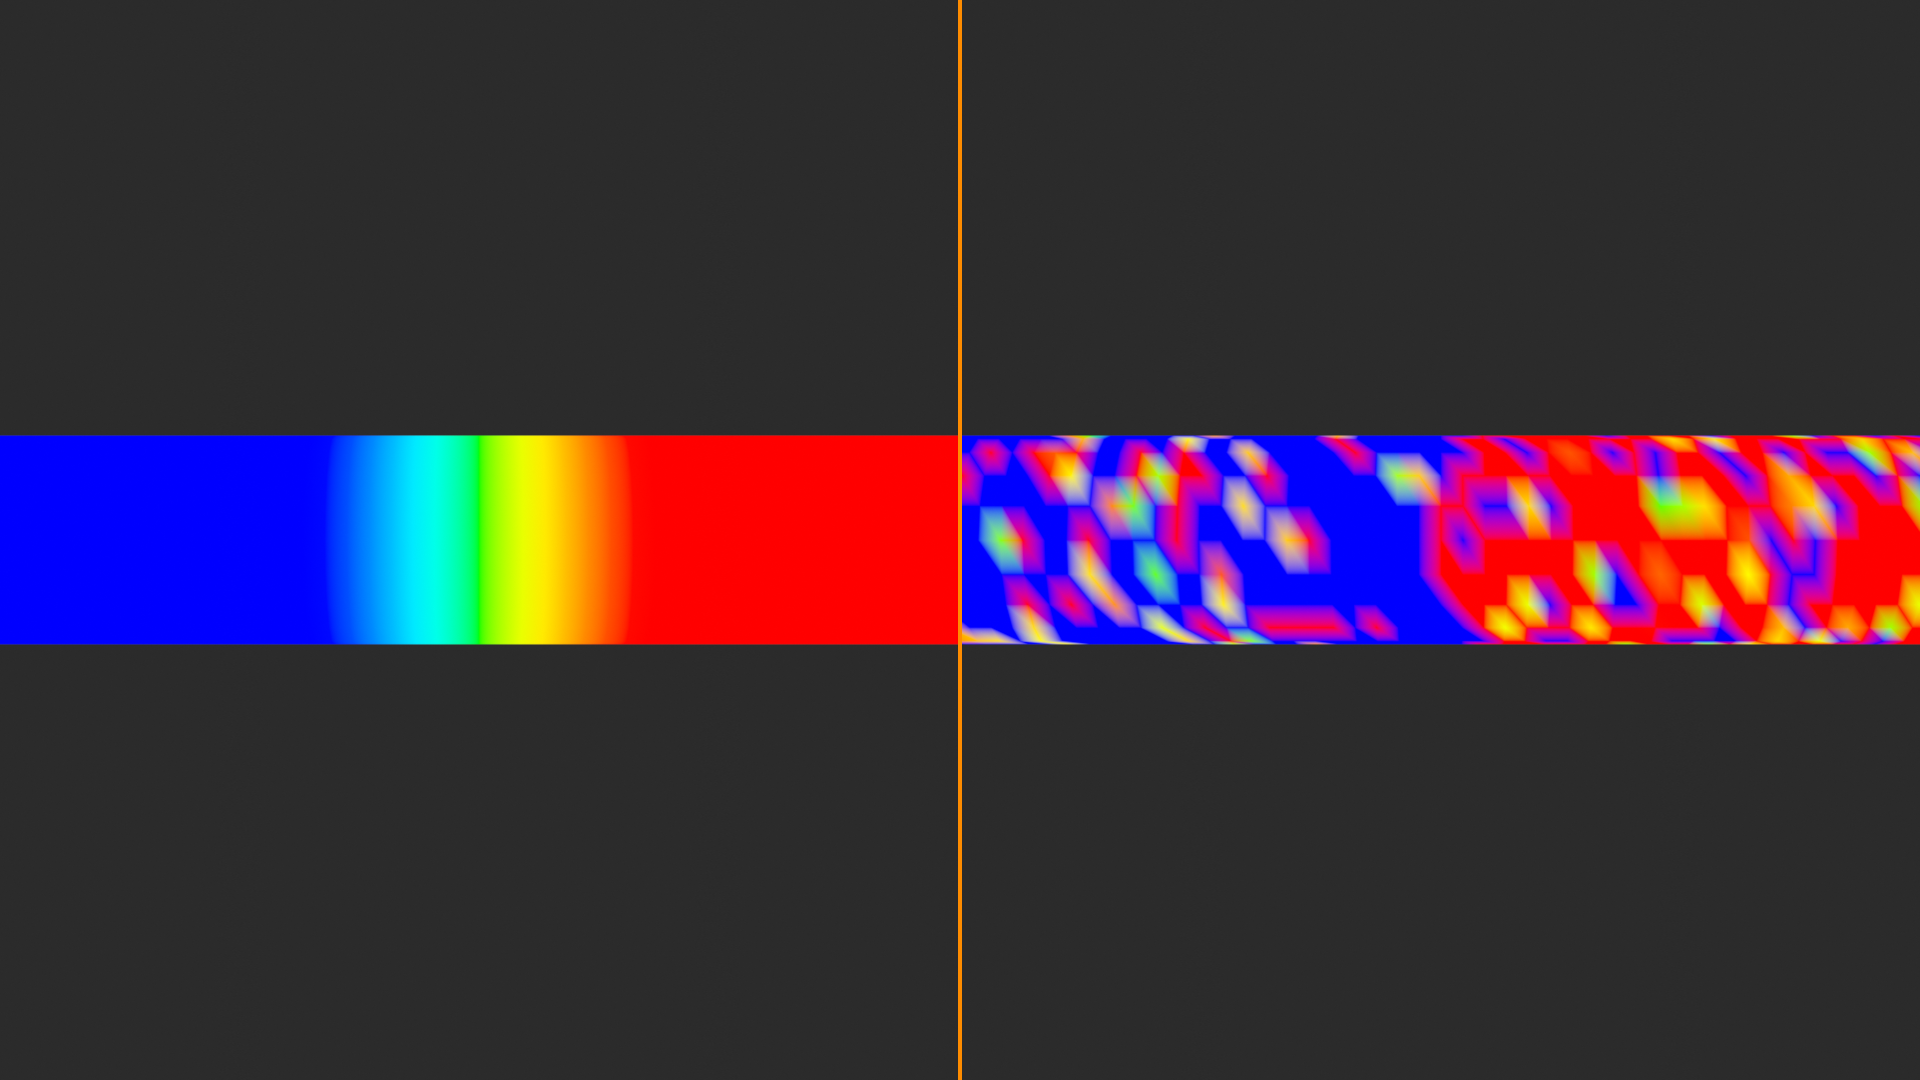
Step 1: Visual Inspection (Weight Paint Mode)
- Enter Weight Paint Mode
- Select each bone one by one (click in Outliner)
- Look for:
- Good: Red center, smooth gradient to blue at extremes
- Bad: Spotty patterns, unexpected blue holes, sharp transitions
- Pay attention to joints (elbows, knees, shoulders)
- Check for bleeding (shoulder weights extending to hand)
Step 2: Pose Testing (Critical!)
- Select armature
- Enter Pose Mode (
Ctrl + Tab) - Test each major joint:
- Elbow: Rotate forearm 90° and 180°
- Knee: Rotate lower_leg backward
- Shoulder: Rotate upper_arm in multiple directions
- Spine: Rotate to bend character
- Watch for problems:
- Sharp creasing (folding like paper)
- Volume loss (arm becomes stick)
- Candy-wrapper effect (spiral twisting)
- Vertices popping to wrong side
Alt + Rto clear poses between tests
Step 3: Extreme Pose Testing
- Don't just test subtle poses—go extreme!
- Bend elbow fully (180° rotation)
- Bend knee fully backward
- Twist spine significantly
- Rotate shoulder through full range
- Problems show up at extremes first
- If it looks good at 180°, it'll look great at 90°
Common Automatic Weight Issues
⚠️ Typical Problems to Expect
Issue 1: Weight Bleeding
- What it is: Bone influences extend too far
- Example: Shoulder bone has weight all the way to hand
- Visual: Red/yellow colors in unexpected distant areas
- Result: Hand moves when shoulder rotates (undesirable)
- Why it happens: Algorithm doesn't know anatomical boundaries
- Fix: Paint away excess weights (use 0.0 weight, blue)
Issue 2: Sharp Transitions at Joints
- What it is: Abrupt change from one bone to next
- Visual: Red suddenly becomes blue with no gradient
- Result: Sharp crease at elbow/knee when bent
- Why it happens: Algorithm didn't create smooth falloff
- Fix: Use Blur brush to create smooth gradient
Issue 3: Unweighted Vertices
- What it is: Some vertices have 0.0 weight to all bones
- Visual: Special indicator color (if enabled)
- Result: Vertices stay frozen, don't follow any bone
- Why it happens: Vertices too far from all bones
- Fix: Manually assign to nearest appropriate bone
Issue 4: Wrong Bone Assignment
- What it is: Vertices assigned to incorrect bone
- Example: Thumb vertices weighted to index finger
- Result: Wrong part moves when bone rotates
- Why it happens: Proximity calculation chose wrong bone
- Fix: Remove wrong weights, paint correct bone
Issue 5: Shoulder/Hip Complexity
- What it is: Complex joint areas poorly weighted
- Where: Shoulder (arm meets torso), hip (leg meets pelvis)
- Result: Unnatural deformation, pinching, stretching
- Why it happens: Multiple bones converge, algorithm confused
- Fix: Most manual work required here (expected!)
When Automatic Weights Are Sufficient
✅ Good-Enough Automatic Weights
Situations Where Manual Painting is Minimal:
- Background characters: Distant from camera, simple movement
- Simple rigs: Low bone count (10-20 bones), basic animation
- Stylized/lowpoly: Cartoony characters with forgiving deformation
- Rigid parts: Mechanical characters, robots, armor
- Perfect topology: Mesh built specifically for rigging (good edge loops)
When to Accept and Move On:
- Deformation looks acceptable at 90° joint bends
- No visible creasing or volume loss
- Character won't perform extreme poses
- Time constraints (prototype, learning project)
- Can always refine later if needed
The 80/20 Rule:
- 80% of deformation quality comes from 20% of weight painting
- Focus manual work on visible, important joints
- Elbows, knees, shoulders = high priority
- Spine, fingers, toes = medium priority
- Hidden/minor areas = accept automatic weights
When Automatic Weights Need Significant Work
⚠️ Expect Major Manual Painting
Situations Requiring Heavy Refinement:
- Hero characters: Main character, close-ups, detailed animation
- Realistic humans: Anatomically accurate deformation required
- Complex topology: Clothing layers, accessories, high detail
- Full finger rigs: Individual finger bones need careful weight work
- Facial rigs: Subtle expressions require precise weights
- Production quality: Film, AAA games, portfolio pieces
Areas That Always Need Work:
- Shoulders: Complex joint, automatic weights rarely sufficient
- Hips: Similar to shoulders, multiple bones converge
- Hands: Finger overlap, palm deformation
- Feet: Ankle rotation, toe articulation
- Neck/head junction: Head tilt, neck stretch
- Clothing seams: Where fabric meets body
Time Investment:
- Simple character: 30-60 minutes manual refinement
- Standard biped: 2-4 hours manual refinement
- Hero character: 8-20 hours manual refinement
- Professional studios: Can spend weeks on single character
- Don't be discouraged—quality takes time!
Improving Automatic Weights Before Binding
You can increase automatic weight quality by preparing your character better before binding!
💡 Pre-Binding Optimizations
Better Mesh Topology:
- Add edge loops at joint locations (elbow, knee, wrist)
- 2-3 edge loops minimum per joint
- Allows smooth gradient zones
- Clean quad topology (no triangles/n-gons at joints)
Better Bone Positioning:
- Bones centered in mesh volume (not at surface)
- Hip bones deep inside pelvis
- Shoulder bones deep inside ribcage
- Algorithm works better with centered bones
Symmetrical Mesh:
- Use Mirror modifier during modeling
- Keep character symmetrical
- Allows X-Mirror weight painting
- Paint one side, other side free!
Neutral Pose:
- Character in T-pose or A-pose when binding
- Arms slightly away from body (not touching)
- Legs slightly apart
- No extreme bends or rotations
- Algorithm calculates better from neutral position
Separate Mesh Parts (Advanced):
- Head as separate object from body
- Hands separate from arms
- Allows more control during binding
- Can bind each part individually
- More setup but cleaner results
Re-running Automatic Weights
🔄 Starting Over with Better Setup
When to Redo Automatic Weights:
- Initial results are terrible across entire character
- You improved bone positioning significantly
- You added edge loops at joints
- You fixed mesh issues (overlapping faces, holes)
- Haven't invested much time in manual painting yet
How to Rebind:
- Select mesh,
Alt + P> Clear Parent - Mesh Data Properties > Vertex Groups
- Select all groups, click minus (-) to delete
- Delete Armature modifier
- Make your improvements (bones, topology, etc.)
- Bind again: Select mesh, Shift-select armature
Ctrl + P> With Automatic Weights- Evaluate new results
When NOT to Redo:
- Already spent hours manual painting
- Only a few problem areas (fix those manually)
- Automatic weights are 80% good
- Manual refinement is faster than starting over
💭 Realistic Expectations: Professional riggers ALWAYS expect to do manual weight painting, even on perfect setups. Automatic weights are a starting point, not the finish line. Studios with thousands of characters and decades of experience still manually paint weights. Accept that this is part of the process—the automatic weights save you from painting EVERYTHING from scratch, which is the real time-saver!
🎯 Automatic Weights Summary
- Algorithm: Distance-based + heat diffusion + hierarchy awareness
- Strengths: Simple limbs, centered bones, good topology, quick starting point
- Weaknesses: Complex joints, overlapping geo, poor topology, artistic intent
- Evaluation: Visual check + pose testing + extreme pose testing
- Common issues: Weight bleeding, sharp transitions, wrong assignments, shoulder/hip problems
- Good enough when: Background characters, simple rigs, acceptable deformation
- Needs work when: Hero characters, close-ups, realistic deformation, production quality
- Improve results: Better topology, centered bones, neutral pose, symmetrical mesh
- Expectation: 70-90% there, manual refinement always needed
Now you know what automatic weights gave you—let's learn manual painting!
🖌️ Manual Weight Painting Techniques
Now we get hands-on! Manual weight painting is where you take control and refine deformation to perfection. This is equal parts technical skill and artistic judgment—knowing what weights to paint is as important as knowing how to paint them. Let's learn the fundamental techniques that professional riggers use every day to create beautiful character deformation!
Basic Painting Workflow
🎨 Think Like a Sculptor: Weight painting is like sculpting with invisible influence instead of clay. You're not changing the mesh shape—you're defining how it responds to bone movement. Start broad (paint large areas), then refine (smooth transitions), then detail (fix individual vertices). This broad-to-detail workflow prevents you from getting lost in minutiae before establishing the foundation!
✅ Standard Weight Painting Workflow
Phase 1: Broad Strokes (Establish Zones)
- Select bone in Outliner (e.g., forearm.L)
- Draw brush (default tool)
- Weight: 1.0 (full red)
- Strength: 0.5-0.7 (moderate)
- Large radius (cover area quickly)
- Paint the middle section of forearm (avoid joint areas)
- Goal: Establish core zone that should fully follow this bone
- Multiple strokes okay—build up gradually
Phase 2: Clear Boundaries (Remove Bleeding)
- Still on same bone (forearm.L)
- Weight: 0.0 (full blue)
- Strength: 0.7-1.0 (higher for removal)
- Medium radius
- Paint areas that should NOT follow this bone
- Example: Hand area when painting forearm
- Goal: Clear separation between bone zones
Phase 3: Smooth Transitions (The Magic Step)
- Switch to Blur brush (key on keyboard or toolbar)
- Strength: 0.5-0.8
- Medium-large radius
- Paint along joint boundaries (elbow area)
- Watch colors blend: red → yellow → green → cyan → blue
- Multiple passes create smoother gradients
- Goal: No sharp color transitions, only smooth gradients
Phase 4: Test and Refine (Essential!)
- Select armature, enter Pose Mode
- Rotate the bone you just painted
- Watch deformation—does it look natural?
- Look for: creasing, pinching, volume loss
- If problems: back to Weight Paint, adjust, test again
- Iterate: paint → test → paint → test
Alt + Rto clear pose between tests
Phase 5: Detail Work (Final Polish)
- Small radius brush
- Lower strength (0.2-0.4)
- Fix individual problem vertices
- Gentle adjustments to perfect deformation
- Enable wireframe to see vertex positions
Essential Painting Techniques
🎯 Core Techniques to Master
Technique 1: Gradient Painting (Joints)
- Purpose: Create smooth weight transitions at joints
- Method:
- Paint upper bone zone (weight 1.0)
- Paint lower bone zone (weight 1.0)
- Switch to Blur brush
- Paint back and forth across joint line
- Creates natural gradient between bones
- Width: Gradient should span 2-3 edge loops
- Result: Smooth bending, no crease
Technique 2: Additive Painting (Build Up)
- Purpose: Gradually increase weight in area
- Method:
- Set weight to desired value (e.g., 0.5)
- Low strength (0.2-0.3)
- Multiple gentle strokes
- Build up to target weight gradually
- Advantage: More control than single heavy stroke
- Use when: Uncertain of exact weight needed
Technique 3: Subtractive Painting (Clean Up)
- Purpose: Remove unwanted weight influence
- Method:
- Weight: 0.0 (blue)
- Strength: 0.7-1.0 (higher for cleanup)
- Paint over areas that shouldn't follow bone
- Common use: Fixing weight bleeding
- Example: Remove shoulder weight from hand
Technique 4: Gradient Tool (Fast Joint Setup)
- Purpose: Create linear gradient quickly
- Method:
- Select Gradient tool
- Click at one end of joint (e.g., upper arm)
- Drag to other end (forearm)
- Release—gradient appears!
- Weight 1.0 at start, 0.0 at end
- Use for: Quick initial joint setup
- Follow with: Blur brush to refine
Technique 5: Weight Copying (Sample)
- Purpose: Match weight from one area to another
- Method:
- Hold
Shift+ click vertex - Brush Weight becomes that vertex's weight
- Paint other areas with sampled weight
- Hold
- Use when: Replicating good deformation patterns
Painting Specific Body Parts
Different body parts have different weight painting strategies. Let's explore best practices for each!
💡 Body-Part Specific Techniques
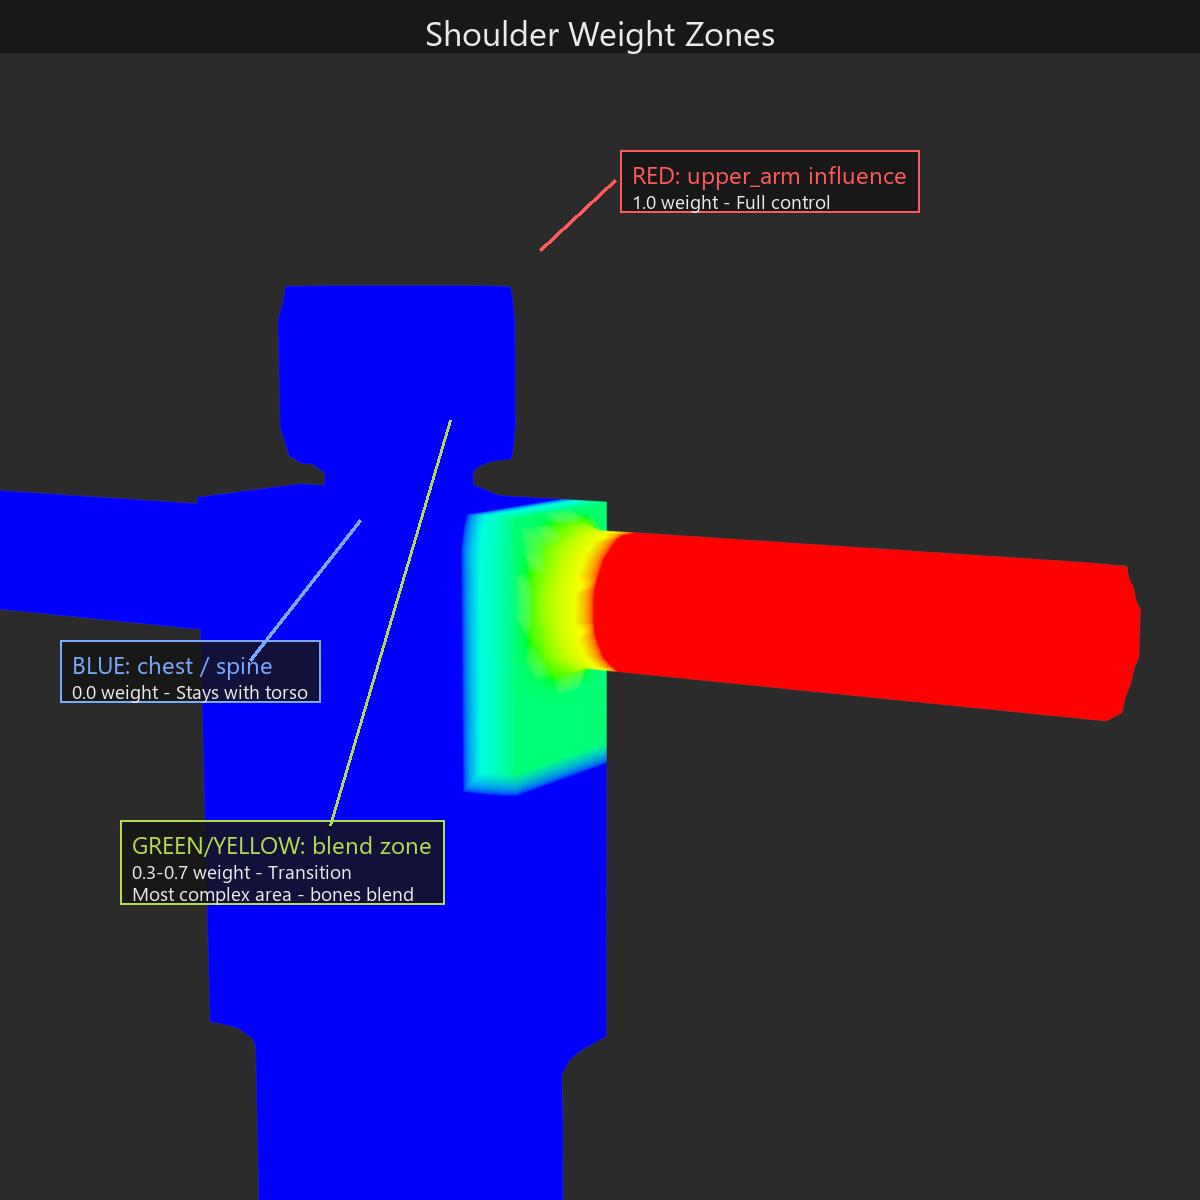
Arms (Simple Limbs):
- Upper arm:
- 100% weight (red) in middle section
- Gradient at shoulder (blend with chest/shoulder bones)
- Gradient at elbow (blend with forearm)
- Usually 3-5 edge loops per gradient zone
- Forearm:
- 100% weight in middle
- Gradient at elbow (toward upper arm)
- Gradient at wrist (toward hand)
- Elbow gradient typically steeper than wrist
- Hand:
- Palm: 100% hand bone
- Wrist area: 50/50 forearm and hand
- Fingers: Complex (covered below)
Legs (Similar to Arms):
- Upper leg:
- 100% in thigh middle
- Gradient at hip (blend with pelvis)
- Gradient at knee (blend with lower leg)
- Hip gradient often wider (more bones involved)
- Lower leg:
- 100% in calf middle
- Gradient at knee (toward upper leg)
- Gradient at ankle (toward foot)
- Foot:
- Ankle area: 50/50 lower_leg and foot
- Arch/ball: 100% foot bone
- Toes: Can be simplified (all follow foot) or detailed
Torso (More Complex):
- Pelvis:
- Hip area: 100% pelvis
- Gradients toward spine_01 (upper)
- Gradients toward upper legs (lower/sides)
- Spine segments:
- Each segment: 100% in middle third
- Gradients at both ends (blend with adjacent segments)
- Wider gradients create smoother bending
- Chest/ribcage:
- Central: blend of upper spine segments
- Sides: include shoulder bone influence
- Complex area—expect to iterate
Shoulders (Most Complex Joint):
- Involves: spine/chest, shoulder/clavicle, upper_arm
- Strategy:
- Upper arm: Strong influence near joint
- Shoulder: Influence in clavicle area
- Chest: Influence in torso connection
- Blend zone: All three bones contribute
- Test extensively—rotate arm in all directions
- Most manual work will be here
Neck/Head:
- Neck: 100% neck bone in middle
- Neck base: Gradient toward chest/spine
- Neck top: Gradient toward head
- Head: Usually 100% head bone
- Jaw (if rigged): Separate vertex group, careful weights
Finger Weight Painting (Special Case)
👆 Finger Weighting Strategy
Challenge: Fingers are close together, overlap, complex
Approach 1: Simple (Acceptable Quality)
- Each finger segment: 100% to its bone
- Tiny gradient at knuckles (1-2 vertices)
- No smooth transition between segments
- Result: Functional but slightly mechanical
- Good for: Background characters, simple rigs
Approach 2: Detailed (High Quality)
- Proximal segment (base): Gradient toward palm (2-3 vertices)
- Middle segment: Gradients at both knuckles
- Distal segment (tip): Gradient toward middle segment
- Carefully separate finger weight from adjacent fingers
- Result: Natural, organic finger motion
- Good for: Hero characters, close-ups
Thumb (Special Case):
- Base: Significant palm bone influence
- Thumb rotates differently than fingers
- Test thumb opposition (touching index fingertip)
- May need unique weight distribution
Testing Fingers:
- Curl all fingers (make fist)
- Curl individual fingers (point, thumbs up, etc.)
- Spread fingers apart
- Watch for: fingers bleeding into each other
Advanced Painting Tips
🎨 Pro-Level Techniques
Tip 1: Paint in Passes, Not Perfection
- Don't aim for perfect weights on first try
- Pass 1: Rough assignment (which vertices to which bones)
- Pass 2: Smooth transitions (blur everything)
- Pass 3: Test and identify problems
- Pass 4: Fix specific issues
- Pass 5: Final polish
- Multiple quick passes faster than one slow perfect pass
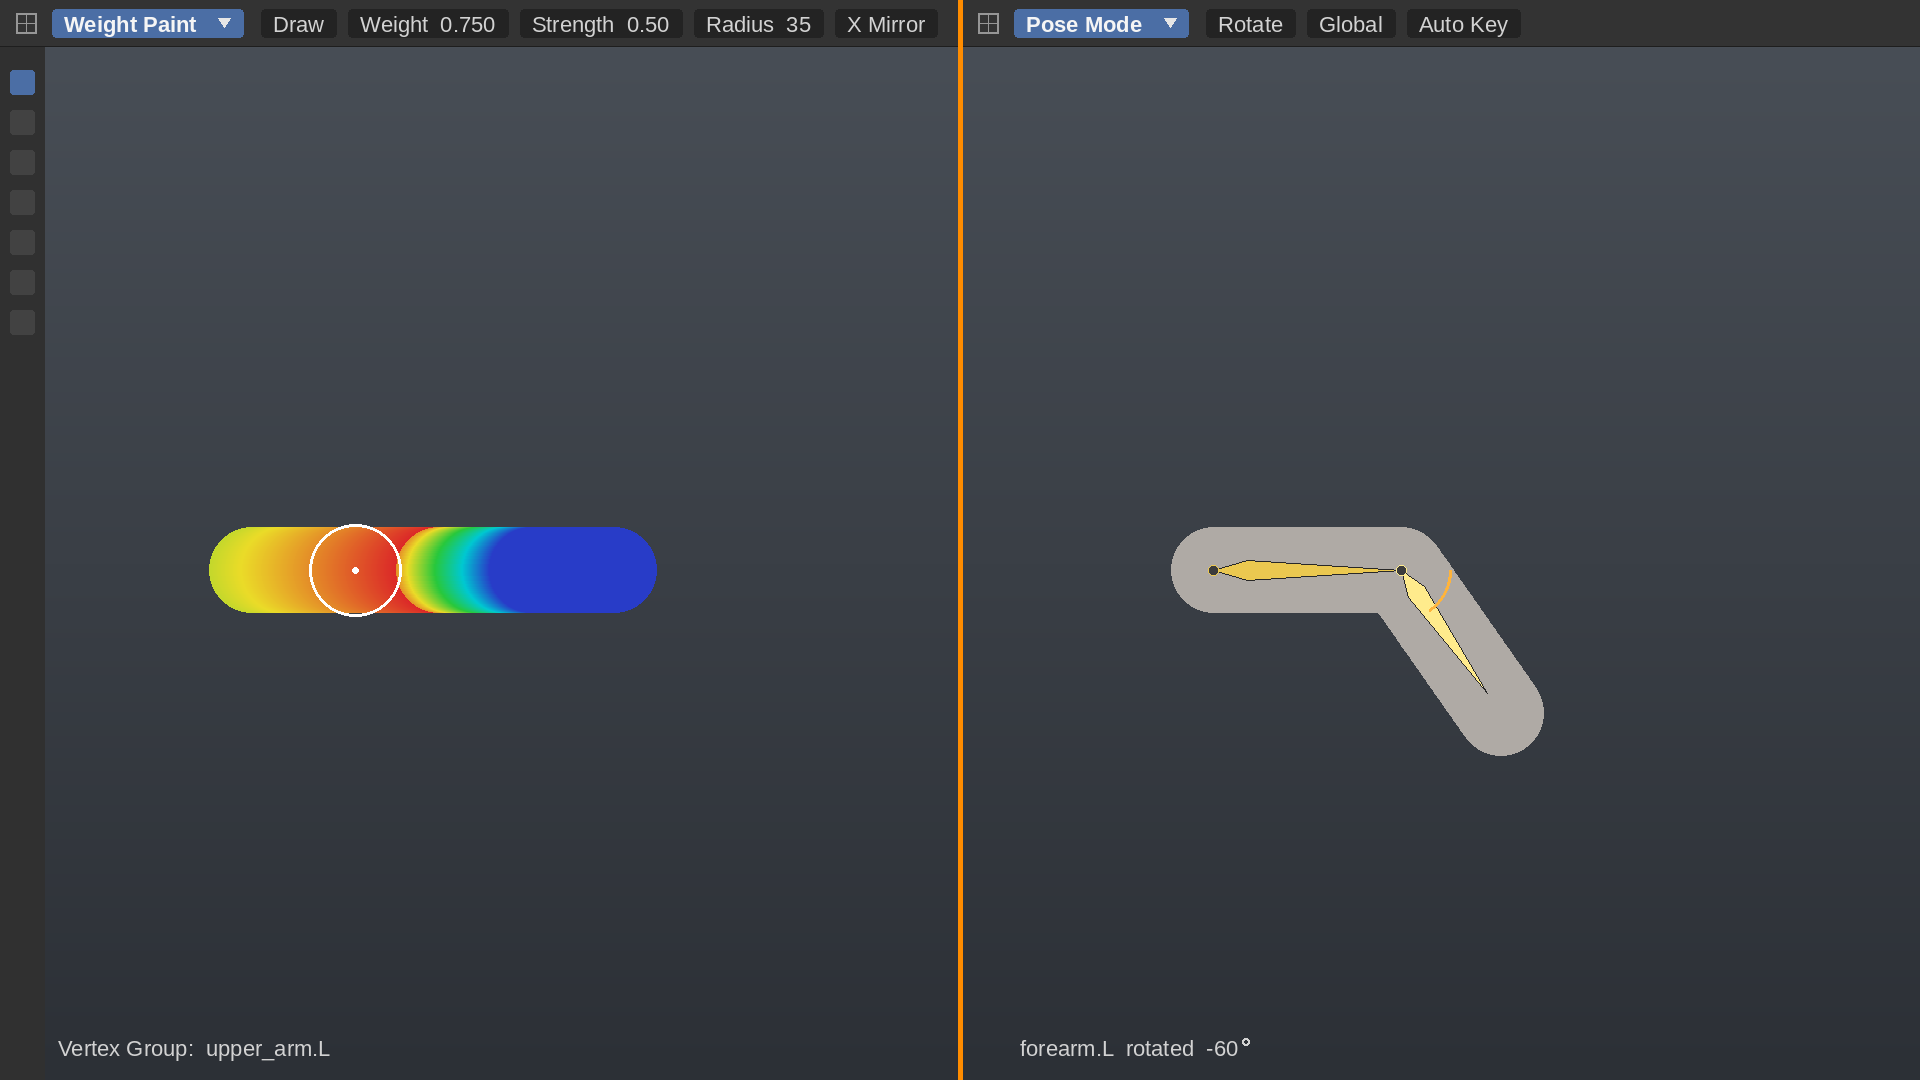
Tip 2: Use Split Screen (Game Changer!)
- Divide viewport into two areas
- Left: Weight Paint Mode (mesh)
- Right: Pose Mode (armature)
- Paint on left, immediately see result on right
- No mode switching needed
- Speeds up workflow dramatically
Tip 3: Enable X-Mirror (Symmetrical Characters)
- Header: X-Mirror option
- Paint left side, right side updates automatically
- Requirements:
- Mesh must be symmetrical
- Bones named with .L and .R
- Character at world origin
- Saves 50% of work!
- Test: Paint upper_arm.L, watch upper_arm.R update
Tip 4: Lower Strength = Better Control
- Beginners use strength 1.0 (full power)
- Pros use strength 0.3-0.5 (gentle)
- Why: Easier to undo mistakes, smoother results
- Multiple gentle strokes beat one heavy stroke
- Think: watercolor vs. spray paint
Tip 5: Blur Is Your Best Friend
- Most professional weight painting = Draw + Blur + Test
- Draw establishes zones, Blur creates smooth transitions
- When in doubt, blur it
- Can't blur too much (worst case: re-paint boundaries)
- Sharp transitions almost always look bad
Tip 6: Focus on Visible Joints First
- Priority 1: Elbows, knees, shoulders (always visible)
- Priority 2: Spine, wrists, ankles
- Priority 3: Fingers, toes, subtle areas
- Don't obsess over hidden areas early
- Can always refine later if needed
Tip 7: Reference Real Anatomy
- Look up photos of bent elbows, knees
- Notice where skin folds, where volume shifts
- Weight painting follows anatomical principles
- Understanding real movement improves digital deformation
Common Painting Mistakes
❌ Avoid These Beginner Errors
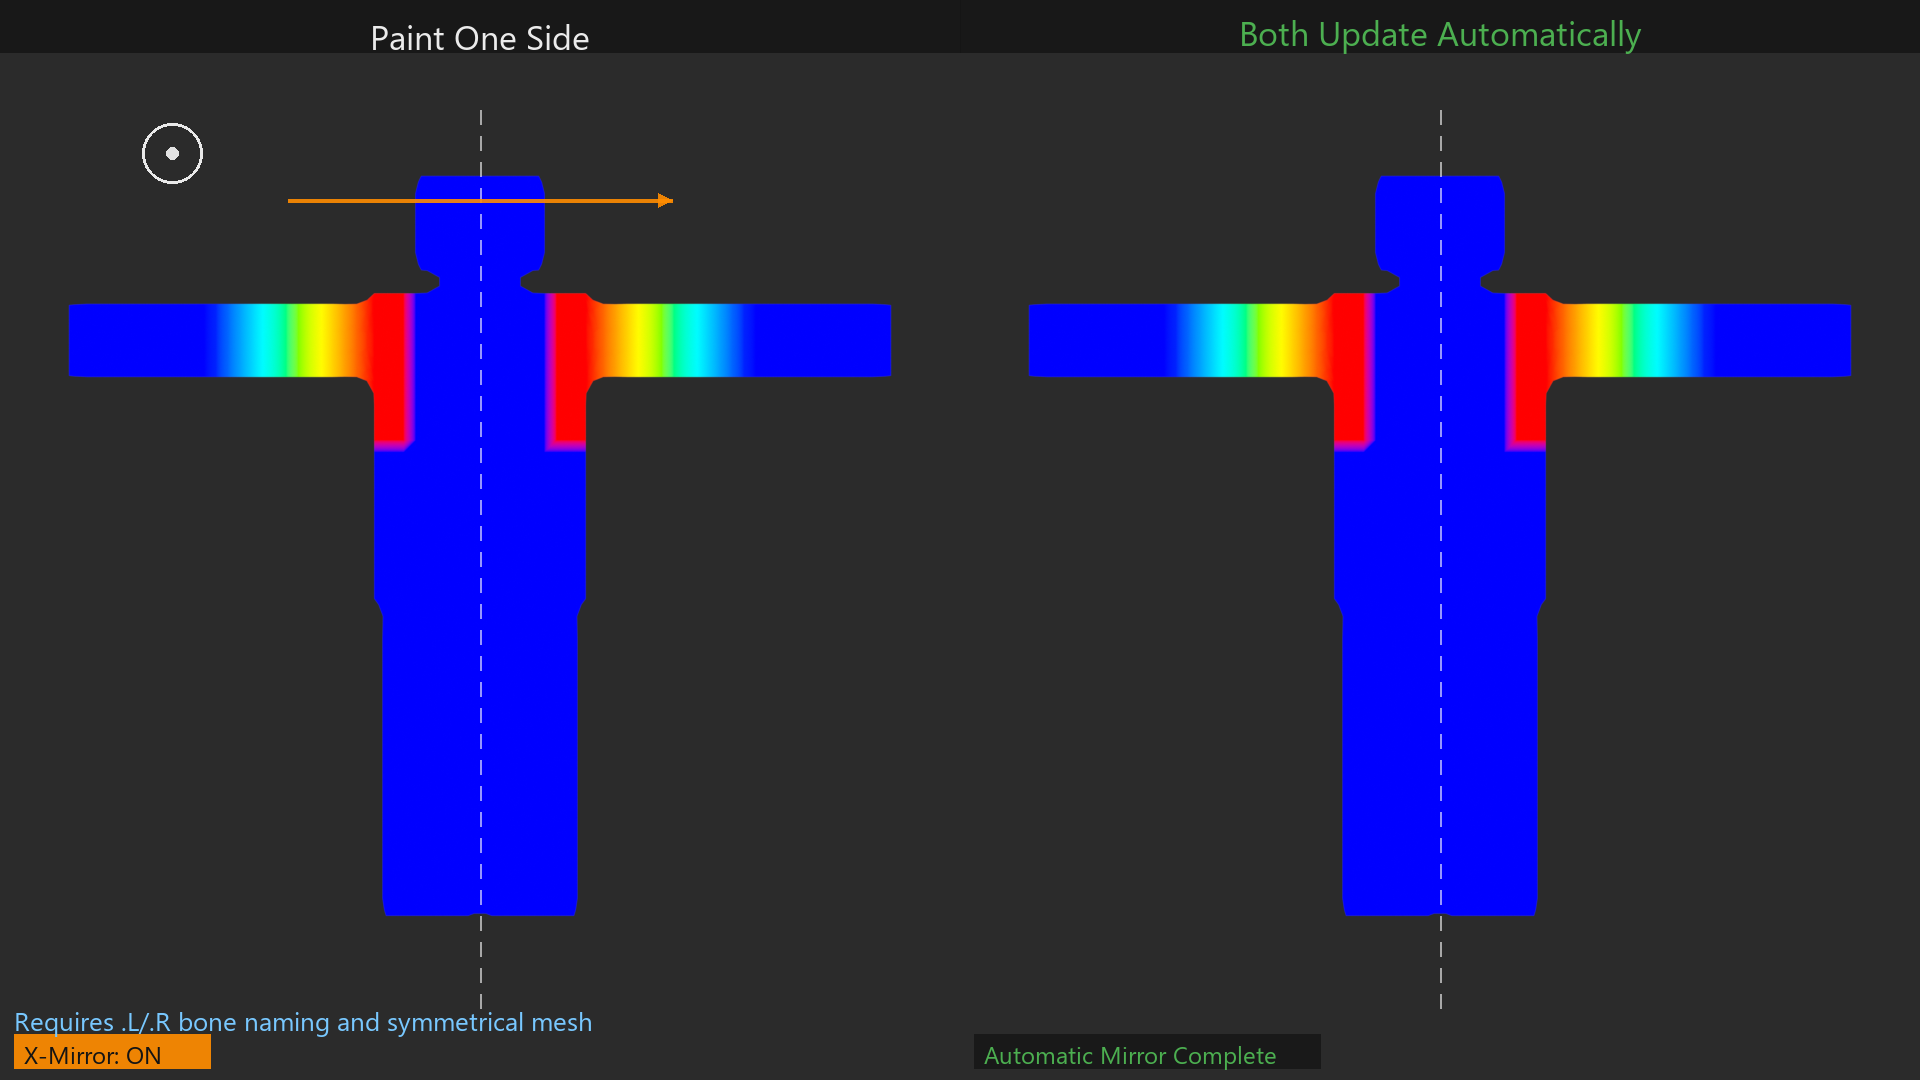
.L/.R bone names and a symmetrical mesh.Mistake 1: Painting Without Testing
- Spending hours painting, never checking Pose Mode
- Fix: Test every 5-10 minutes minimum
- Paint → test → paint → test cycle
Mistake 2: Using Full Strength All The Time
- Strength 1.0 = overpowering, hard to control
- Fix: Use strength 0.3-0.5 for most work
- Reserve 1.0 for removing weights (0.0 value)
Mistake 3: Forgetting to Blur
- Sharp red-to-blue transitions everywhere
- Fix: Use Blur brush liberally
- Every joint needs smooth gradients
Mistake 4: Ignoring Auto Normalize
- Disabled = weights can exceed 1.0 (bad)
- Fix: Keep Auto Normalize enabled
- Ensures proper weight distribution
Mistake 5: Painting Wrong Bone
- Thinking you're painting forearm, actually painting upper_arm
- Fix: Always check active vertex group (header shows name)
- Verify colors match expected pattern
Mistake 6: Perfecting One Joint for Hours
- Obsessing over single elbow while rest is untouched
- Fix: Do rough pass on entire character first
- Then refine problem areas
- Broad to detail workflow
💭 The Paint-Test-Refine Loop: Professional weight painting is 50% painting, 50% testing. You can't judge weight quality by colors alone—you MUST see how it deforms. The pros constantly switch between Weight Paint and Pose Mode, making tiny adjustments and immediately checking results. This loop becomes second nature with practice. Paint → Test → Adjust → Test → Adjust → Done!
🎯 Manual Painting Techniques Summary
- Workflow: Broad strokes → clear boundaries → blur transitions → test → detail
- Gradient painting: Core technique for smooth joints (2-3 edge loops wide)
- Low strength: 0.3-0.5 for most work, 1.0 only for removal
- Blur brush: Essential for smooth transitions, use liberally
- Split screen: Weight Paint + Pose Mode simultaneously = huge time saver
- X-Mirror: Paint one side, other side automatic (symmetrical characters)
- Body parts: Arms/legs = gradients at joints, torso = complex blends, shoulders = most work
- Fingers: Simple (100% per segment) or detailed (gradients at knuckles)
- Test constantly: Paint → test → paint → test cycle
- Focus priority: Visible joints first, details later
Techniques learned! Now let's master testing and refinement!
🧪 Testing and Refining Deformation
Testing is where theory meets reality! You can paint beautiful gradients and perfectly smooth transitions, but if the character doesn't bend naturally when posed, the weights aren't working. This section teaches you how to systematically test deformation, identify problems visually, and know exactly what to fix. Master testing and you'll cut your weight painting time in half by targeting real issues instead of chasing phantom problems!
The Testing Mindset
🔬 Think Like a Quality Tester: Professional riggers test obsessively—every joint, every angle, every extreme pose. They're not satisfied until the character can do anything the animator might ask. You're not done when the weights "look good" in Weight Paint Mode—you're done when the character passes every test you throw at it. Be ruthless with testing, patient with refinement!
✅ Systematic Testing Workflow
Test 1: Individual Joint Testing
- Setup:
- Armature in Pose Mode
- Mesh visible, shaded view
- Clear all previous poses (
Alt + R,Alt + G)
- Test each joint systematically:
- Select bone (e.g., forearm.L)
- Rotate slowly from neutral to 90°
- Watch deformation at joint
- Continue to 180° (extreme bend)
- Rotate back to neutral
- What to watch for:
- Smooth bending (no sharp creases)
- Volume preservation (arm stays round)
- No mesh separation (gaps at joint)
- No penetration (mesh passing through itself)
- Document issues:
- Mental or written note: "Left elbow creases"
- Don't fix yet—finish testing first
- Get complete picture before adjustments
Test 2: Extreme Poses
- Why: Problems appear at extremes first
- Elbow test: 180° bend (arm fully folded)
- Knee test: 180° backward (leg touching thigh)
- Shoulder test: Arm straight up, behind back, across body
- Spine test: Extreme backward/forward bends
- If it works at extreme: Will definitely work at subtle angles
Test 3: Combined Motion
- Why: Multiple bones interact
- Arm reach test: Shoulder + elbow + spine together
- Walk pose test: Legs + spine + arms
- Crouch test: Legs + spine + hips
- Reveals problems that single-joint tests miss
Test 4: Symmetry Check
- Pose left arm, then right arm identically
- Should deform exactly the same
- If different: weight painting not symmetrical
- Re-enable X-Mirror and fix
Identifying Deformation Problems Visually
👁️ Visual Problem Recognition
Problem 1: Sharp Creasing
- What it looks like: Hard fold line at joint, like paper creasing
- Where: Elbow, knee, wrist, ankle
- Cause: Abrupt weight transition (red immediately to blue)
- Visual in Weight Paint: No gradient zone, sharp color boundary
- Fix: Use Blur brush to create smooth gradient (2-3 edge loops wide)
Problem 2: Volume Loss (Stick Limbs)
- What it looks like: Round arm becomes thin stick when bent
- Where: Any bent limb, especially arms
- Cause: Vertices collapsing toward bone center
- Solutions:
- Enable "Preserve Volume" in Armature modifier
- Adjust weights at joint to distribute better
- Use wider gradient zone
Problem 3: Candy-Wrapper Effect (Twisting)
- What it looks like: Mesh spirals/twists unnaturally
- Where: Forearms, shoulders, complex joints
- Cause: Incorrect bone roll or confused weight distribution
- Fix:
- First: Check bone roll in Edit Mode (Ctrl + N)
- Then: Adjust weights if roll is correct
- May need to reduce gradient width
Problem 4: Mesh Separation (Gaps)
- What it looks like: Hole appears at joint when bent
- Where: Inside of elbow/knee, armpit
- Cause: Vertices don't have enough weight to either bone
- Fix: Increase weights in gap area for surrounding bones
Problem 5: Mesh Penetration (Self-Intersection)
- What it looks like: Arm mesh passes through chest
- Where: Anywhere body parts touch when bent
- Cause: Too much weight pulling mesh into itself
- Fix: Reduce weights in penetrating area
Problem 6: Rippling/Waviness
- What it looks like: Surface looks bumpy when bent
- Where: Smooth areas that should stay smooth
- Cause: Inconsistent vertex weights (some high, some low randomly)
- Fix: Use Blur or Average brush to even out weights
Problem 7: Wrong Part Moving
- What it looks like: Hand moves when rotating shoulder
- Cause: Weight bleeding (shoulder weights extend to hand)
- Fix: Paint away unwanted weights (0.0 weight in hand for shoulder bone)
The Iterative Refinement Process
💡 Refinement Workflow
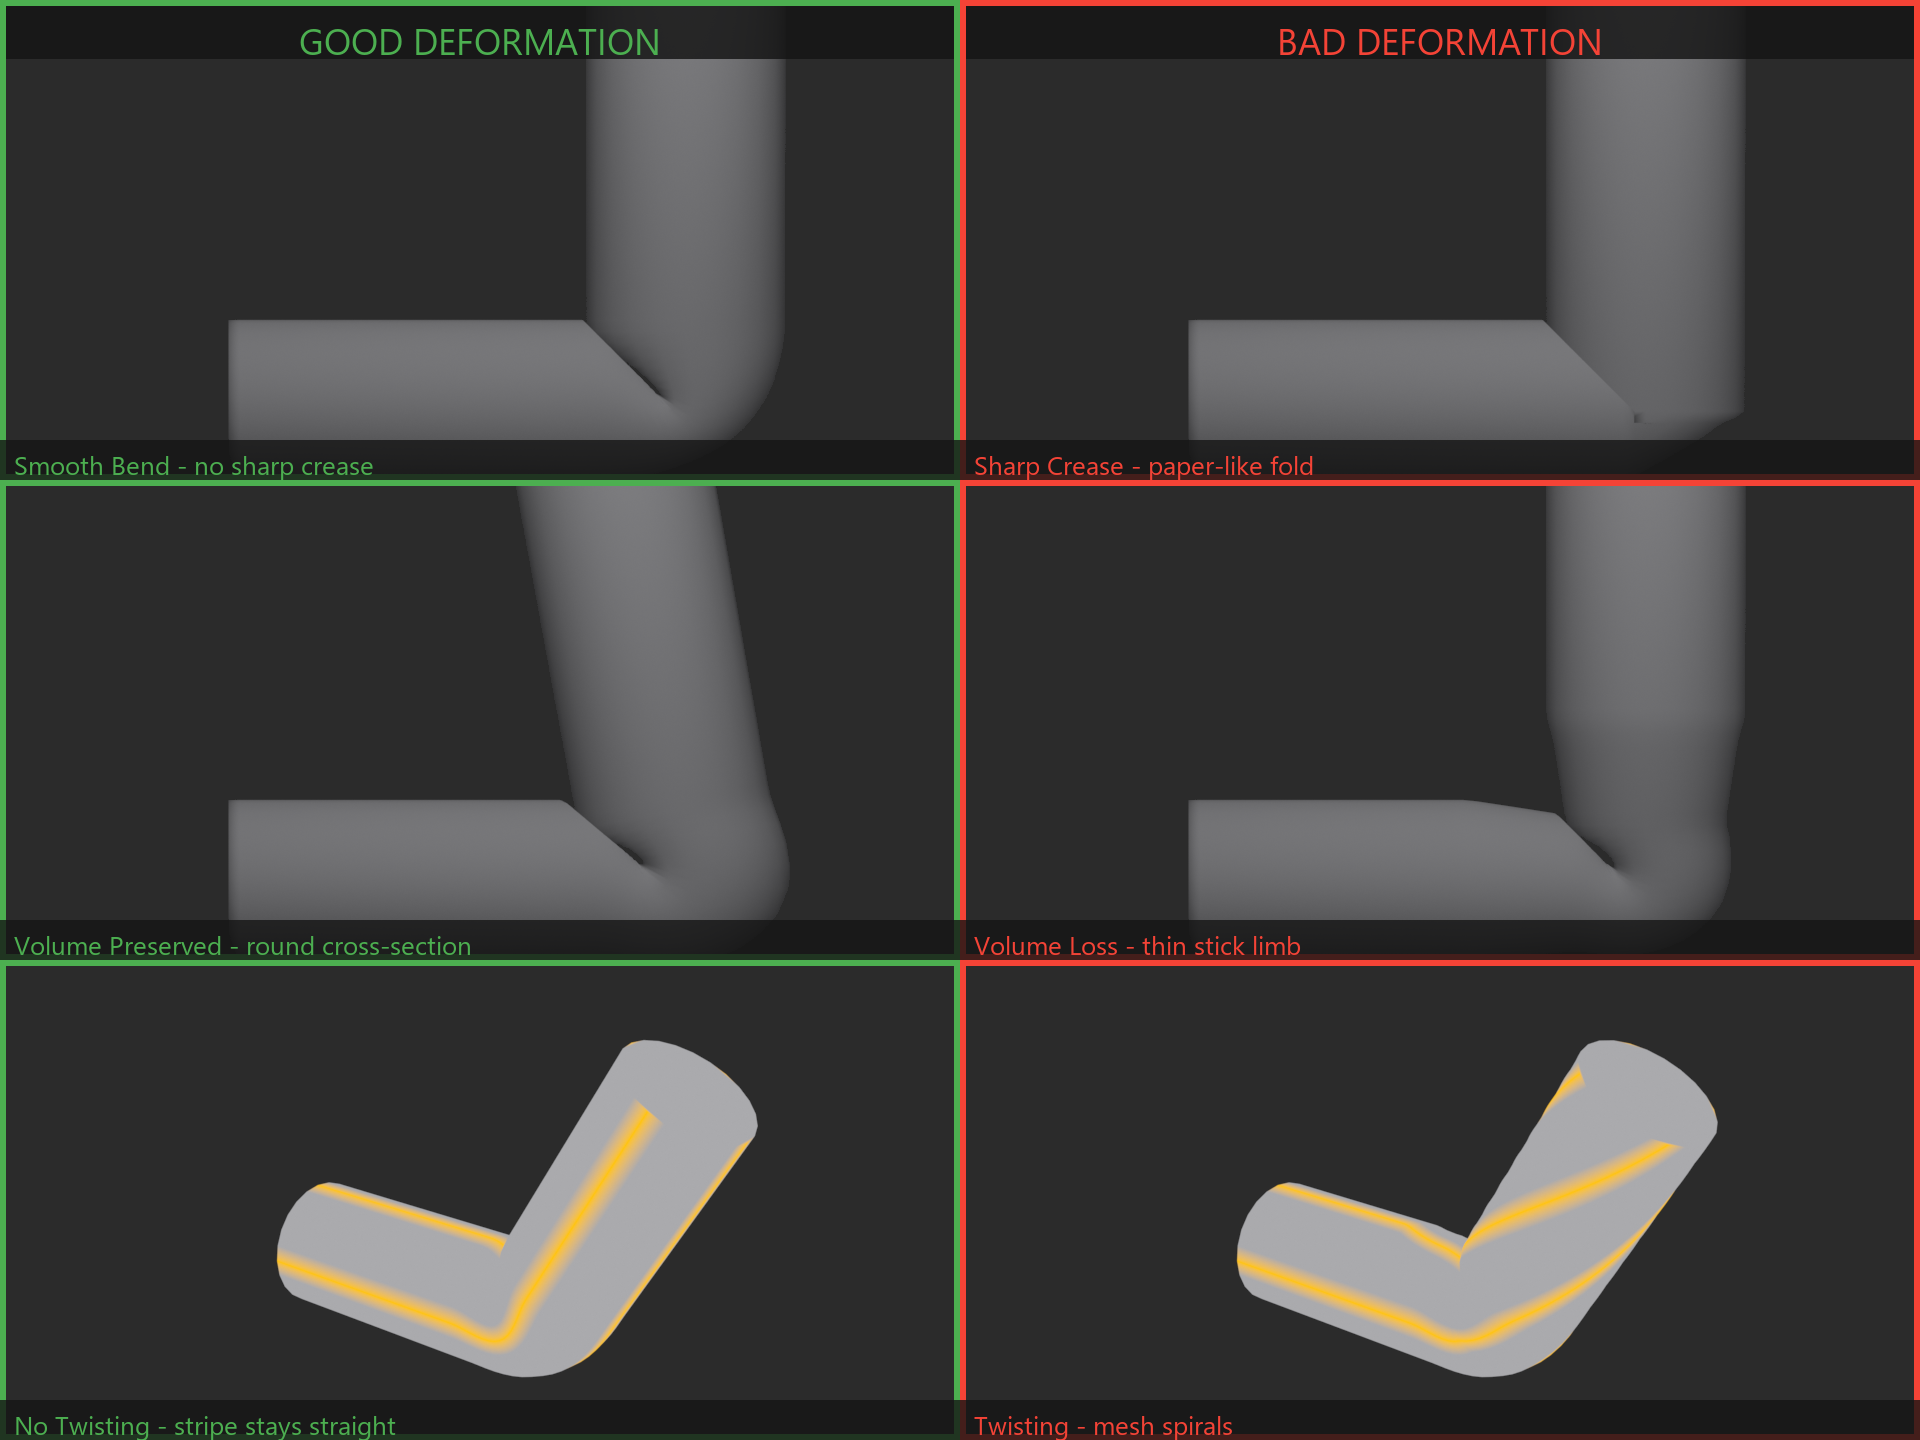
Step 1: Identify Problem Area
- Pose bone, see deformation issue
- Note exactly which vertices look wrong
- Determine which bone(s) are involved
- Example: "Left elbow inner crease too sharp"
Step 2: Switch to Weight Paint Mode
- Keep pose visible (don't clear it!)
- Select mesh, enter Weight Paint Mode
- Or: Use split screen (Weight Paint + Pose)
- Select bone involved in problem (e.g., forearm.L)
Step 3: Make Targeted Adjustment
- Identify what needs changing:
- Sharp crease = need gradient (blur)
- Volume loss = need wider influence
- Wrong area moving = need removal (0.0 weight)
- Choose appropriate tool (Draw, Blur, etc.)
- Make gentle adjustment (low strength)
- Don't overdo it—small changes
Step 4: Immediately Re-Test
- Switch back to Pose Mode
- Rotate bone to same position
- Check if problem improved
- Better? Continue. Same? Try different approach
Step 5: Repeat Until Satisfied
- Paint → test → paint → test → paint → test
- Each iteration brings improvement
- Know when to stop: "Good enough" is okay
- Perfection is enemy of completion
Using Reference for Natural Deformation
📸 Reference-Based Testing
Real-World Comparison:
- Take photos or find images of:
- Bent elbow from side
- Bent knee from side
- Shoulder rotation
- Extreme poses
- Load reference images in Blender (Image > Reference)
- Compare your deformation to real anatomy
- Adjust weights to match natural folding
What to Look For in References:
- Where skin folds: Indicates high deformation
- Volume shifts: Notice bicep bulge when arm bends
- Crease patterns: Natural vs unnatural folding
- Range of motion: How far joints naturally bend
Testing Checklist
✅ Complete Testing Checklist
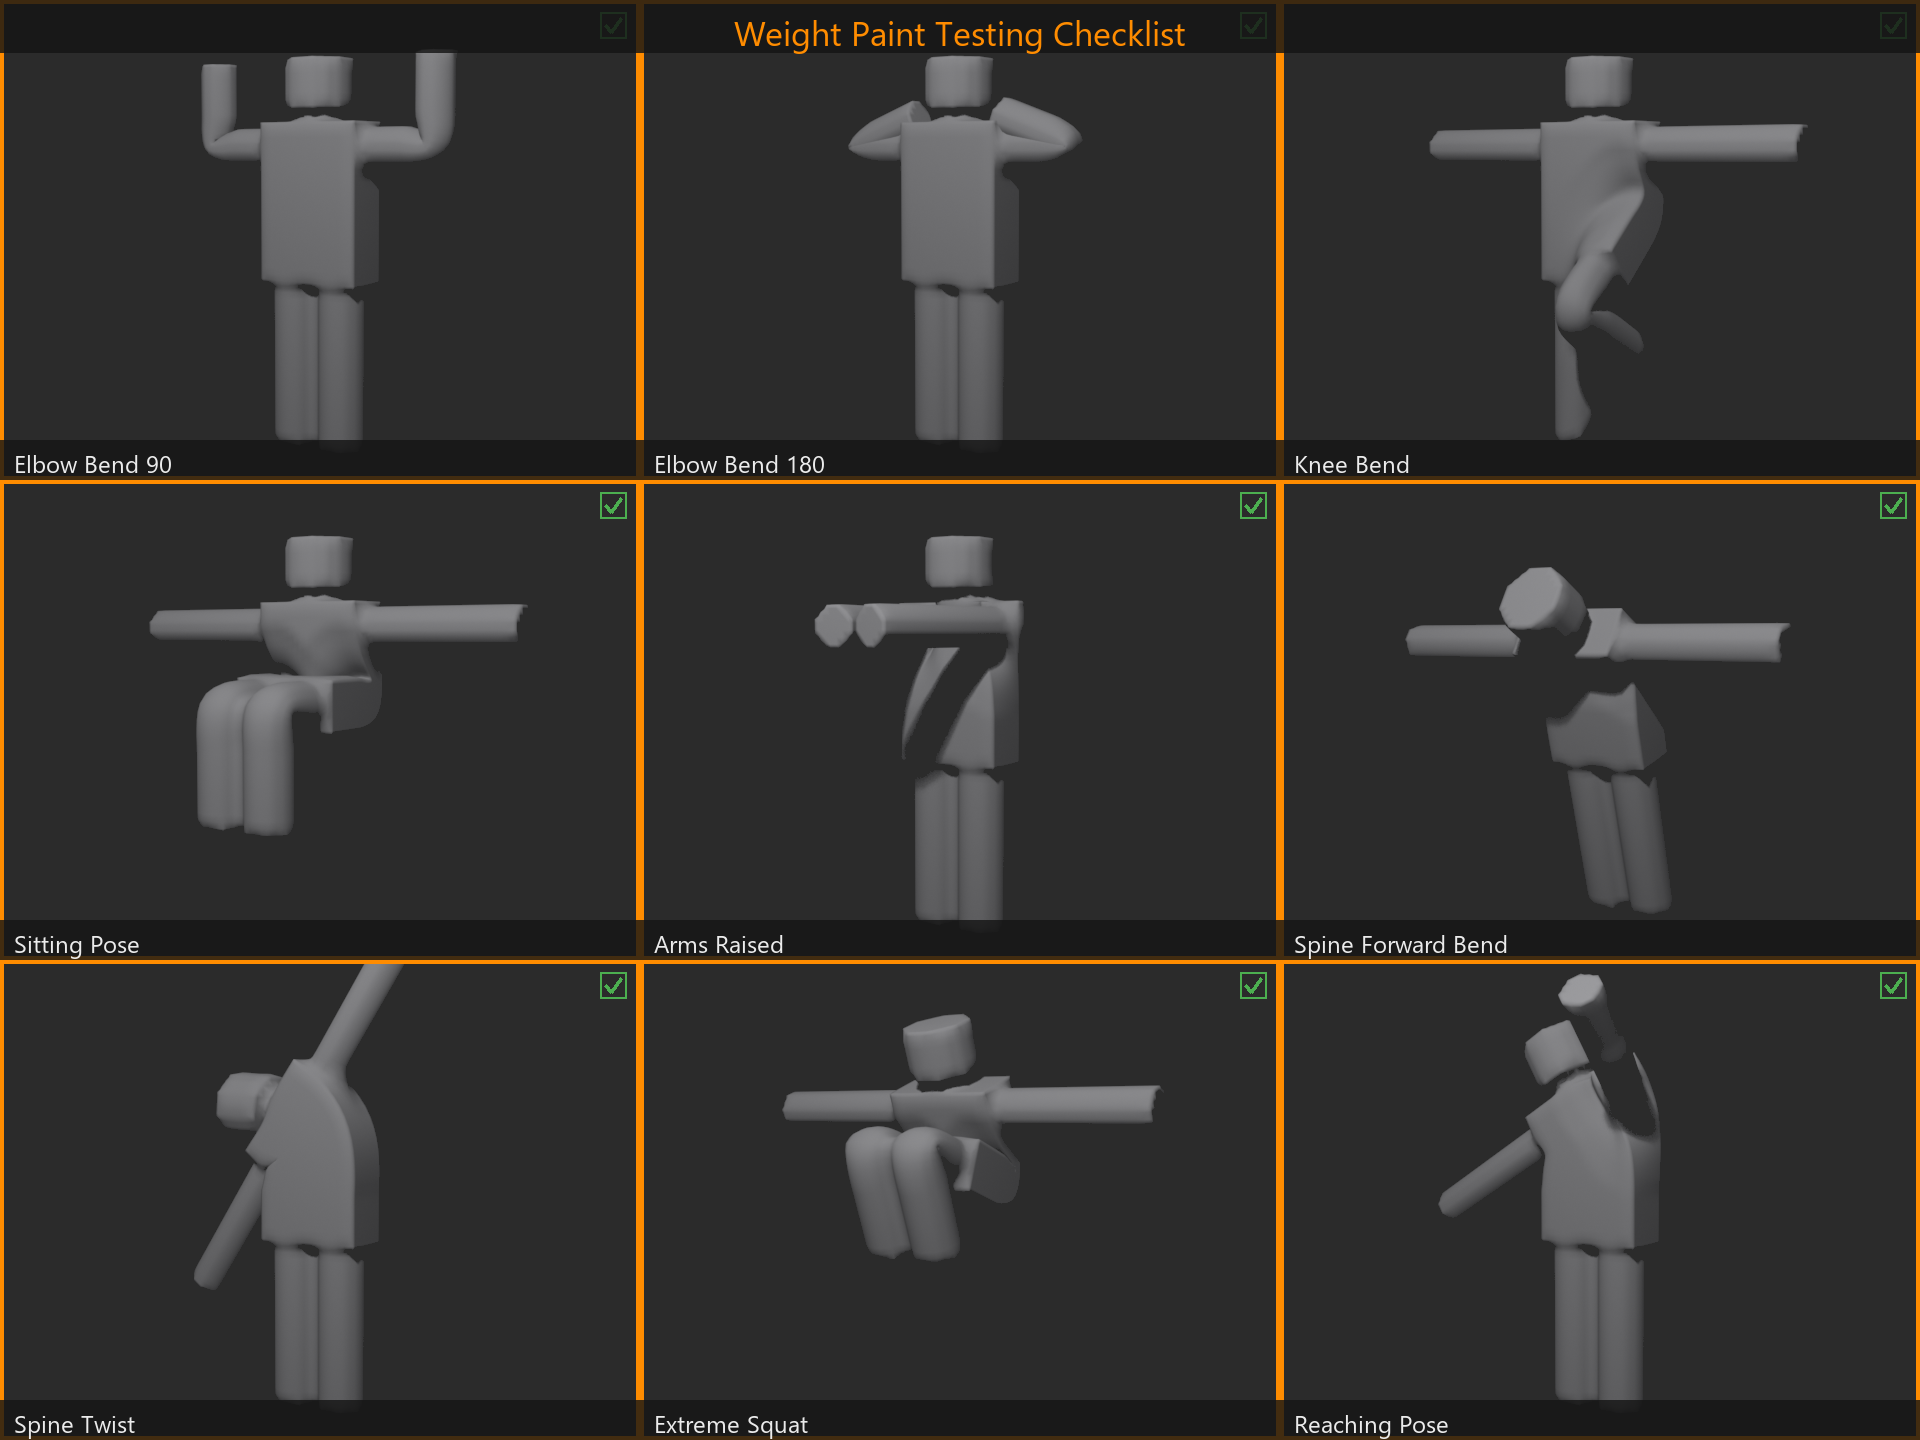
Per-Joint Tests:
- □ Left elbow: 90° bend, 180° bend, -30° extension
- □ Right elbow: Same as left (symmetry check)
- □ Left knee: 180° bend (heel to thigh)
- □ Right knee: Same as left
- □ Left shoulder: Up, down, forward, back, rotation
- □ Right shoulder: Same as left
- □ Left wrist: Bend up, down, rotate
- □ Right wrist: Same as left
- □ Spine: Forward bend, back bend, twist left/right
- □ Neck: Tilt forward, back, left, right, rotate
- □ Head: Rotation in all axes
Per-Finger Tests (If Detailed):
- □ Make fist (all fingers curl)
- □ Point (index extended, others curled)
- □ Thumbs up (thumb up, fingers curled)
- □ Spread fingers (all extended and apart)
- □ Individual finger curls
Combined Motion Tests:
- □ Reaching pose (shoulder + elbow + spine)
- □ Walking pose (legs alternating, arms swinging)
- □ Crouching (knees + hips + spine)
- □ Sitting (knees 90°, hips 90°)
- □ Arms crossed (both arms + chest)
- □ Looking over shoulder (spine twist + neck + head)
Quality Checks:
- □ No sharp creasing anywhere
- □ Volume preserved in bent limbs
- □ No candy-wrapper twisting
- □ No mesh separation (gaps)
- □ No mesh penetration (self-intersection)
- □ Left and right sides symmetrical
- □ All joints move smoothly
- □ Extreme poses look believable
When to Stop Refining
🎯 The "Good Enough" Standard
You're Done When:
- Major joints work well: Elbows, knees, shoulders bend naturally
- No obvious problems: No creasing, twisting, or breaks visible
- Character can perform needed poses: All animation requirements met
- Time vs. quality balanced: Further refinement yields diminishing returns
Perfectionism Warning:
- Weight painting can become infinite time sink
- There's always "one more vertex" to adjust
- Professional studios have deadlines—know when to ship
- 80/20 rule: 80% of quality from 20% of effort
- Get it "good," not "perfect"
- Can always refine later if specific shot needs it
Quality Tiers:
- Background character: No obvious breaks, basic tests pass
- Mid-ground character: Smooth at common poses, passes standard tests
- Hero character: Beautiful at all poses, passes extreme tests
- Match effort to character importance
Documenting Tests and Issues
📝 Tracking Testing Progress
Simple Documentation Method:
- Create text file: "character_weight_tests.txt"
- List all joints to test
- Mark: Pass (✓), Fail (✗), or Needs Work (~)
- Notes for failures: "Left elbow creases"
- Update as you fix and retest
Example Documentation:
Left Elbow: ✓ (smooth at 90° and 180°)
Right Elbow: ✓ (matches left)
Left Knee: ~ (slight volume loss at 180°)
Right Knee: ~ (matches left issue)
Left Shoulder: ✗ (twisting when rotated back)
Right Shoulder: ✗ (same as left)

Priority fixes:
1. Shoulders - twisting issue
2. Knees - volume preservation
Benefits:
- Don't forget which joints need work
- Track progress systematically
- Share with team (if collaborating)
- Return to project later and remember status
💭 The Testing Truth: Amateur riggers test once at the end and cry when everything's broken. Professional riggers test constantly during the process and fix small issues immediately. The difference isn't skill—it's workflow discipline. Test early, test often, test thoroughly. Every minute spent testing saves ten minutes fixing later. Make testing a habit, not an afterthought!
🎯 Testing and Refinement Summary
- Test systematically: Each joint individually, then combined motions
- Extreme poses: Problems show at 180° bends before subtle angles
- Visual problems: Creasing, volume loss, twisting, gaps, penetration, rippling
- Refinement loop: Identify → paint → test → repeat until satisfied
- Split screen: See Weight Paint and Pose Mode simultaneously
- Reference photos: Compare to real anatomy for natural deformation
- Testing checklist: All joints, all directions, combined motions
- "Good enough" matters: Don't chase perfection, meet project needs
- Document progress: Track what's tested, what needs fixing
- Test constantly: Early and often, not just at the end
Testing mastered! Now let's solve common problems!
🔧 Common Weight Painting Problems
Every rigger encounters the same frustrating issues: stubborn creases, mysterious twisting, weights that won't behave. The good news? These problems are well-known with proven solutions! This section is your troubleshooting guide—the fixes that professionals use when weight painting goes wrong. Bookmark this section—you'll refer to it often!
Problem-Solution Quick Reference
🔍 Fast Problem Lookup
| Problem | Quick Fix |
|---|---|
| Sharp crease at joint | Blur brush on joint area |
| Arm becomes stick when bent | Enable Preserve Volume |
| Mesh spirals/twists | Check bone roll (Ctrl + N) |
| Hand moves when rotating shoulder | Paint 0.0 weight (remove bleeding) |
| Gap appears at joint | Increase weights in gap area |
| Mesh penetrates itself | Reduce weights in penetrating area |
| X-Mirror not working | Check .L/.R naming, mesh symmetry |
| Painting does nothing | Check active vertex group |
| Weights exceed 1.0 | Enable Auto Normalize |
| Asymmetrical deformation | Enable X-Mirror, repaint |
Sharp Creasing (Most Common Problem)
❌ Problem: Sharp Crease at Joint
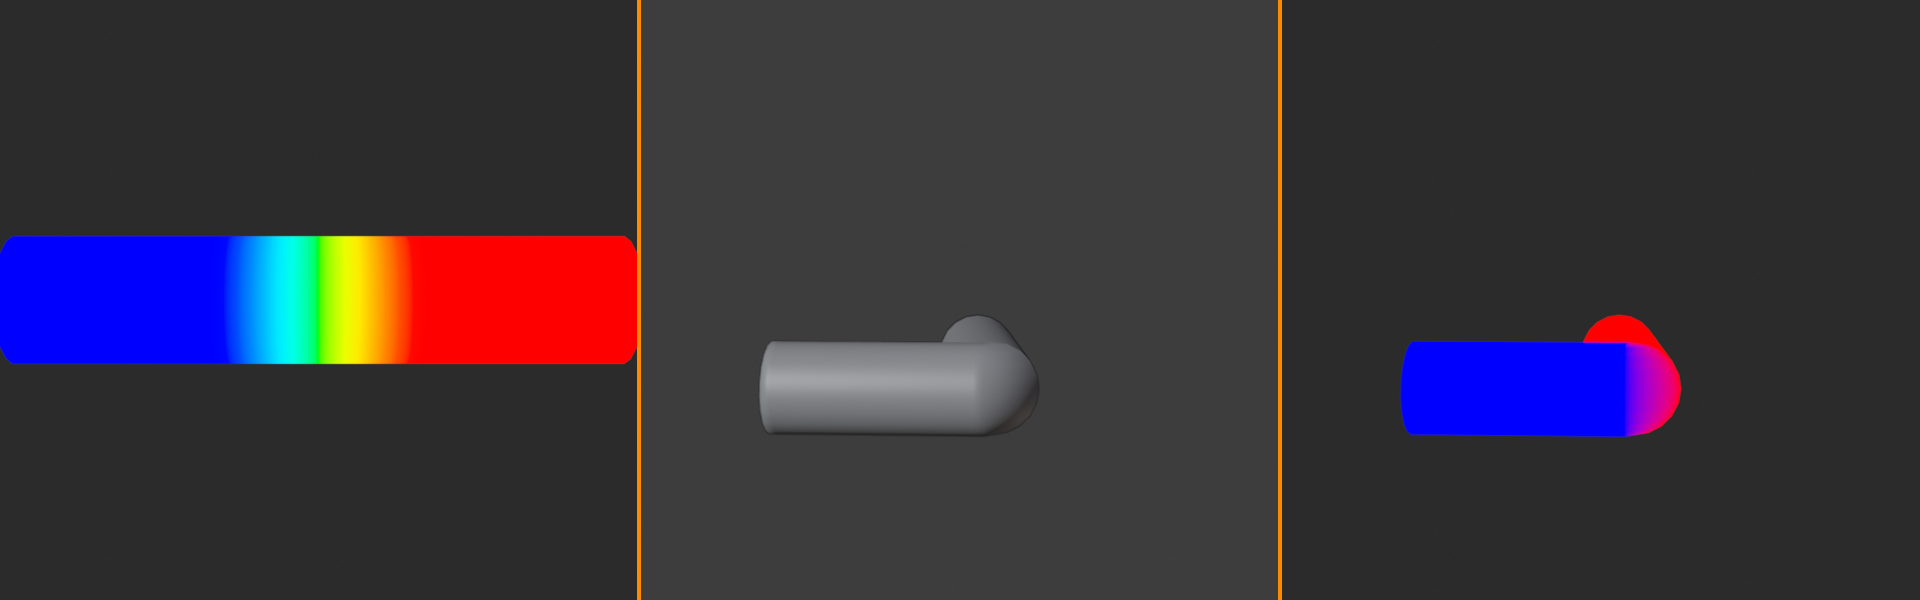
Symptoms:
- Hard fold line appears when joint bends
- Looks like paper folding, not skin bending
- Usually at elbows, knees, wrists, ankles
- Most visible at 90° and beyond
Cause:
- Abrupt weight transition from one bone to next
- In Weight Paint Mode: Red immediately becomes blue with no gradient
- No intermediate weights (no green/yellow zone)
- Automatic weights often create this problem
Solution 1: Blur Brush (Primary Fix)
- Weight Paint Mode
- Select bone on either side of crease (e.g., upper_arm.L)
- Switch to Blur brush
- Strength: 0.5-0.8
- Medium-large radius
- Paint back and forth across crease area
- Watch gradient form: red → yellow → green → cyan → blue
- Multiple passes create smoother blend
- Test in Pose Mode—crease should soften
Solution 2: Manual Gradient Painting
- Select upper bone (e.g., upper_arm.L)
- Draw brush, Weight: 1.0
- Paint area just above joint (make red)
- Weight: 0.75, paint next edge loop down
- Weight: 0.5, paint joint center
- Weight: 0.25, paint next edge loop
- Weight: 0.0, paint area below joint
- Creates manual gradient
- Follow with Blur to smooth further
Solution 3: Gradient Tool (Fast Method)
- Select bone
- Choose Gradient tool
- Click above joint, drag to below joint
- Instant linear gradient created
- Use Blur brush to refine
How Wide Should Gradient Be?
- Minimum: 2 edge loops (bare minimum)
- Ideal: 3-4 edge loops (smooth, natural)
- Maximum: 5-6 edge loops (very smooth but may feel mushy)
- Balance between stiffness and smoothness
Volume Loss (Stick Limbs)
❌ Problem: Limb Loses Volume When Bent
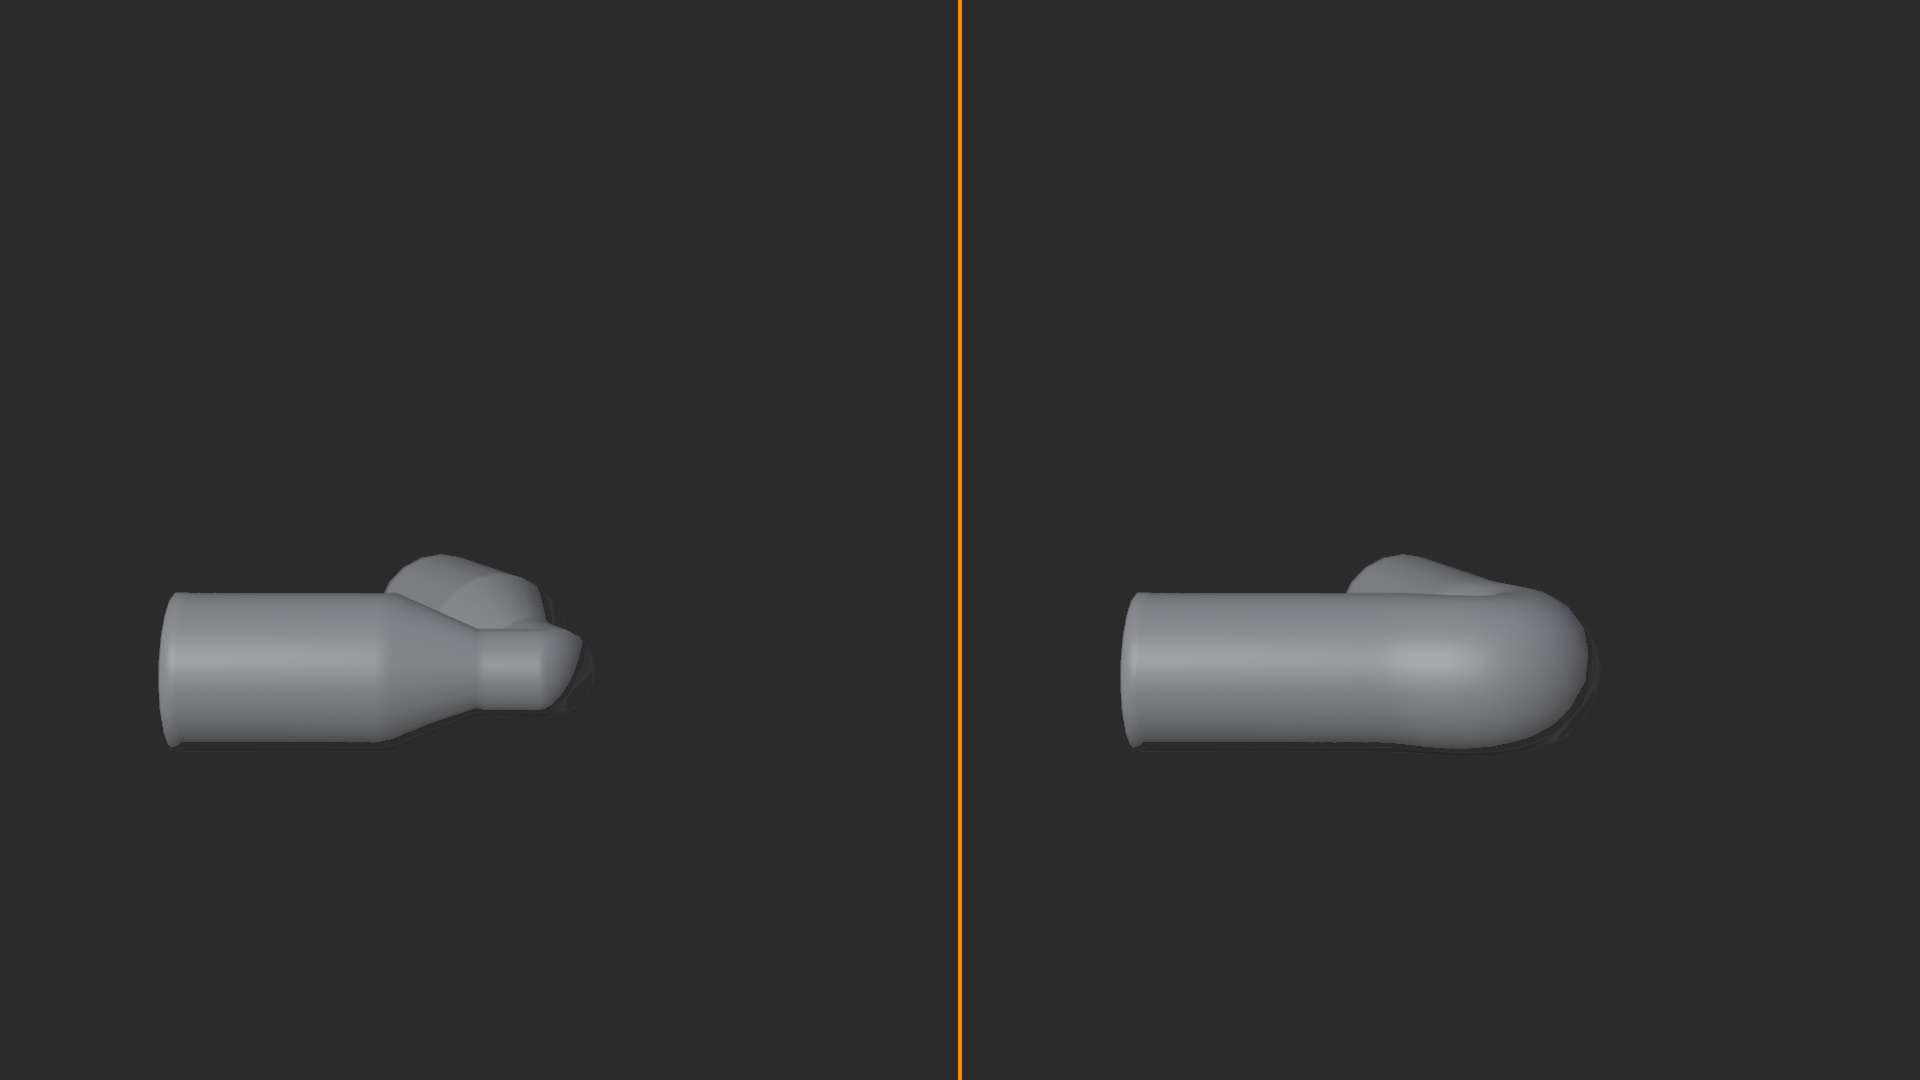
Symptoms:
- Round arm becomes thin stick when elbow bends
- Leg loses thickness at bent knee
- Vertices collapse toward bone center
- Character looks deflated
Causes:
- Vertices following bone axis too directly
- No volume preservation in Armature modifier
- Gradient too narrow or too steep
- Poor topology (not enough edge loops at joint)
Solution 1: Enable Preserve Volume (Easy Fix)
- Select mesh object
- Modifier Properties > Armature modifier
- Enable "Preserve Volume" checkbox
- Test bend—volume should improve significantly
- Why it works: Algorithm compensates for collapsing
- When to use: Almost always for organic characters
Solution 2: Widen Gradient Zone
- Weight Paint Mode
- Select both bones at joint (upper_arm and forearm)
- Use Blur brush with large radius
- Create wider gradient (4-5 edge loops instead of 2-3)
- More gradual transition preserves volume better
Solution 3: Adjust Outer Vertices
- Identify vertices at limb's outer edge (furthest from bone)
- These should have lower weights than inner vertices
- Paint outer edge with slightly lower weights
- Allows outer edge to "float" more, preserving roundness
Solution 4: Add Edge Loops (Mesh Edit)
- If geometry too sparse, add edge loops at joint
- More geometry = smoother deformation = better volume
- Requires re-weight painting area
- Last resort if other solutions fail
Candy-Wrapper Effect (Twisting)
❌ Problem: Mesh Spirals/Twists Unnaturally
Symptoms:
- Mesh spirals around bone like twisted candy wrapper
- Usually happens at forearms, shoulders
- Vertices rotate around bone axis wrong direction
- Can be subtle or extreme
Primary Cause: Incorrect Bone Roll
- Bone's local axes rotated wrong
- Vertices follow twisted coordinate system
- Fix this FIRST before adjusting weights!
Solution 1: Recalculate Bone Roll
- Select armature
- Enter Edit Mode
- Select problem bone (e.g., forearm.L)
- Press
Ctrl + N(Recalculate Roll) - Choose "Global +Y Axis" (most common)
- Switch to Pose Mode, test bend
- Twisting should improve or disappear
Solution 2: Manual Roll Adjustment
- Edit Mode, select problem bone
- Press
Ctrl + R(Roll tool) - Move mouse to rotate bone around its length
- Watch bone axes (enable in Armature Properties)
- Adjust until axes look correct
- Test in Pose Mode
Secondary Cause: Weight Distribution Issues
- If roll is correct but twisting persists
- Vertices have confused weight assignments
- Fix: Simplify weights in twisted area
- Paint stronger, clearer weight zones
- Reduce number of bones influencing area
Weight Bleeding (Wrong Area Moving)
❌ Problem: Distant Area Moves with Bone
Symptoms:
- Hand moves slightly when rotating shoulder
- Foot affected by spine rotation
- Weights extending too far from bone
- Automatic weights common culprit
Cause:
- Bone has non-zero weights in distant vertices
- Automatic weights calculated influence too broadly
- Gradient extends beyond appropriate area
Solution: Remove Unwanted Weights
- Weight Paint Mode
- Select bone causing problem (e.g., shoulder.L)
- Look for red/yellow colors in wrong areas (e.g., hand)
- Draw brush, Weight: 0.0
- Strength: 0.8-1.0 (higher for removal)
- Paint over entire wrong area
- Watch colors turn blue (no influence)
- Test in Pose Mode—area should stay still
Prevention:
- After automatic weights, immediately check for bleeding
- Select each bone, look for unexpected red areas
- Clean up bleeding before detailed work
- Saves time vs. discovering it later
X-Mirror Not Working
❌ Problem: Painting One Side Doesn't Mirror
Symptoms:
- X-Mirror enabled but right side doesn't update
- Paint left arm, right arm stays unchanged
- Symmetrical painting not working
Cause 1: Incorrect Bone Naming
- Bones not named with .L and .R suffixes
- Or using inconsistent naming (.L vs _L vs .Left)
- Fix:
- Edit Mode, check bone names
- Rename: left_arm → arm.L, right_arm → arm.R
- Must match exactly except .L/.R
Cause 2: Mesh Not Symmetrical
- Mesh vertices not mirrored across X-axis
- Left and right sides slightly different
- Test:
- Edit Mode (mesh)
- Select vertex on left side
- Check X position (e.g., 0.5)
- Select corresponding vertex on right
- Should be -0.5 (exact negative)
- Fix: Use Mirror modifier to ensure symmetry
Cause 3: Armature Not at Origin
- Armature object offset from world origin
- X-Mirror uses world center as mirror plane
- Fix:
- Object Mode, select armature
- Move to origin (0, 0, 0)
- Or:
Ctrl + A> Apply Location
Cause 4: Vertex Groups Missing
- Right-side vertex groups don't exist
- Check: Mesh Data Properties > Vertex Groups list
- Should see both arm.L and arm.R
- Fix: Re-bind with automatic weights or create manually
Painting Has No Effect
❌ Problem: Brush Strokes Don't Change Weights
Symptoms:
- Paint on mesh, colors don't change
- Brush circle visible but no effect
- Frustrating—feels broken!
Cause 1: Wrong Vertex Group Active
- Painting wrong bone's weights
- Check: Header shows active vertex group name
- Fix: Click correct bone in Outliner
- Verify group name matches bone you intend to paint
Cause 2: Strength Set to Zero
- Brush strength accidentally set to 0.0
- Check: Header shows "Strength: 0.000"
- Fix: Increase strength to 0.5 or higher
Cause 3: Mesh Not Selected
- In Weight Paint Mode but mesh not active
- Fix: Click mesh, ensure it's selected
- Outline should be orange/yellow
Cause 4: Armature Modifier Disabled
- Modifier disabled in viewport
- Check: Modifier Properties, Armature modifier
- Eye icon should be enabled
- Fix: Click eye icon to enable
Cause 5: Lock Icon Enabled
- Vertex group locked (can't be edited)
- Check: Vertex Groups list, lock icon next to group
- Fix: Click lock icon to unlock
General Troubleshooting Steps
✅ Universal Problem-Solving Process
When Something Goes Wrong:
- Test in Pose Mode first:
- Confirm problem actually exists
- Identify exactly which joint/bone
- Note specific visual symptom
- Check the basics:
- Is Armature modifier present and enabled?
- Does it point to correct armature?
- Are vertex groups present for all bones?
- Is mesh parented to armature?
- Verify bone setup:
- Edit Mode: Check bone roll (Ctrl + N)
- Check "Deform" enabled in Bone Properties
- Verify bone names match vertex group names
- Isolate the issue:
- Does problem happen on both sides? (symmetry issue)
- Does it happen at all angles? (specific pose problem)
- Is it one bone or multiple? (local vs. global issue)
- Try simple fix first:
- Crease? Blur it
- Volume loss? Enable Preserve Volume
- Twisting? Recalculate roll
- 90% of problems have simple solutions
- If still stuck:
- Save file, take a break
- Return with fresh eyes
- Search online: "Blender [specific symptom] weight paint"
- Ask in Blender community forums
💭 The Debug Mindset: When weight painting goes wrong, don't panic or randomly paint hoping things improve. Professionals debug systematically: identify the specific symptom, hypothesize the cause, test the hypothesis with a targeted fix, verify the result. This methodical approach solves problems faster than frantic random adjustments. Most issues have been encountered and solved before—learn from that collective knowledge!
🎯 Common Problems Summary
- Sharp creasing: Use Blur brush to create smooth gradients (2-4 edge loops)
- Volume loss: Enable Preserve Volume + widen gradient zones
- Candy-wrapper twisting: Recalculate bone roll (Ctrl + N)
- Weight bleeding: Paint 0.0 weight to remove unwanted influence
- X-Mirror not working: Check .L/.R naming, mesh symmetry, origin position
- Painting has no effect: Verify active vertex group, strength, selection
- Gaps at joints: Increase weights in gap area for surrounding bones
- Mesh penetration: Reduce weights in penetrating vertices
- Debug systematically: Identify → hypothesize → test → verify
- Most problems: Have simple, well-known solutions
Problems solved! Now let's explore advanced tools!
🚀 Advanced Weight Painting Tools
Beyond the basic Draw and Blur brushes lie powerful advanced tools that can dramatically speed up your workflow. These tools let you transfer weights between meshes, select vertices by weight value, normalize weights precisely, and more. Professional riggers use these tools daily to work efficiently. Let's unlock these advanced capabilities!
Weight Transfer Between Meshes
🎁 The Gift of Good Weights: Imagine spending hours perfecting weights on one character, then needing to rig a similar character. Instead of starting from scratch, weight transfer lets you copy weights from your perfect character to the new one! It's like having a template—adjust it slightly instead of painting everything manually. This is how studios rig multiple characters efficiently!
✅ Transfer Weights Tool
What It Does:
- Copies vertex weights from one mesh to another
- Works based on surface proximity
- Great for similar characters, LOD models, or updated meshes
- Saves hours of manual repainting
When to Use:
- Creating multiple similar characters (variations)
- Transferring to LOD (Level of Detail) versions
- Updated mesh topology but same armature
- Clothing meshes sharing same armature as body
How to Transfer Weights:
- Setup:
- Source mesh (has good weights) and target mesh (needs weights)
- Both meshes use same armature
- Both meshes have vertex groups created
- Select objects:
- Select target mesh (receiving weights) first
- Shift-select source mesh (donating weights) second
- Both selected, source is active (lighter orange)
- Transfer:
- Weight Paint Mode (on active mesh)
- Menu: Weights > Transfer Weights
- Or: search (F3) "Transfer Weights"
- Blender calculates transfer
- Target mesh now has copied weights
- Refine:
- Test target mesh in Pose Mode
- Adjust any problem areas manually
- Usually 80-90% correct, needs minor tweaking
Transfer Settings (Advanced):
- Opens adjustment panel in bottom left after transfer
- Vertex Mapping: How it finds corresponding vertices
- Nearest Surface Point: Default, usually best
- Nearest Vertex: For very similar topology
- Edge Interpolated: Advanced, uses edges
- Adjust if default transfer looks wrong
Selecting Vertices by Weight
🎯 Weight-Based Selection
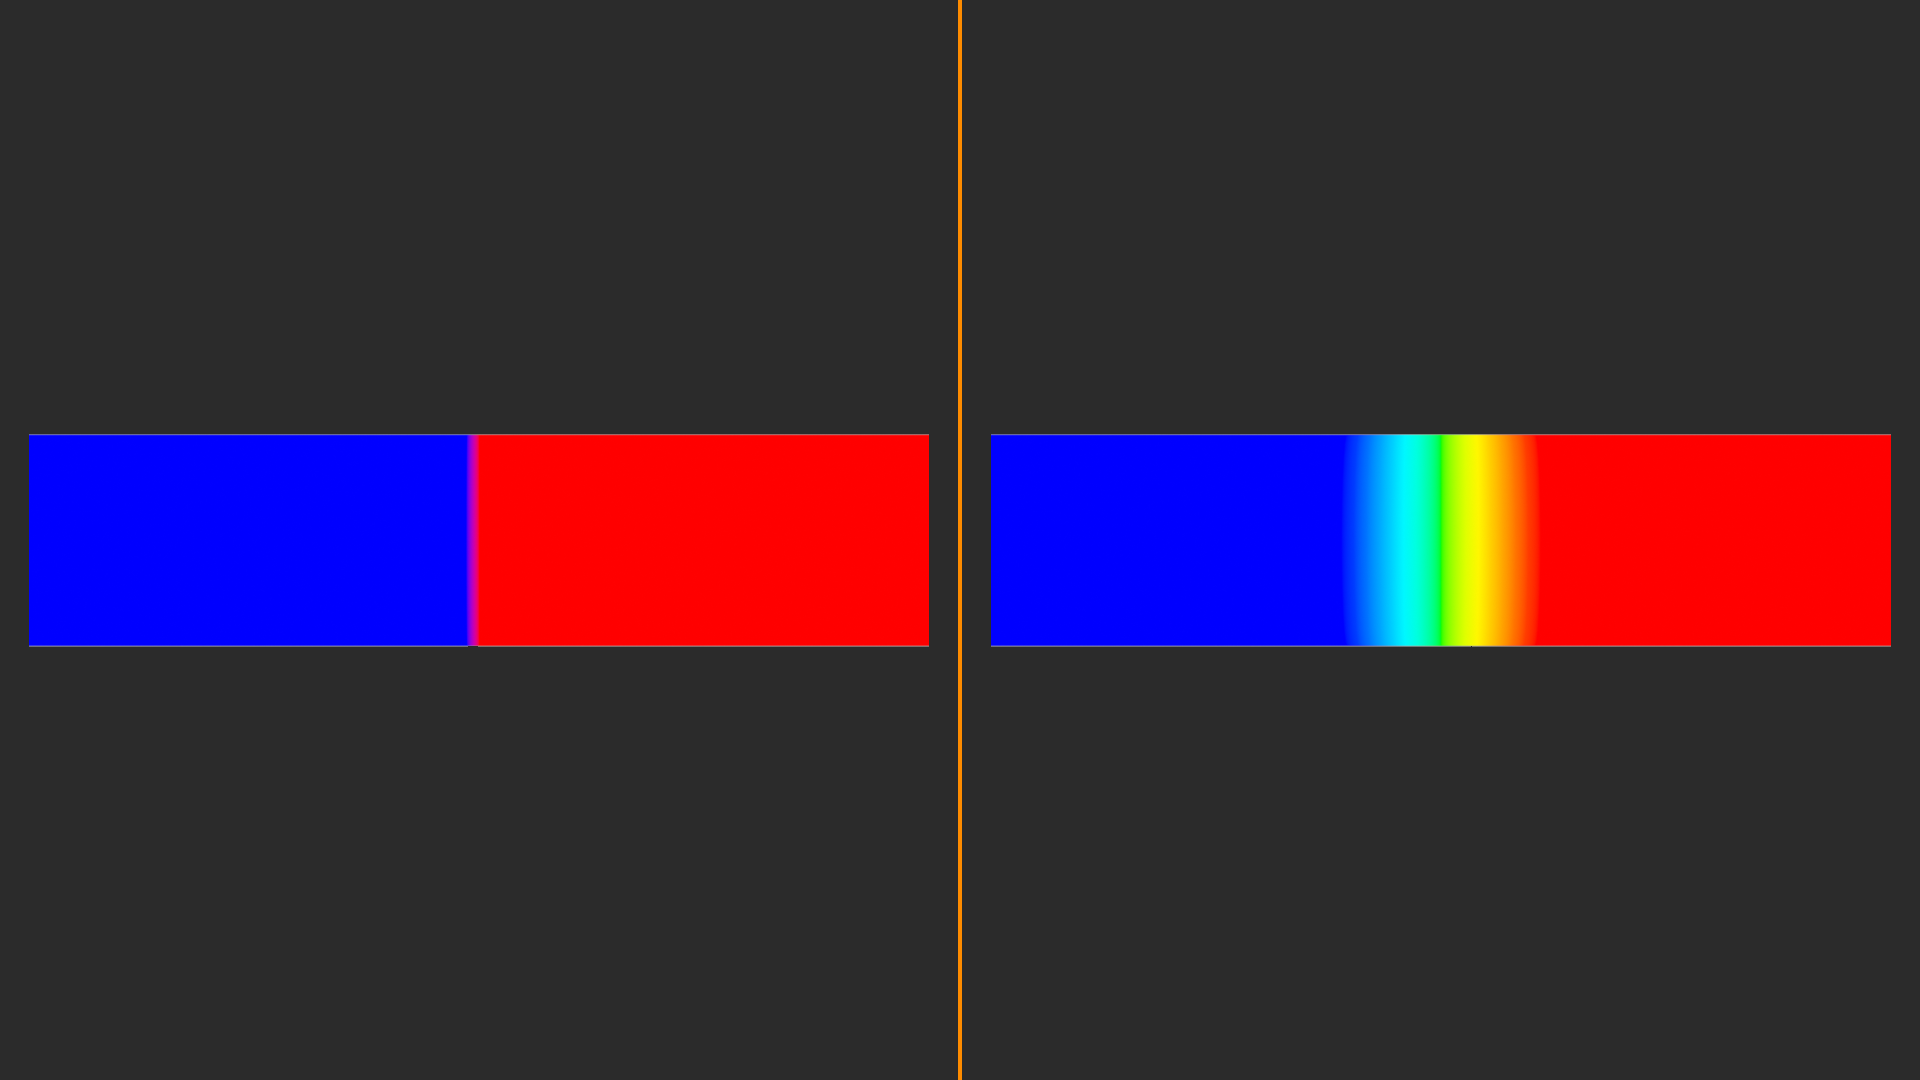
Why It's Useful:
- Find all vertices with specific weight values
- Example: "Select all vertices with 0.0 weight" (unassigned)
- Example: "Select all vertices with weight > 0.5" (strong influence)
- Allows batch operations on specific weight ranges
Method 1: Select Menu
- Weight Paint Mode
- Select bone/vertex group
- Menu: Select > Select More/Less
- More: Expands selection based on weights
- Less: Contracts selection
Method 2: Edit Mode Selection
- Switch to Edit Mode
- Menu: Select > Select All by Trait > Vertex Group
- Choose vertex group from list
- Selects all vertices in that group
Practical Uses:
- Find unassigned vertices: Look for those with no weights
- Clean up bleeding: Select distant high-weight vertices
- Batch assign: Select region, assign to vertex group
Normalize and Clean Tools
💡 Weight Cleanup Tools
Normalize All (Fix Weight Sums):
- What it does: Ensures all vertex weights sum to 1.0
- When to use:
- After manual weight editing without Auto Normalize
- Imported weights from other software
- Weights seem broken/unpredictable
- How to use:
- Weight Paint Mode
- Menu: Weights > Normalize All
- Blender recalculates all weights
- Per-vertex totals become exactly 1.0
- Options:
- Lock Active: Keep current group's weights, adjust others
- Usually leave unchecked (normalize everything)
Clean Weights (Remove Tiny Values):
- What it does: Removes very small weights (e.g., 0.001)
- Why it's useful:
- Tiny weights (0.01 or less) have minimal effect
- But they clutter vertex groups and slow calculations
- Cleaning removes noise, improves performance
- How to use:
- Weight Paint Mode
- Menu: Weights > Clean
- Set threshold (default 0.01 is good)
- Any weight below threshold gets removed (set to 0.0)
- When to use:
- After automatic weights (creates many tiny values)
- Before finalizing rig
- When weight painting feels sluggish
Limit Total (Cap Number of Influences):
- What it does: Limits vertices to N bones max
- Why it's useful:
- Game engines often limit to 4 bones per vertex
- Reduces calculation complexity
- Usually no visual difference
- How to use:
- Weight Paint Mode
- Menu: Weights > Limit Total
- Set limit (typically 4)
- Blender keeps N strongest influences, removes weaker ones
Vertex Group Operations
📊 Managing Vertex Groups
Location: Mesh Data Properties > Vertex Groups
Assign Vertices to Group:
- Edit Mode or Weight Paint Mode
- Select vertices
- Vertex Groups panel, select group
- Set weight (0.0-1.0)
- Click Assign button
- Selected vertices now in that group with set weight
Remove from Group:
- Select vertices
- Select vertex group
- Click Remove button
- Vertices no longer in that group
Select Group Vertices:
- Edit Mode
- Select vertex group
- Click Select button
- All vertices in group become selected
Copy Vertex Group:
- Select group in list
- Dropdown menu (v) > Copy Vertex Group
- Creates duplicate with "_copy" suffix
- Useful for testing variations
Mirror Vertex Group:
- Select group (e.g., "upper_arm.L")
- Dropdown menu > Mirror Vertex Group
- Creates/updates mirrored group ("upper_arm.R")
- Requires symmetrical mesh
- Alternative to X-Mirror painting
Lock and Protection
🔒 Protecting Vertex Groups
Lock Vertex Group:
- Vertex Groups list, click lock icon next to group
- Locked groups can't be painted or edited
- Use when:
- Weights are perfect, don't want to accidentally change
- Working near finished area, want protection
- Multiple people working, prevent conflicts
- Click lock icon again to unlock
Lock All Vertex Groups:
- Dropdown menu > Lock All
- Protects entire rig
- Unlock All when ready to edit again
Advanced Brush Options
🖌️ Pro-Level Brush Settings
Accumulate (Brush Property):
- Sidebar (N) > Tool > Accumulate checkbox
- Enabled: Weight builds up with overlapping strokes
- Disabled: Each stroke applies max once (no buildup)
- Most use cases: Keep enabled
Front Faces Only:
- Sidebar (N) > Tool > Front Faces Only
- Enabled: Only paint visible faces
- Disabled: Paint through mesh (affects back side too)
- Use when: Don't want to accidentally paint back side
Curve Falloff:
- Determines how brush strength fades from center to edge
- Click curve widget to customize
- Presets: Smooth, Sharpen, Root, etc.
- Smooth: Gradual falloff (most natural)
- Constant: No falloff (hard edge)
- Experiment to find what feels right
Weights Menu Operations
💡 Weights Menu (Weight Paint Mode)
Available Operations:
- Transfer Weights: Copy from another mesh
- Smooth: Average weights of selected vertices
- Normalize All: Fix weight sums to 1.0
- Clean: Remove tiny weight values
- Limit Total: Cap bones per vertex
- Quantize: Round weights to steps (e.g., 0.25 increments)
- Levels: Offset/gain weight values (like photo levels)
- Invert: Flip weights (1.0 becomes 0.0, 0.5 stays 0.5)
Smooth Weights (Different from Blur Brush):
- Menu: Weights > Smooth
- Averages weights across selected vertices
- More aggressive than Blur brush
- Multiple iterations for stronger smoothing
- Use when: Need to even out entire area quickly
Invert Weights (Flip):
- Menu: Weights > Invert
- High weights become low, low become high
- Example: Forearm (mostly red) becomes mostly blue
- Use when: Accidentally painted opposite of intended
Python Scripting for Weights (Advanced)
🐍 Scripting Weight Operations
For Advanced Users:
- Blender Python API allows programmatic weight manipulation
- Automate repetitive weight painting tasks
- Create custom weight distribution algorithms
- Example use cases:
- Set all vertices in region to specific weight
- Generate procedural weight gradients
- Batch process multiple characters
Simple Example Script:
import bpy

# Get active object (mesh)
obj = bpy.context.active_object

# Get vertex group
vg = obj.vertex_groups.get("upper_arm.L")

# Set weight for all vertices in group
if vg:
    for v in obj.data.vertices:
        vg.add([v.index], 1.0, 'REPLACE')
Learning Path:
- Master manual weight painting first
- Then learn Python for automation
- Blender documentation has weight painting API reference
- Advanced technique for production pipelines
Workflow Optimization Tips
✅ Pro Workflow Enhancements
Custom Hotkeys:
- Edit > Preferences > Keymap
- Assign shortcuts to frequent operations:
- Switch to Blur brush
- Normalize All
- Clean Weights
- Saves time vs. navigating menus
Quick Favorites Menu:
- Press
Qfor Quick Favorites - Right-click any menu item > Add to Quick Favorites
- Build personal toolkit of frequent operations
Viewport Shading Presets:
- Save custom shading setups for weight painting
- One preset: Bones visible (In Front enabled)
- Another preset: Wireframe overlay for vertex precision
- Switch between presets instantly
Use Collections for Organization:
- Armature in one collection
- Mesh in another
- Toggle visibility to reduce clutter
- Easier to focus on specific parts
💭 Advanced Tools Philosophy: These advanced tools aren't required for good weight painting—you can create beautiful deformation with just Draw and Blur. But professional riggers use these tools to work faster and smarter. Weight Transfer alone can cut rigging time in half for similar characters. Learn the basics first, then add advanced tools to your arsenal as you encounter situations where they save time. Efficiency comes from knowing when to use the right tool!
🎯 Advanced Tools Summary
- Weight Transfer: Copy weights between similar meshes (huge time saver)
- Normalize All: Fix weight sums to exactly 1.0 per vertex
- Clean Weights: Remove tiny values below threshold (improve performance)
- Limit Total: Cap max bones per vertex (game engine requirement)
- Vertex Group ops: Assign, remove, select, copy, mirror
- Lock groups: Protect finished weights from accidental changes
- Smooth operation: Average weights across selected vertices
- Weight-based selection: Select vertices by weight value ranges
- Python scripting: Automate repetitive weight operations (advanced)
- Workflow optimization: Hotkeys, Quick Favorites, custom presets
Advanced tools mastered! Time for the hands-on project!
🎨 Hands-On Project: Complete Character Weight Painting
Time to put everything together! You'll take a simple humanoid character through the complete weight painting process—from initial automatic weights to refined manual painting. This project mirrors real production workflows and will give you practical experience with every technique we've covered. By the end, you'll have a fully weighted character ready for animation!
🎯 Project Overview
Goal: Weight paint a simple humanoid character for clean deformation
Time Required: 2-3 hours (take breaks!)
Skills Applied:
- Automatic weights generation
- Testing and identifying problem areas
- Manual weight painting with Draw and Blur
- Using advanced tools (Smooth, Clean, Normalize)
- Mirror workflow for efficiency
- Final testing and refinement
Result: A character that bends naturally at all joints, ready for animation!
Project Setup
📋 What You'll Need
Option 1: Use Existing Character
- Character model from Lesson 36 (Character Modeling)
- Armature from Lesson 37 (Armature and Bones)
- Already parented with Automatic Weights
Option 2: Simple Test Character
- Create a simple humanoid shape:
- Torso: Cylinder (scaled)
- Head: UV Sphere (scaled smaller)
- Arms/Legs: Cylinders (rotated, scaled)
- Join all parts into one mesh (
Ctrl+J) - Add simple armature (see Lesson 37 quick setup)
- Parent with Automatic Weights
Option 3: Download Practice Character
- Blender Cloud or free sites offer simple rigged characters
- Remove existing weights (Weights > Delete All Vertex Groups)
- Re-parent with Automatic Weights to start fresh
Phase 1: Initial Assessment
🔍 Step 1: Test Automatic Weights
Test Each Joint:
- Select armature, enter Pose Mode (
Ctrl+Tab) - Rotate bones one at a time:
- Shoulder: Should lift arm smoothly
- Elbow: Should bend without twisting
- Hip: Should move leg naturally
- Knee: Should bend cleanly
- Spine: Should curve torso
- Neck/Head: Should tilt/rotate
- Document problems:
- Areas that deform strangely
- Vertices that don't move (missing weights)
- Parts that move with wrong bone
- Twisting or collapsing geometry
Common Issues You'll Find:
- Shoulders: Armpit collapses or chest moves with arm
- Elbows: Forearm twists when bending
- Hips: Butt deforms when leg moves
- Knees: Calf pinches or thigh moves too much
- Spine: Too stiff or bends in wrong places
Take Notes:
- Screenshot problem poses
- List which bones need work
- Prioritize worst areas first
- This roadmap guides your painting
Phase 2: Fix Major Problem Areas
🎨 Step 2: Paint Shoulder Weights
Shoulder Setup:
- Reset armature to rest pose (
Alt+G, Alt+R, Alt+Son all bones) - Select mesh, Weight Paint Mode
- Select upper arm bone (shoulder) in vertex groups
- Enable X-Mirror in Tool Settings
- Make armature visible (In Front enabled)
Paint Strategy:
- Shoulder socket (top of arm):
- Should be pure red (1.0 weight)
- Draw brush, Weight 1.0, paint top of shoulder
- This area moves 100% with upper arm
- Armpit transition:
- Gradient from shoulder to chest
- Subtract brush (hold
Ctrl) on chest side - Blur brush to smooth transition
- Goal: Arm lifts, armpit stretches naturally, chest stays
- Upper arm body:
- Pure red from shoulder to elbow area
- Draw brush, fill solidly
- This entire section is controlled by upper arm bone
Test:
- Pose Mode, rotate upper arm bone
- Arm should lift smoothly
- Armpit should stretch but not tear
- Chest should stay in place
- If wrong, back to Weight Paint and adjust
🎨 Step 3: Paint Elbow Weights
Elbow is Critical:
- Most visible joint in animation
- Poor elbow weights = robotic movement
- Goal: Natural bend, no twisting
Paint Strategy:
- Forearm bone selection:
- Select forearm bone in vertex groups
- View current weights (should be mostly blue near elbow)
- Pure forearm area:
- From mid-forearm to wrist: Pure red (1.0)
- This section moves 100% with forearm bone
- Draw brush, paint solidly
- Elbow transition zone:
- Around elbow joint: Gradient from upper arm to forearm
- Upper arm side: More blue (controlled by upper arm)
- Forearm side: More red (controlled by forearm)
- Middle: Green/yellow (50/50 blend)
- Use multiple low-strength passes to build gradient
- Smooth transition:
- Blur brush around elbow crease
- Several passes until gradient is smooth
- No sudden color jumps
Test:
- Pose Mode, bend elbow bone
- Should bend naturally (like your real arm)
- No twisting or candy-wrapper effect
- Outer elbow should stretch, inner should compress
- Iterate until it looks right
🎨 Step 4: Paint Hip and Leg Weights
Hip Area Challenges:
- Complex deformation (leg attaches to pelvis)
- Buttocks should move with legs but not too much
- Pelvis should stay stable
Thigh Bone (Upper Leg):
- Pure thigh area:
- From mid-thigh to hip socket: Pure red (1.0)
- This moves 100% with thigh bone
- Hip socket transition:
- Top of leg where it meets pelvis: Gradient
- Inner thigh: Less weight (doesn't move as much)
- Outer thigh: More weight (follows leg movement)
- Create natural crease at hip joint
- Buttocks area:
- Lower portion: Moves with leg (subtle weight)
- Upper portion: Stays with pelvis (low/no weight)
- Blend carefully with Blur brush
Knee Joint:
- Similar to elbow:
- Shin bone: Pure red from mid-calf to ankle
- Knee transition: Gradient from thigh to shin
- Front of knee: Tighter gradient (bends more)
- Back of knee: Wider gradient (stretches more)
- Smooth with Blur:
- Multiple passes around knee cap
- Create natural bending deformation
Test:
- Pose Mode, lift leg forward
- Hip should fold naturally
- Buttocks should follow slightly
- Bend knee: Should flex smoothly
- No pinching or strange volume loss
Phase 3: Refine Secondary Areas
✅ Step 5: Spine and Torso
Spine Weight Distribution:
- Multiple spine bones:
- Lower spine: Controls lower torso/hips
- Mid spine: Controls mid-section
- Upper spine: Controls chest/shoulders
- Paint each region:
- Lower torso: Weight to lower spine bone
- Transition zones: Blend between spine bones
- Upper torso: Weight to upper spine/chest bone
- Create gradual flow from bottom to top
- Smooth transitions:
- Blur brush between each spine segment
- Goal: Torso bends naturally like real spine
- No sudden breaks or stiff sections
Test:
- Rotate each spine bone individually
- Should create smooth curve along torso
- Rotating lower spine: Hips tilt, upper torso follows less
- Rotating upper spine: Chest moves, hips stay mostly still
✅ Step 6: Neck and Head
Simple but Important:
- Neck bone:
- Entire neck geometry: Pure red (1.0)
- Transition at base: Blend into upper spine
- Transition at top: Blend into head
- Head bone:
- Entire head: Pure red (1.0)
- Neck-head junction: Slight gradient
- Usually automatic weights work well here
Test:
- Rotate neck: Head follows, body stays
- Rotate head: Face turns, neck mostly stable
- Should feel natural, like turning your own head
Phase 4: Advanced Cleanup
🧹 Step 7: Apply Advanced Tools
Clean Up Weights:
- Normalize All:
- Weight Paint Mode > Weights > Normalize All
- Ensures all vertices sum to 1.0
- Fixes any weighting errors from manual painting
- Clean Weights:
- Weights > Clean (threshold 0.01)
- Removes tiny values from automatic weights
- Improves performance
- Limit Total (optional):
- If targeting game engine: Weights > Limit Total (4 bones)
- Keeps only 4 strongest influences per vertex
- Usually no visible difference for simple characters
Check for Unweighted Vertices:
- Weight Paint Mode, wireframe overlay
- Cycle through all vertex groups
- Look for completely blue/dark areas (0.0 weight everywhere)
- These vertices won't move with any bone!
- Assign them to appropriate bone (usually nearest joint)
Phase 5: Final Testing
🎬 Step 8: Comprehensive Pose Testing
Test Every Major Pose:
- Arms Up:
- Raise both arms straight up (T-pose to Y-pose)
- Check: Shoulders deform naturally, armpits don't collapse
- Arms Forward:
- Extend arms forward (like zombie pose)
- Check: Shoulders roll naturally, chest doesn't pull
- Elbows Bent:
- Bend elbows fully (bicep curl position)
- Check: Clean fold, no twisting, maintains volume
- Sitting Pose:
- Bend hips and knees 90 degrees
- Check: Natural hip fold, knees bend cleanly, buttocks deform properly
- Walking Pose:
- One leg forward, one back (mid-stride)
- Check: Hips rotate naturally, legs move independently
- Spine Bend:
- Bend spine forward (bow), backward (arch), side-to-side
- Check: Smooth curve, no sudden breaks, torso flows naturally
- Extreme Poses:
- Try exaggerated poses (deep squat, arm fully extended)
- Reveals edge cases and problem areas
- Refine any issues before considering done
What to Look For:
- Collapsing geometry: Areas that pinch or disappear
- Unexpected movement: Parts moving with wrong bone
- Volume loss: Arms/legs getting too thin when bent
- Twisting: Limbs rotating unnaturally
- Stiffness: Areas that don't bend enough
Iteration is Normal:
- You'll find issues—that's expected!
- Go back to Weight Paint Mode, fix problem areas
- Test again, repeat until satisfied
- Professional riggers iterate many times
- Perfection takes patience!
Success Criteria
✅ Your Character is Ready When:
- All joints bend naturally without pinching or twisting
- No unexpected deformation when posing (parts moving with wrong bones)
- Smooth gradients at all joint transitions (no sudden color changes in weight paint view)
- Volume is maintained in bent poses (arms/legs don't get too thin)
- Extreme poses work without breaking (deep squats, arms overhead, etc.)
- Symmetry is correct (both sides deform identically)
- No blue vertices (all geometry is weighted to at least one bone)
- Character feels natural to pose (like manipulating a real figure)
Bonus Quality Checks:
- Weights cleaned (tiny values removed)
- Weights normalized (all sum to 1.0)
- All vertex groups match armature bones
- File saved with clear name (character_weighted.blend)
Project Variations and Challenges
🎯 Optional Challenges
Challenge 1: Clothing Weights
- Add clothing mesh to your character (shirt, pants)
- Use Weight Transfer to copy body weights to clothing
- Refine areas where clothing should drape differently
- Test that clothing moves naturally with body
Challenge 2: Facial Weights
- If your character has a detailed face, weight it to facial bones
- Jaw bone: Lower face, chin
- Eye bones: Eye sockets and lids
- Cheek bones: Mid-face
- Extremely detailed work for character animators!
Challenge 3: Hand and Finger Weights
- Weight individual fingers to finger bones
- Each finger needs proper gradient from base to tip
- Knuckles need smooth transitions like elbows
- Test by making fist, spreading fingers, pointing
- Very tedious but essential for hand animation!
Challenge 4: Weight Painting Speedrun
- Create a new simple character
- Time yourself weight painting from start to finish
- Try to beat your time while maintaining quality
- Develop muscle memory for efficient workflow
- Professional riggers can weight simple characters in under an hour!
🏆 Congratulations on Your Weight Painted Character! Weight painting is one of the most technical skills in 3D art, and you've just completed a full character! This is a huge milestone. Your character is now ready for animation—bones control the mesh naturally and smoothly. You've learned a skill that studios value highly. Many 3D artists avoid rigging entirely because weight painting seems intimidating, but you've conquered it! The character you've weighted is your foundation for learning animation, and you can use these same skills on any future characters, creatures, or mechanical rigs. Well done!
🎉 Project Complete!
You've Successfully:
- Generated and evaluated automatic weights
- Identified problem areas through testing
- Manually painted weights for all major joints
- Created smooth transitions with gradients
- Applied advanced cleanup tools
- Tested extensively in multiple poses
- Created a fully functional rigged character!
Your character is animation-ready! Time to celebrate and move to the next lesson!
🎓 Lesson Summary: Weight Painting Mastery
Weight painting transforms static armatures into functional character rigs. You've learned how to assign vertex weights to bones, creating the relationship that lets meshes deform naturally during animation. From automatic weights to manual painting refinement, you now have the skills to rig any character for smooth, believable movement!
🔑 Key Takeaways
Fundamental Concepts:
- Weight painting assigns mesh vertices to bones using 0.0-1.0 values (0% to 100% influence)
- Each vertex can be influenced by multiple bones with weights summing to 1.0 for natural blending
- Color indicates weight strength: Blue (0.0) to Green (0.5) to Red (1.0)
- Automatic weights provide a starting point, but manual refinement is necessary for quality
Essential Workflow:
- Start with automatic weights (parent with Automatic Weights option)
- Test in Pose Mode first to identify problem areas before painting
- Paint in rest pose with armature visible (In Front enabled)
- Use X-Mirror to paint both sides simultaneously for symmetrical characters
- Iterate between Weight Paint and Pose Mode frequently for testing
Core Techniques:
- Draw brush: Add/remove weight directly (primary tool)
- Blur brush: Smooth transitions between weights (creates gradients)
- Strong weights: Areas near joints (pure red, 1.0 weight)
- Gradient zones: Between joints (smooth transition from one bone's influence to another)
- Weight strength: Lower values for subtle control, higher for major regions
Advanced Tools:
- Weight Transfer: Copy weights between similar meshes (huge time-saver)
- Normalize All: Fix vertex weight sums to exactly 1.0
- Clean Weights: Remove tiny values below threshold
- Limit Total: Cap maximum bones per vertex (game engine requirement)
- Smooth operation: Average weights across selected vertices
Professional Practices:
- Test early and often in Pose Mode to catch issues quickly
- Work on worst problems first before refining subtle areas
- Use Blur brush liberally for smooth, natural transitions
- Save versions before major changes (easy to revert mistakes)
- Build muscle memory through repetition—speed comes with practice
- Reference real anatomy for guidance on how joints actually move
What You've Accomplished
🏆 Skills Mastered
- ✅ Understanding vertex weights and bone influence
- ✅ Setting up Weight Paint Mode workspace
- ✅ Generating and evaluating automatic weights
- ✅ Using Draw and Blur brushes effectively
- ✅ Creating smooth weight gradients at joints
- ✅ Testing deformation in Pose Mode
- ✅ Painting with X-Mirror for symmetry
- ✅ Fixing common deformation problems
- ✅ Using advanced weight painting tools
- ✅ Completing a fully weighted character
Common Pitfalls to Avoid
⚠️ Watch Out For These Mistakes
- Painting in posed position: Always return to rest pose for painting (weights should be authored in neutral position)
- Forgetting to test: Don't paint entire character without testing—catch issues early!
- Over-blurring: Too much Blur makes deformation mushy and unpredictable
- Ignoring Auto Normalize: Weights exceeding 1.0 cause unpredictable deformation
- Painting too fast: Low brush strength with multiple passes gives better control than high strength
- Not checking all angles: Rotate viewport to see deformation from all sides
- Skipping cleanup: Normalize and Clean weights before final export
- Perfectionism paralysis: Good enough is better than perfect—you can always refine later!
Next Steps
🚀 Where to Go From Here
Immediate Practice:
- Weight paint different character types (thin, muscular, stylized)
- Try creature rigs (quadrupeds have different weight patterns)
- Experiment with mechanical rigs (robots, vehicles)
- Weight paint accessories (capes, tails, hair)
Advanced Topics to Explore:
- Corrective Shape Keys: Create specific shapes for extreme poses (flexed bicep, bent knee)
- Dual Quaternion Skinning: Alternative deformation method (better volume preservation)
- Preserve Volume modifier: Maintain muscle volume when bending
- Shrinkwrap modifier: Keep clothing following body deformation
- Bone constraints: Limit bone rotation/movement for realistic joint behavior
Next Lesson Preview:
Lesson 39: Rigging Essentials will teach you complete rigging workflows—combining armatures, constraints, IK/FK, and custom controls. You'll build professional character rigs with animation-ready controllers. Weight painting is the foundation; rigging is the structure that makes animation efficient and intuitive!
Resources and Further Learning
📚 Deepen Your Knowledge
Blender Documentation:
- Official Weight Paint Mode docs (detailed tool reference)
- Vertex Groups documentation (technical specifications)
- Armature modifier documentation (how skinning works)
Study Real Anatomy:
- Human anatomy for artists (understand how joints and muscles work)
- Animal anatomy (if rigging creatures)
- Observe how your own body moves and deforms
- Reference photos of people in various poses
Practice Projects:
- Rig characters from free model sites (practice on diverse body types)
- Weight paint your own sculpted characters
- Join rigging challenges (online communities often host them)
- Analyze professional rigs (many free game/animation rigs available)
Community and Support:
- Blender Artists forum (rigging section)
- BlenderStackExchange (technical troubleshooting)
- Discord/Reddit communities (share work, get feedback)
- Study production rigs from animated films (see professional standards)
💡 Final Wisdom: Weight painting is both art and science. The science is understanding how vertex weights control deformation mathematically. The art is knowing where to place those weights for natural, appealing movement. Like any art form, it improves with practice. Your first character might take many hours and iterations—that's normal! Professional riggers have spent thousands of hours refining their craft. Each character you weight teaches you something new. Be patient with yourself, celebrate small victories, and remember: even "good enough" weights can produce beautiful animation. Perfection can wait; motion is magic!
🎓 Weight Painting Complete!
You've mastered one of the most technical and essential skills in character animation. Your characters are now ready to move, and you're ready to bring them to life. Weight painting is your foundation for all rigging and animation work ahead.
In the next lesson, we'll dive into complete rigging workflows, building advanced character rigs with constraints, controllers, and IK/FK systems. You'll transform your weighted characters into animation-ready rigs!
Ready to build professional character rigs? Let's continue the journey! 🚀